


.svg)


Dashboard
The dashboard is your personalised home page, aptly named Home.
You can customize the colours and layout of your dashboard through the widgets available in Clarc. The dashboard is especially useful for day to day usage by your team members to manage their own tasks and daily to do lists.
How to edit your dashboard
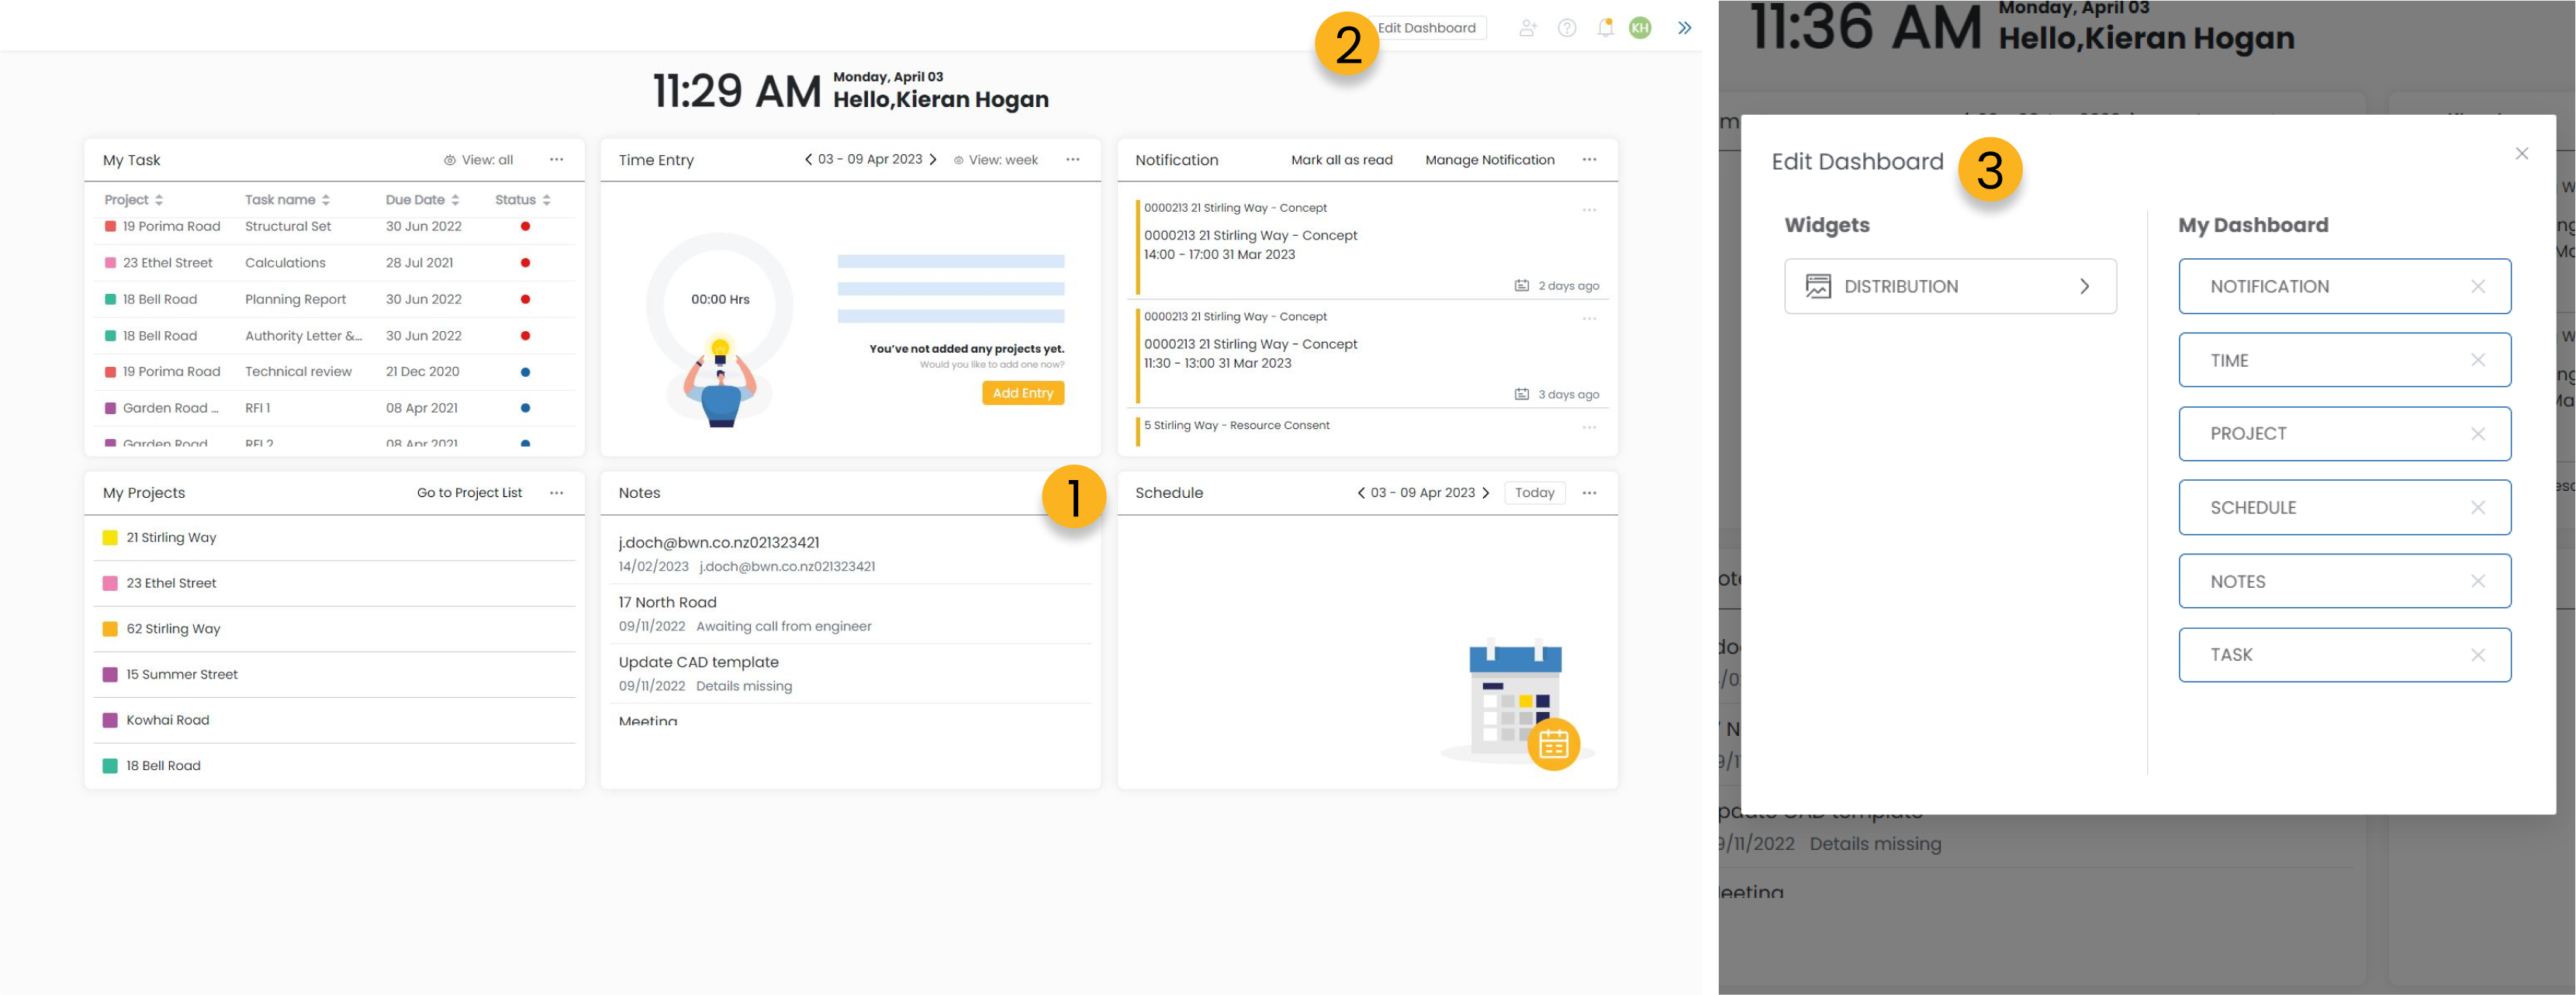
1. Drag and drop widget tiles around your dashboard to lay them out the way you want.
2. Edit Dashboard - Click this button to open the popup to add or remove widgets from your dashboard.
3. Clicking an option in the Widget list will add that widget to your dashboard. Clicking the X icon on the option in the Dashboard list will remove it.
My Task
My task is a widget that displays the tasks that you are assigned to across projects in your organisation.
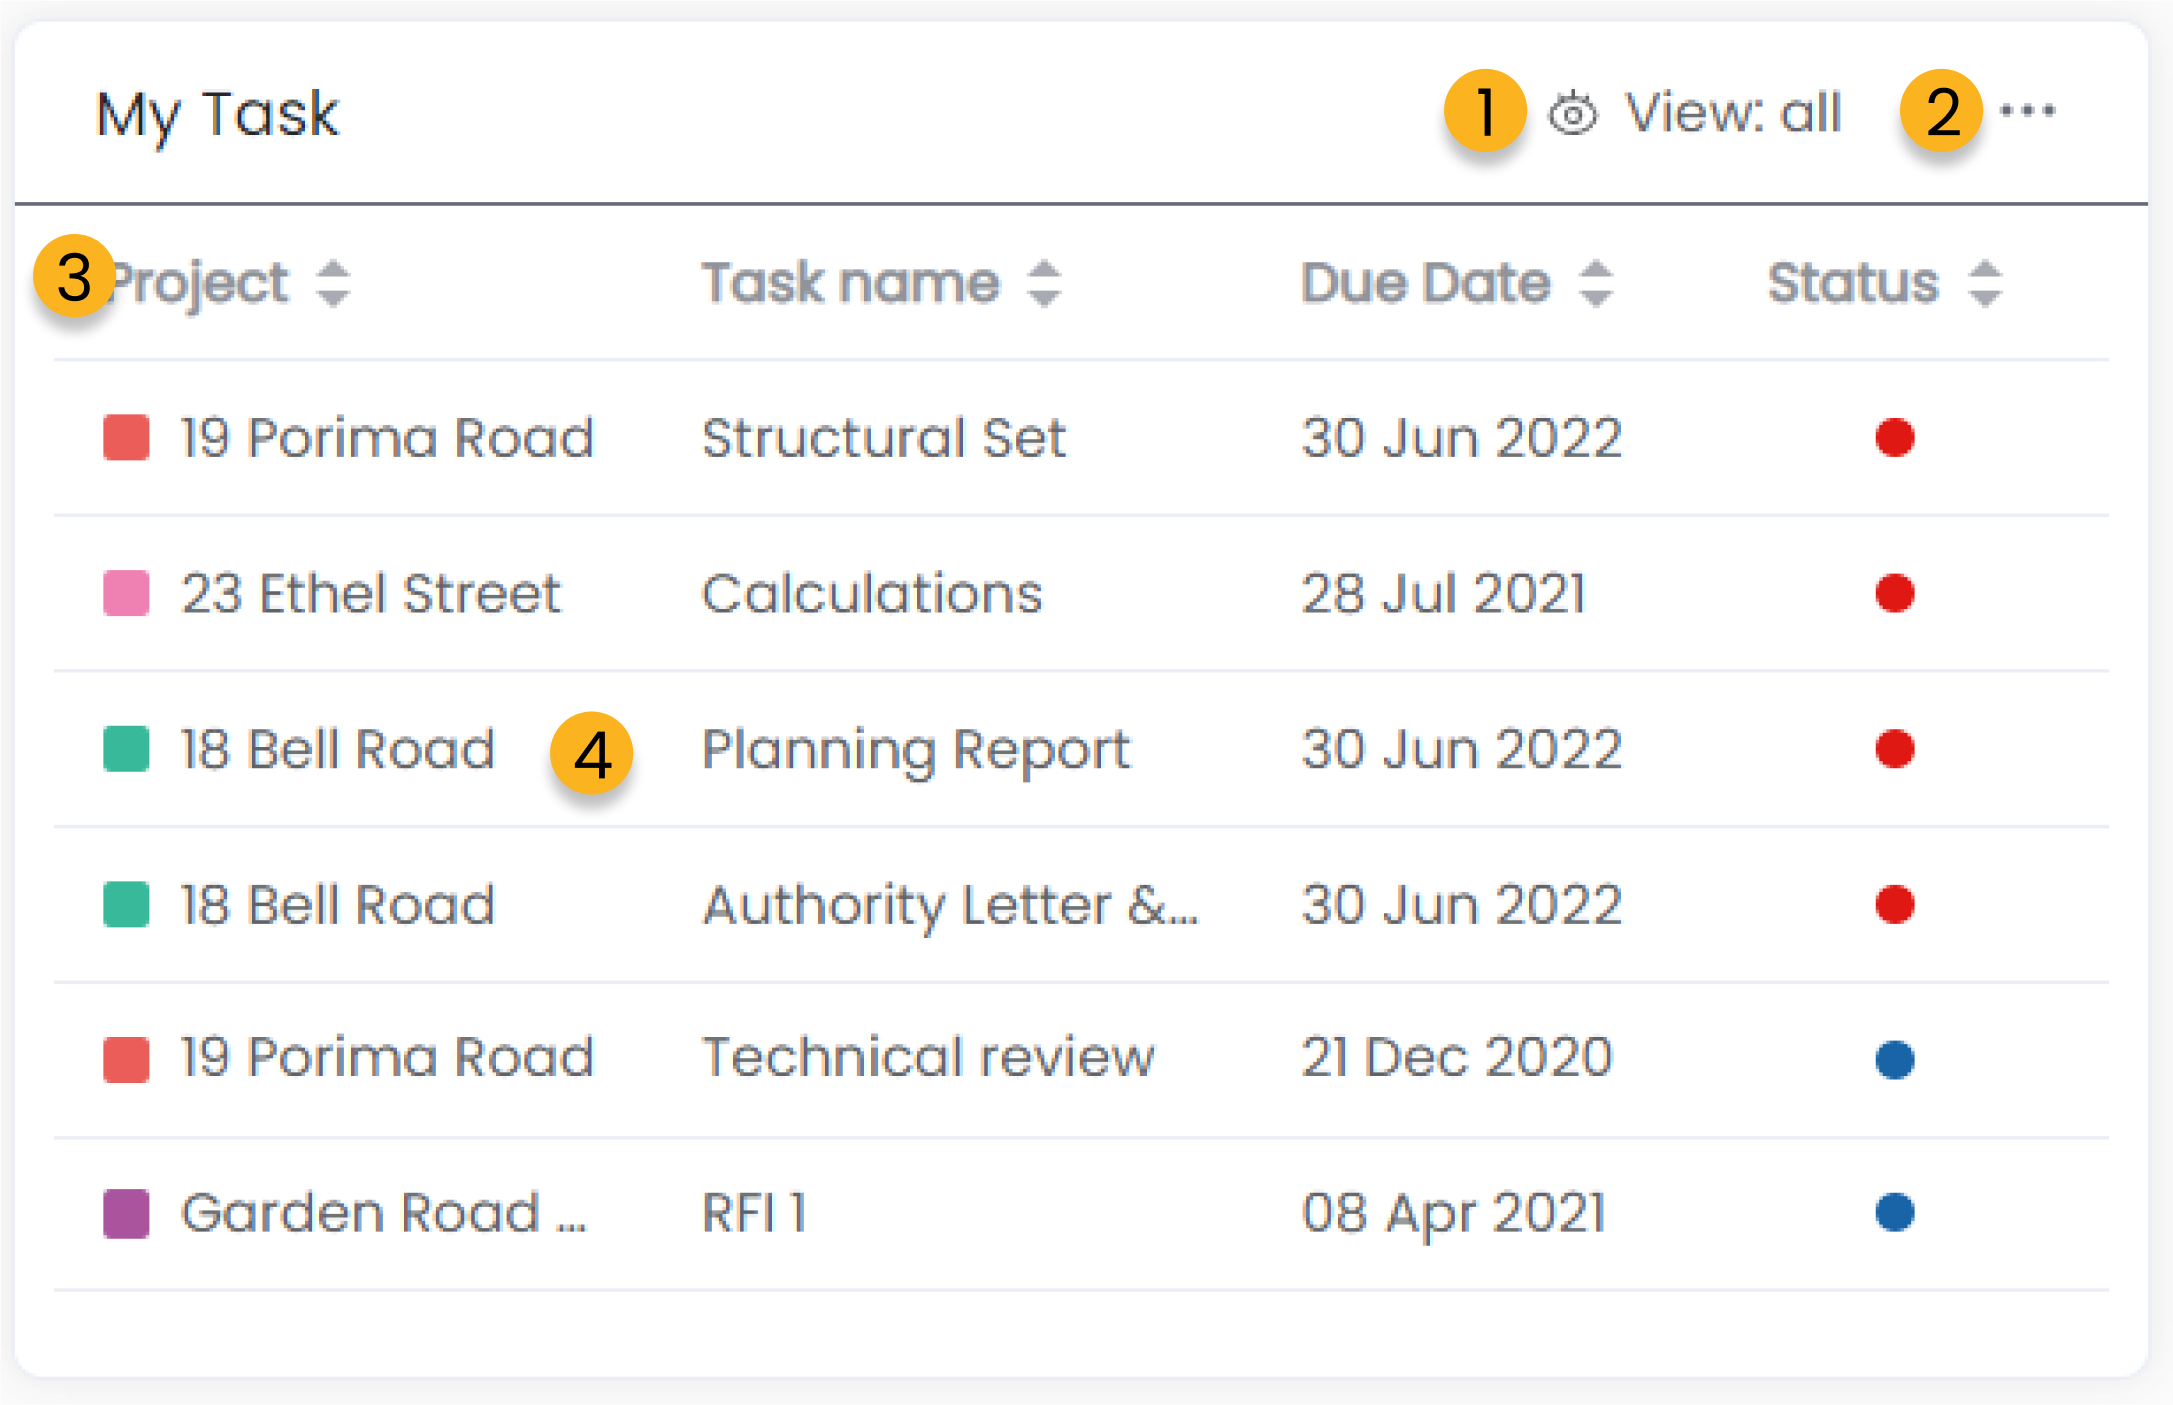
1. Filter by All tasks, Tasks in progress or completed tasks.
2. Edit the My Task widget with options to remove, increase the size of the widget and change the background colour.
3. Click the column title to sort by that column.
4. Click a task to open up your task sidebar.
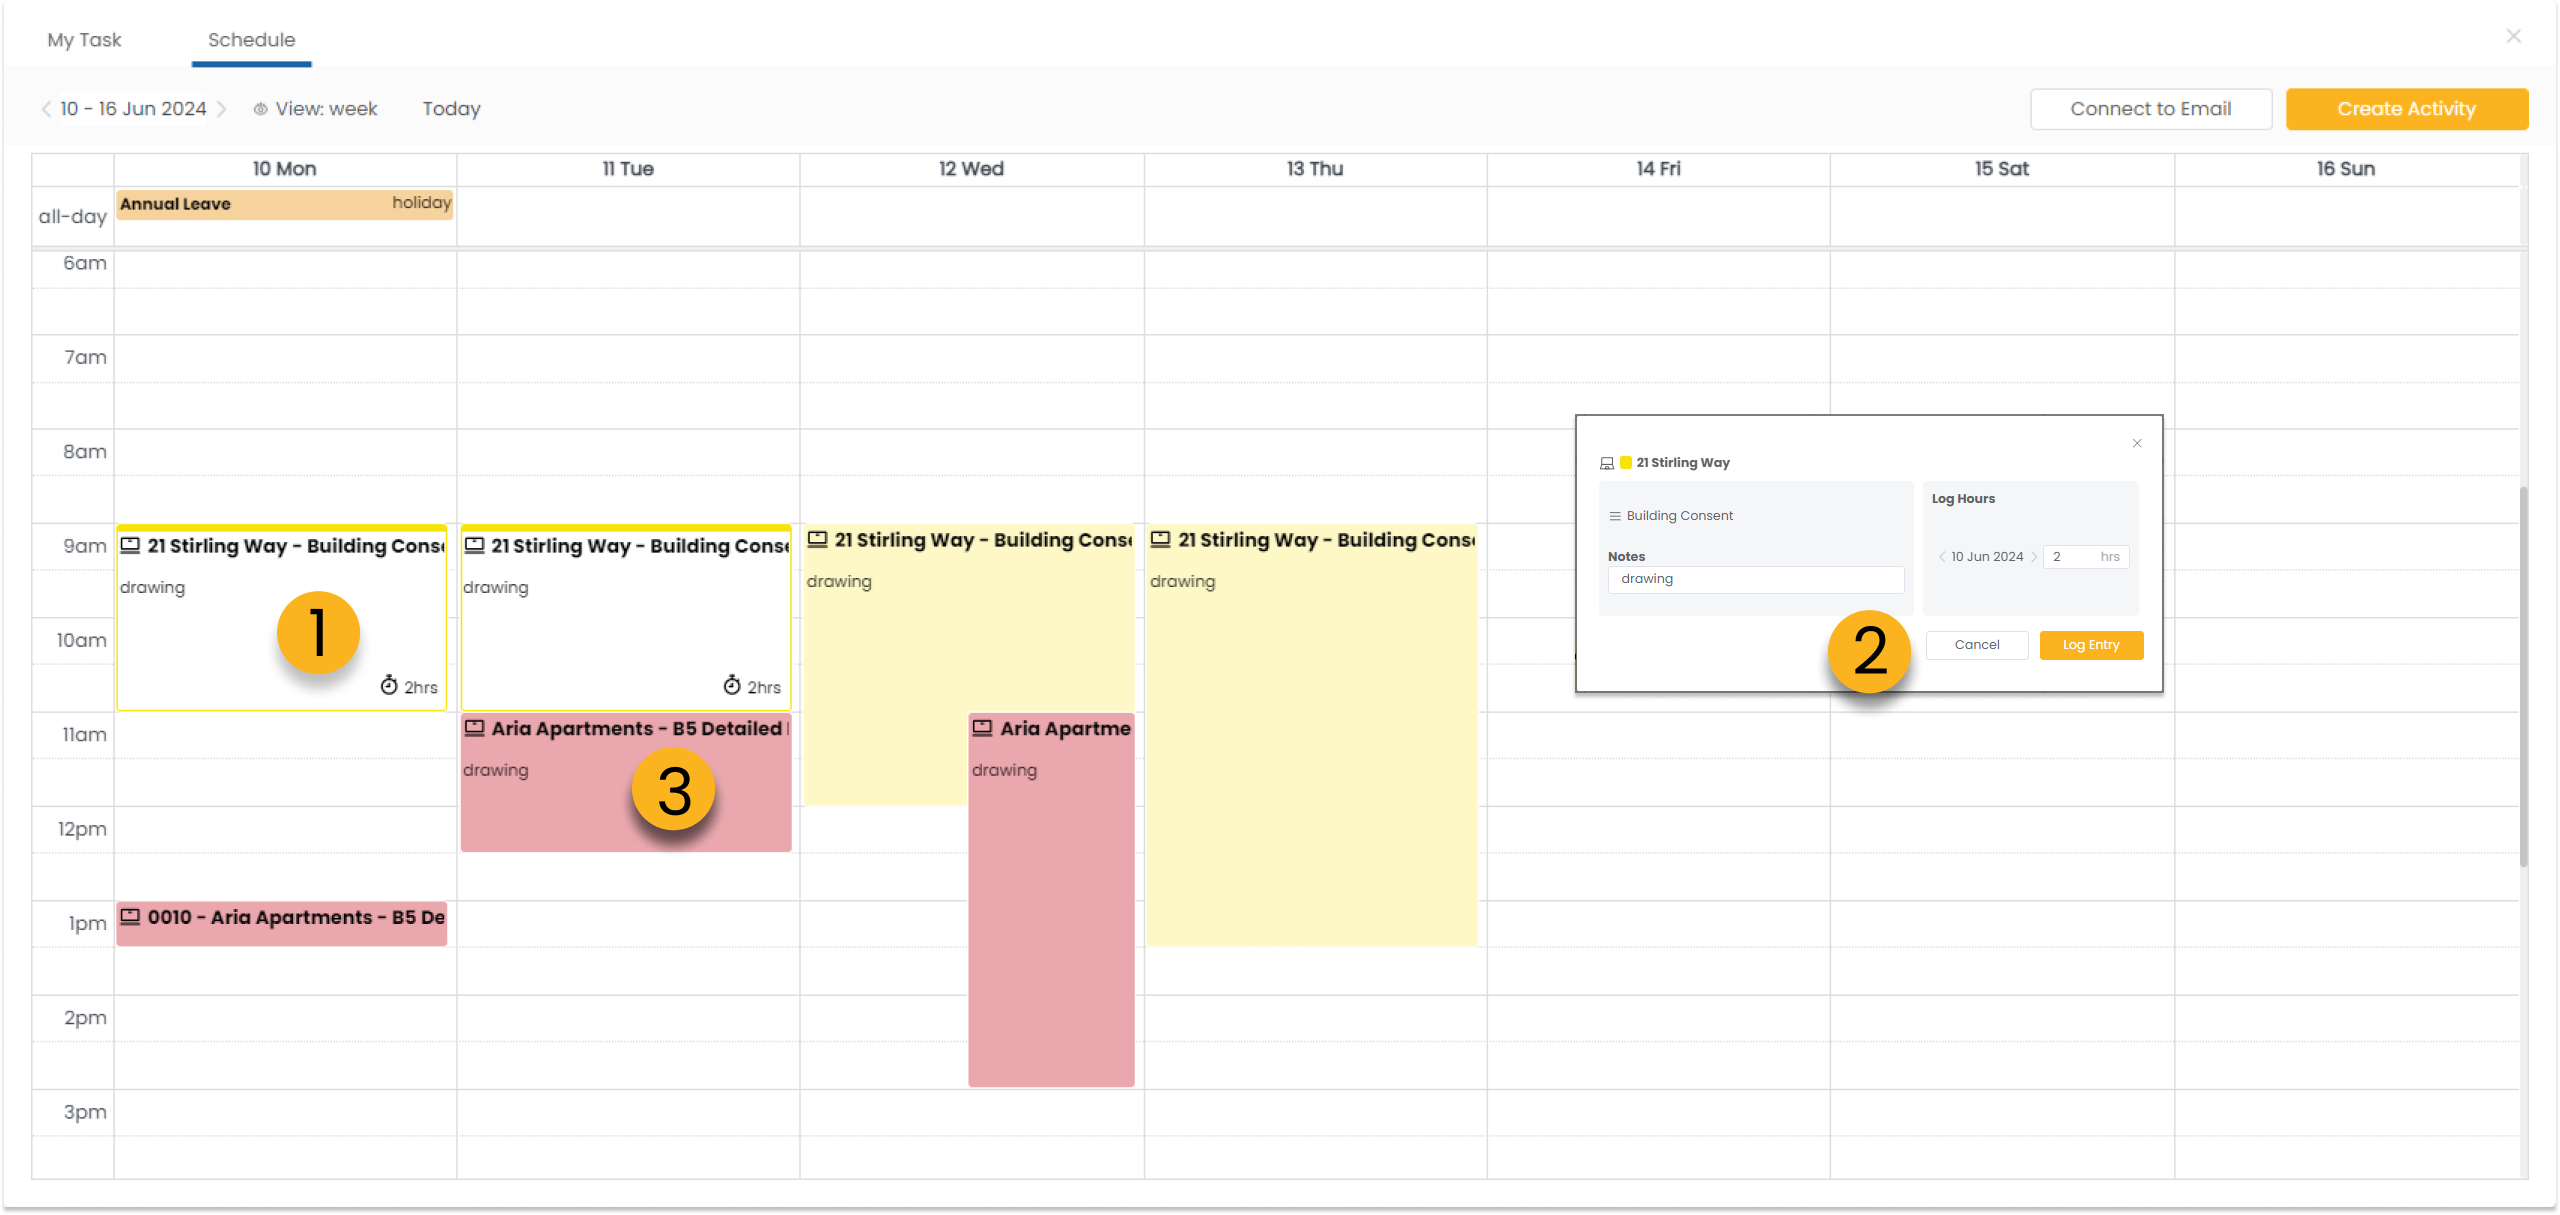
Schedule
The schedule widget displays the activities that are planned in your Clarc schedule and allows you to add new activities quickly with the create activity button.
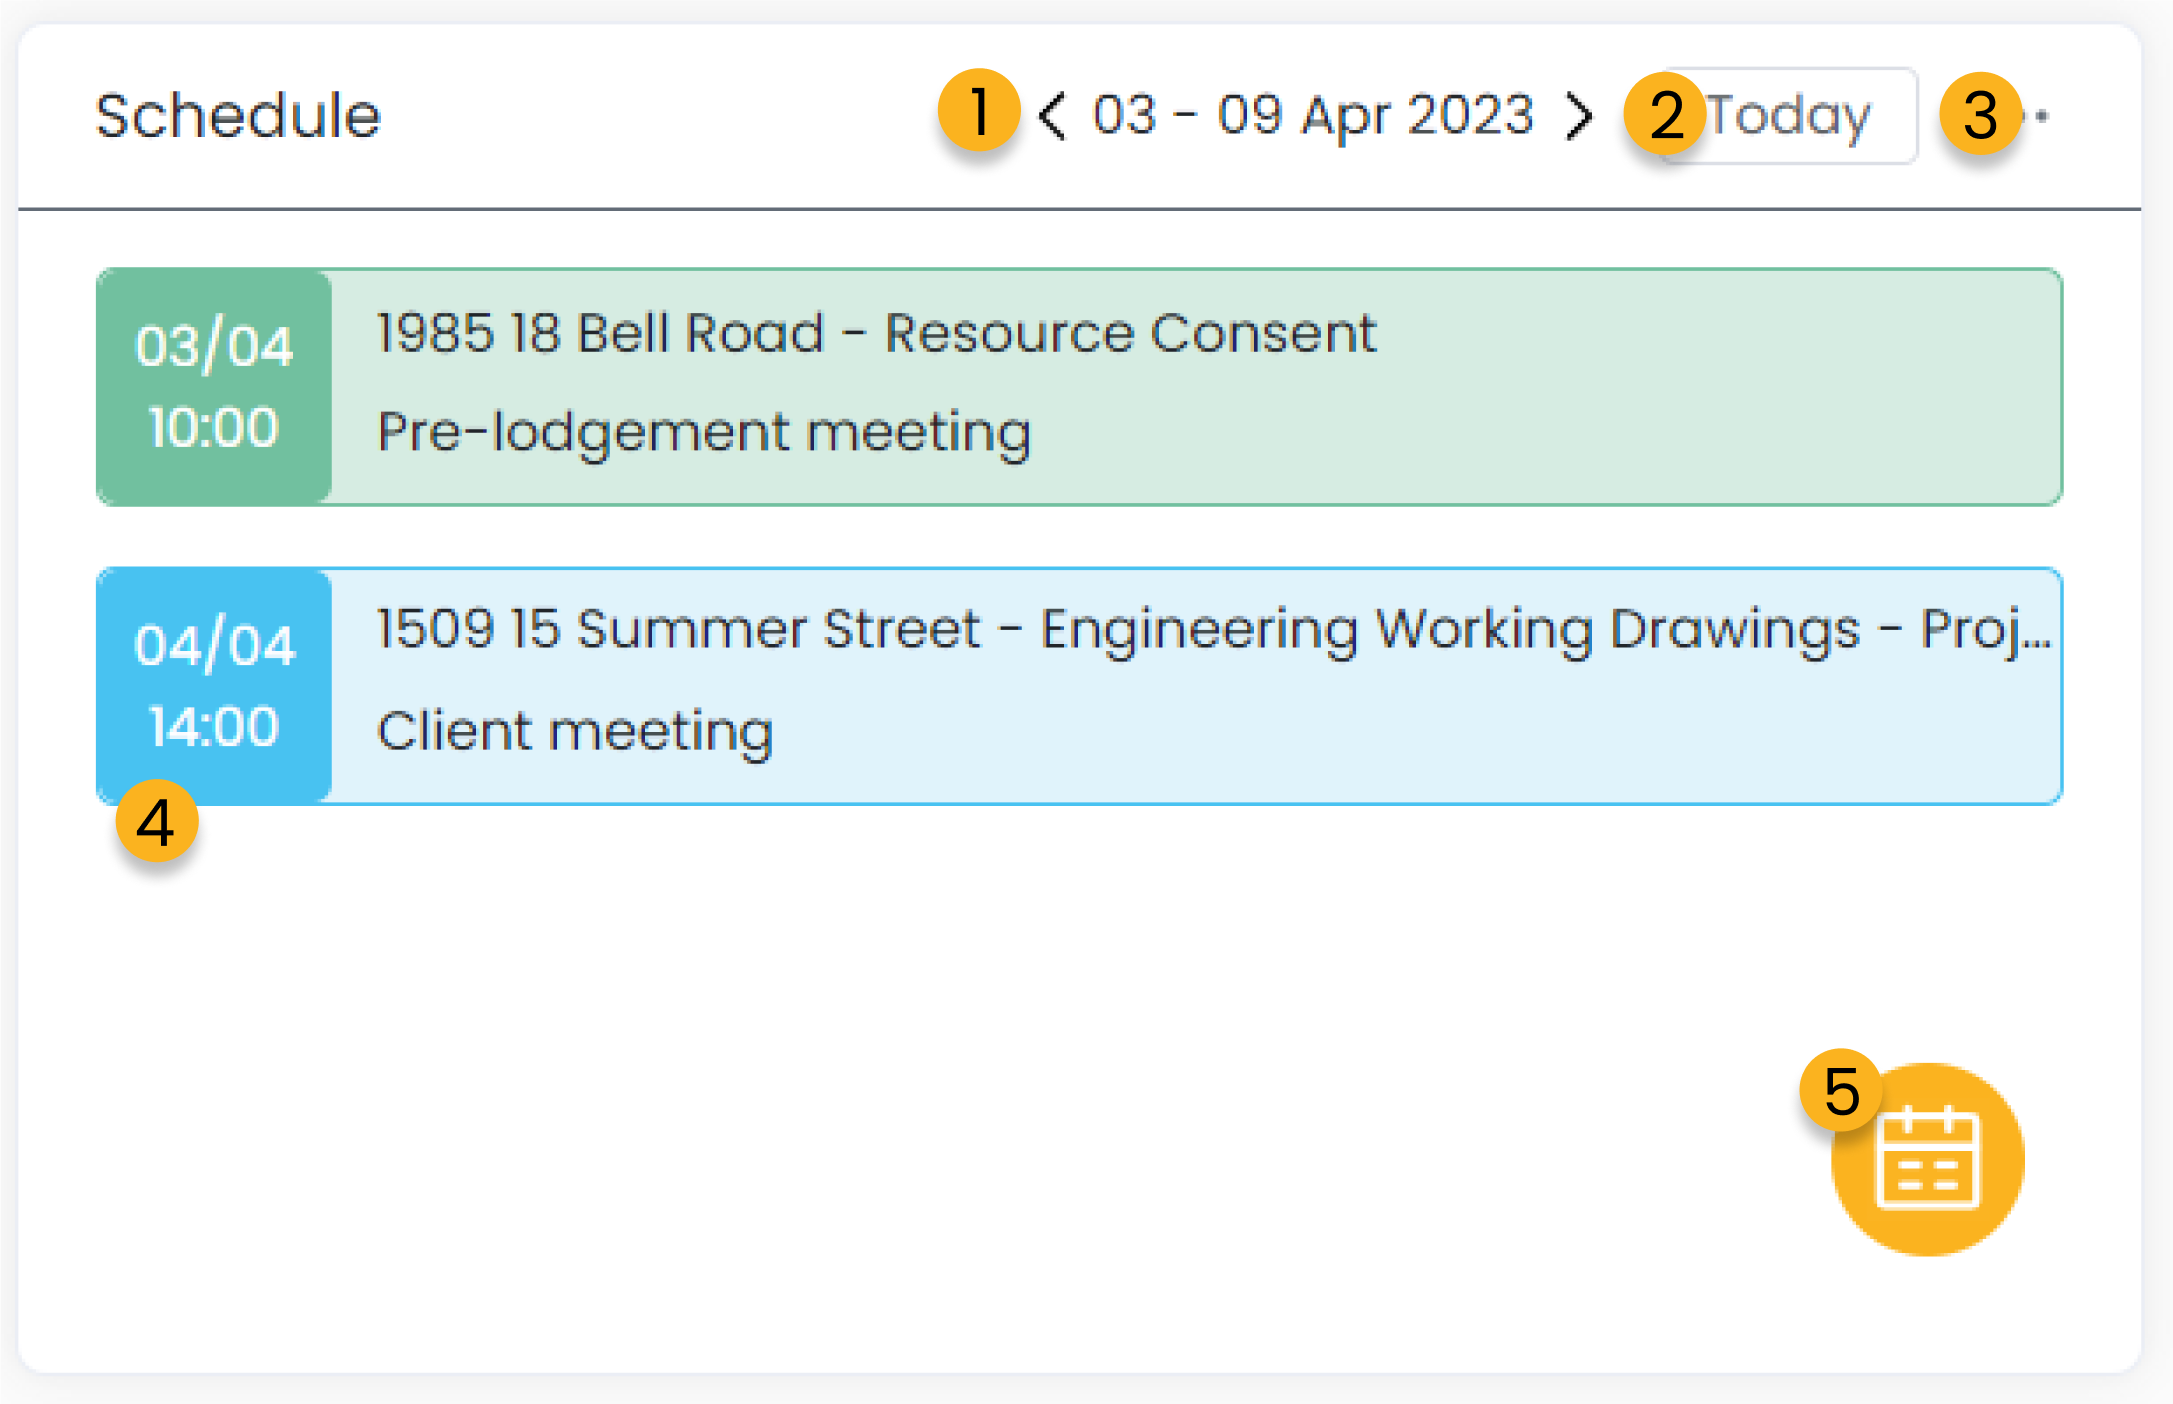
1. Select the date range for which you wish to view your scheduled events.
2. Change the date range to the current week.
3. Edit the My Task widget with options to remove, increase the size of the widget and change the background colour.
4. Click to edit any of your scheduled activities.
5. Click to create a new activity.
Notification
The notification widget displays your most recent notifications from Clarc and allows quick access to those notifications.
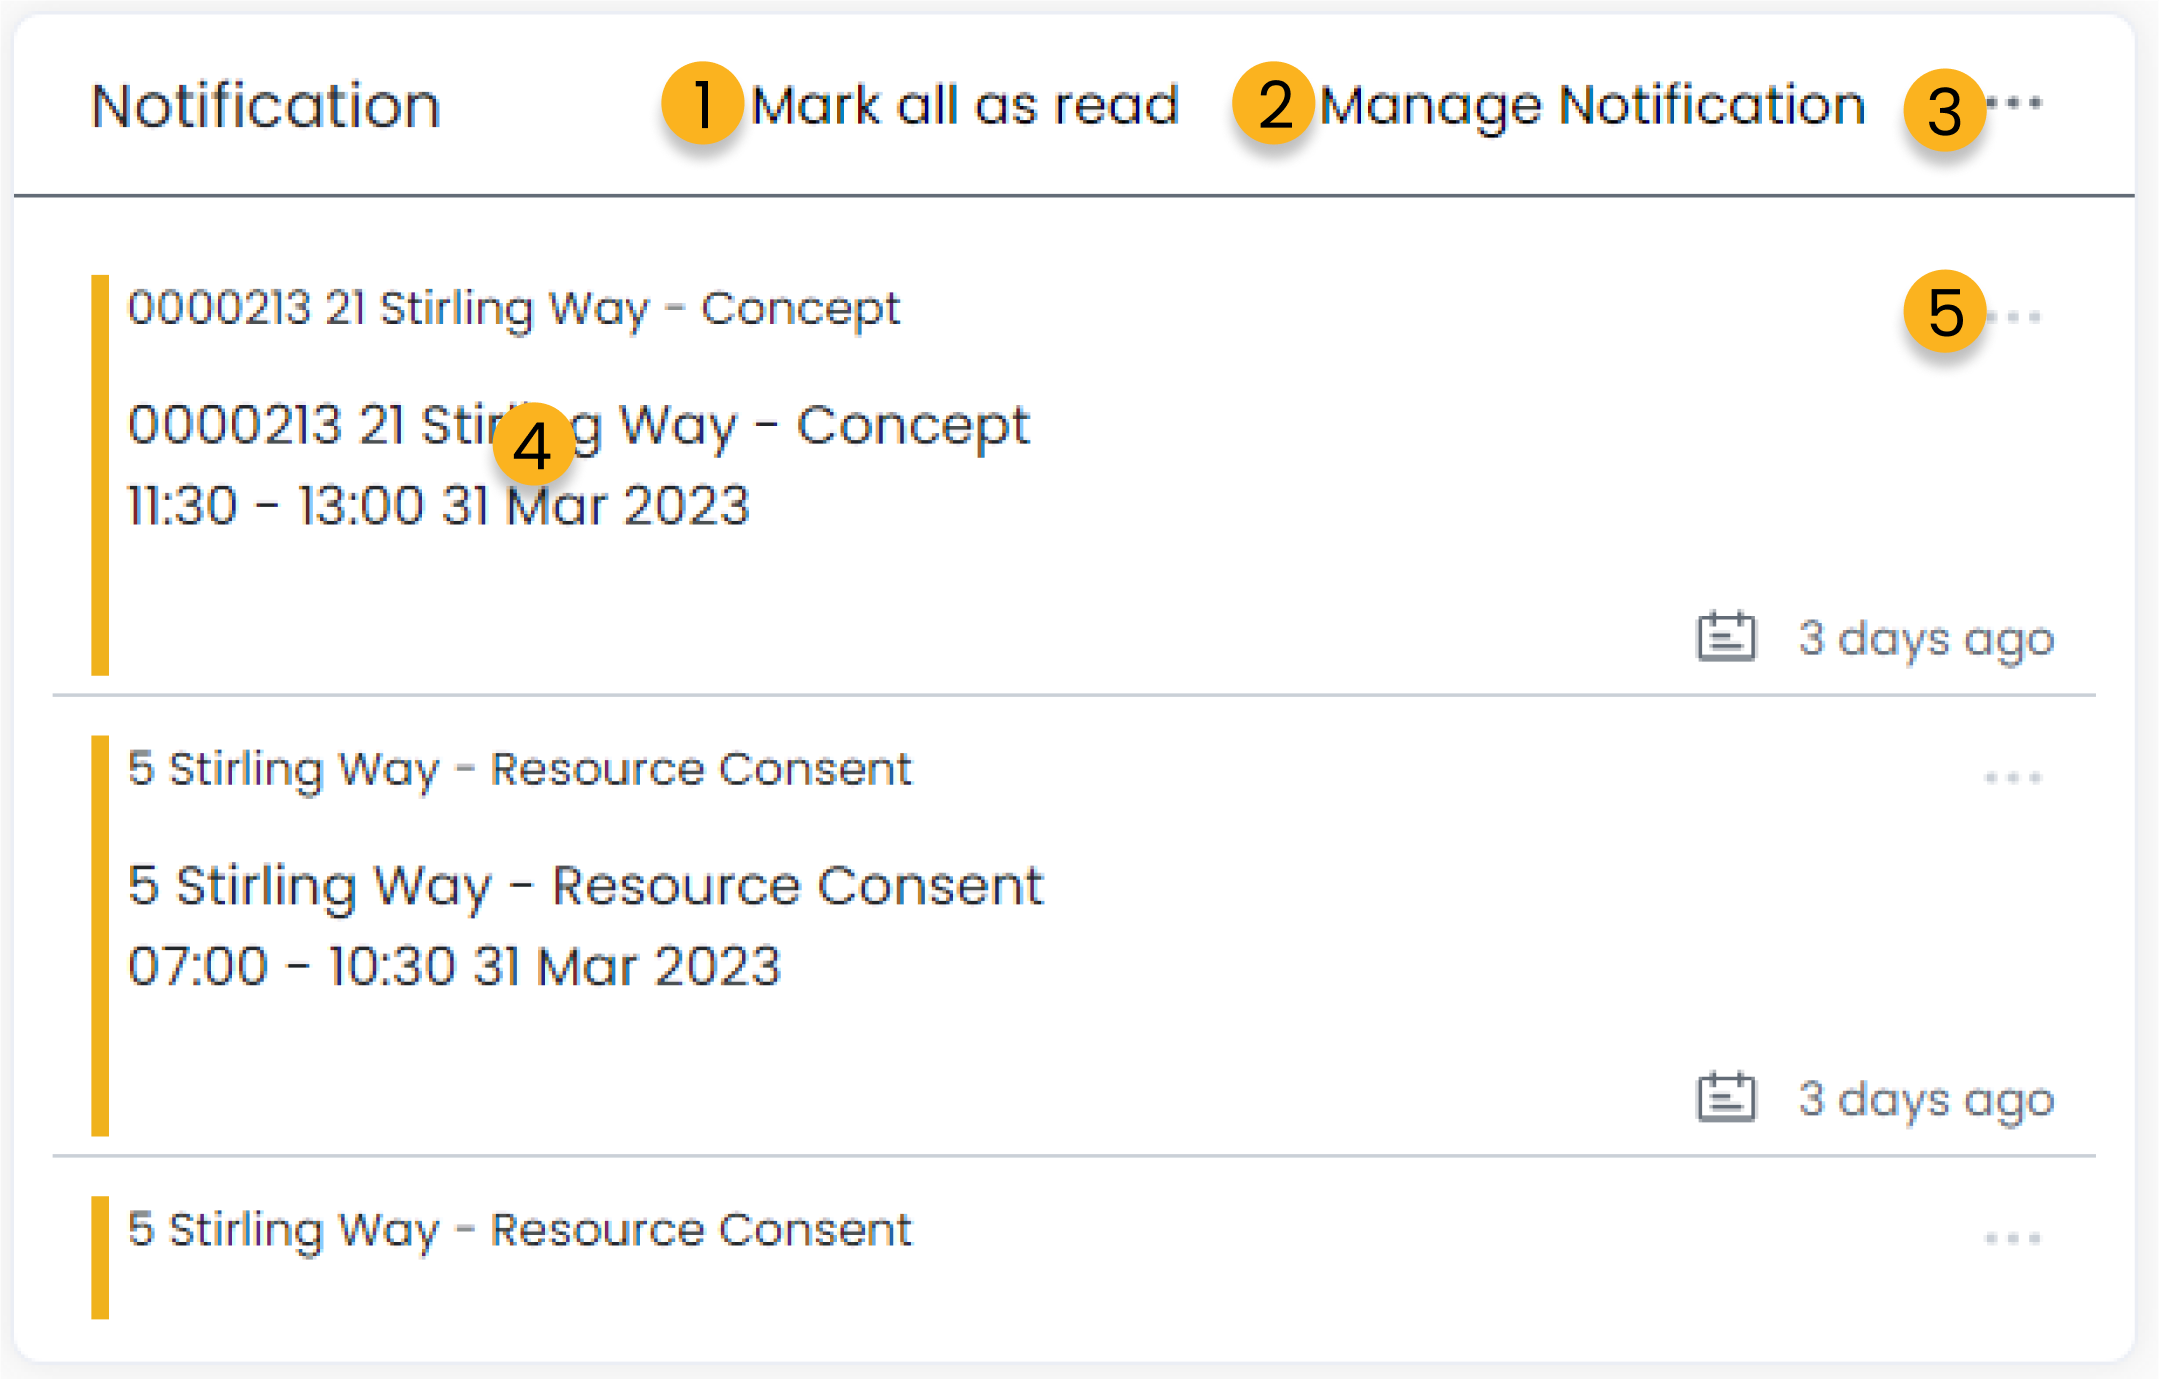
1. Mark all notifications as read.
2. Jump to the notification settings option in account settings.
3. Edit the Notification widget with options to remove, increase the size of the widget and change the background colour.
4. Click one of your notificaitons to jump to the page with the task/event that the notificaiton relates to.
5. Archive or delete selected notification.
My Projects
The My Project widget allows quick access to the most recent projects you are involved with.
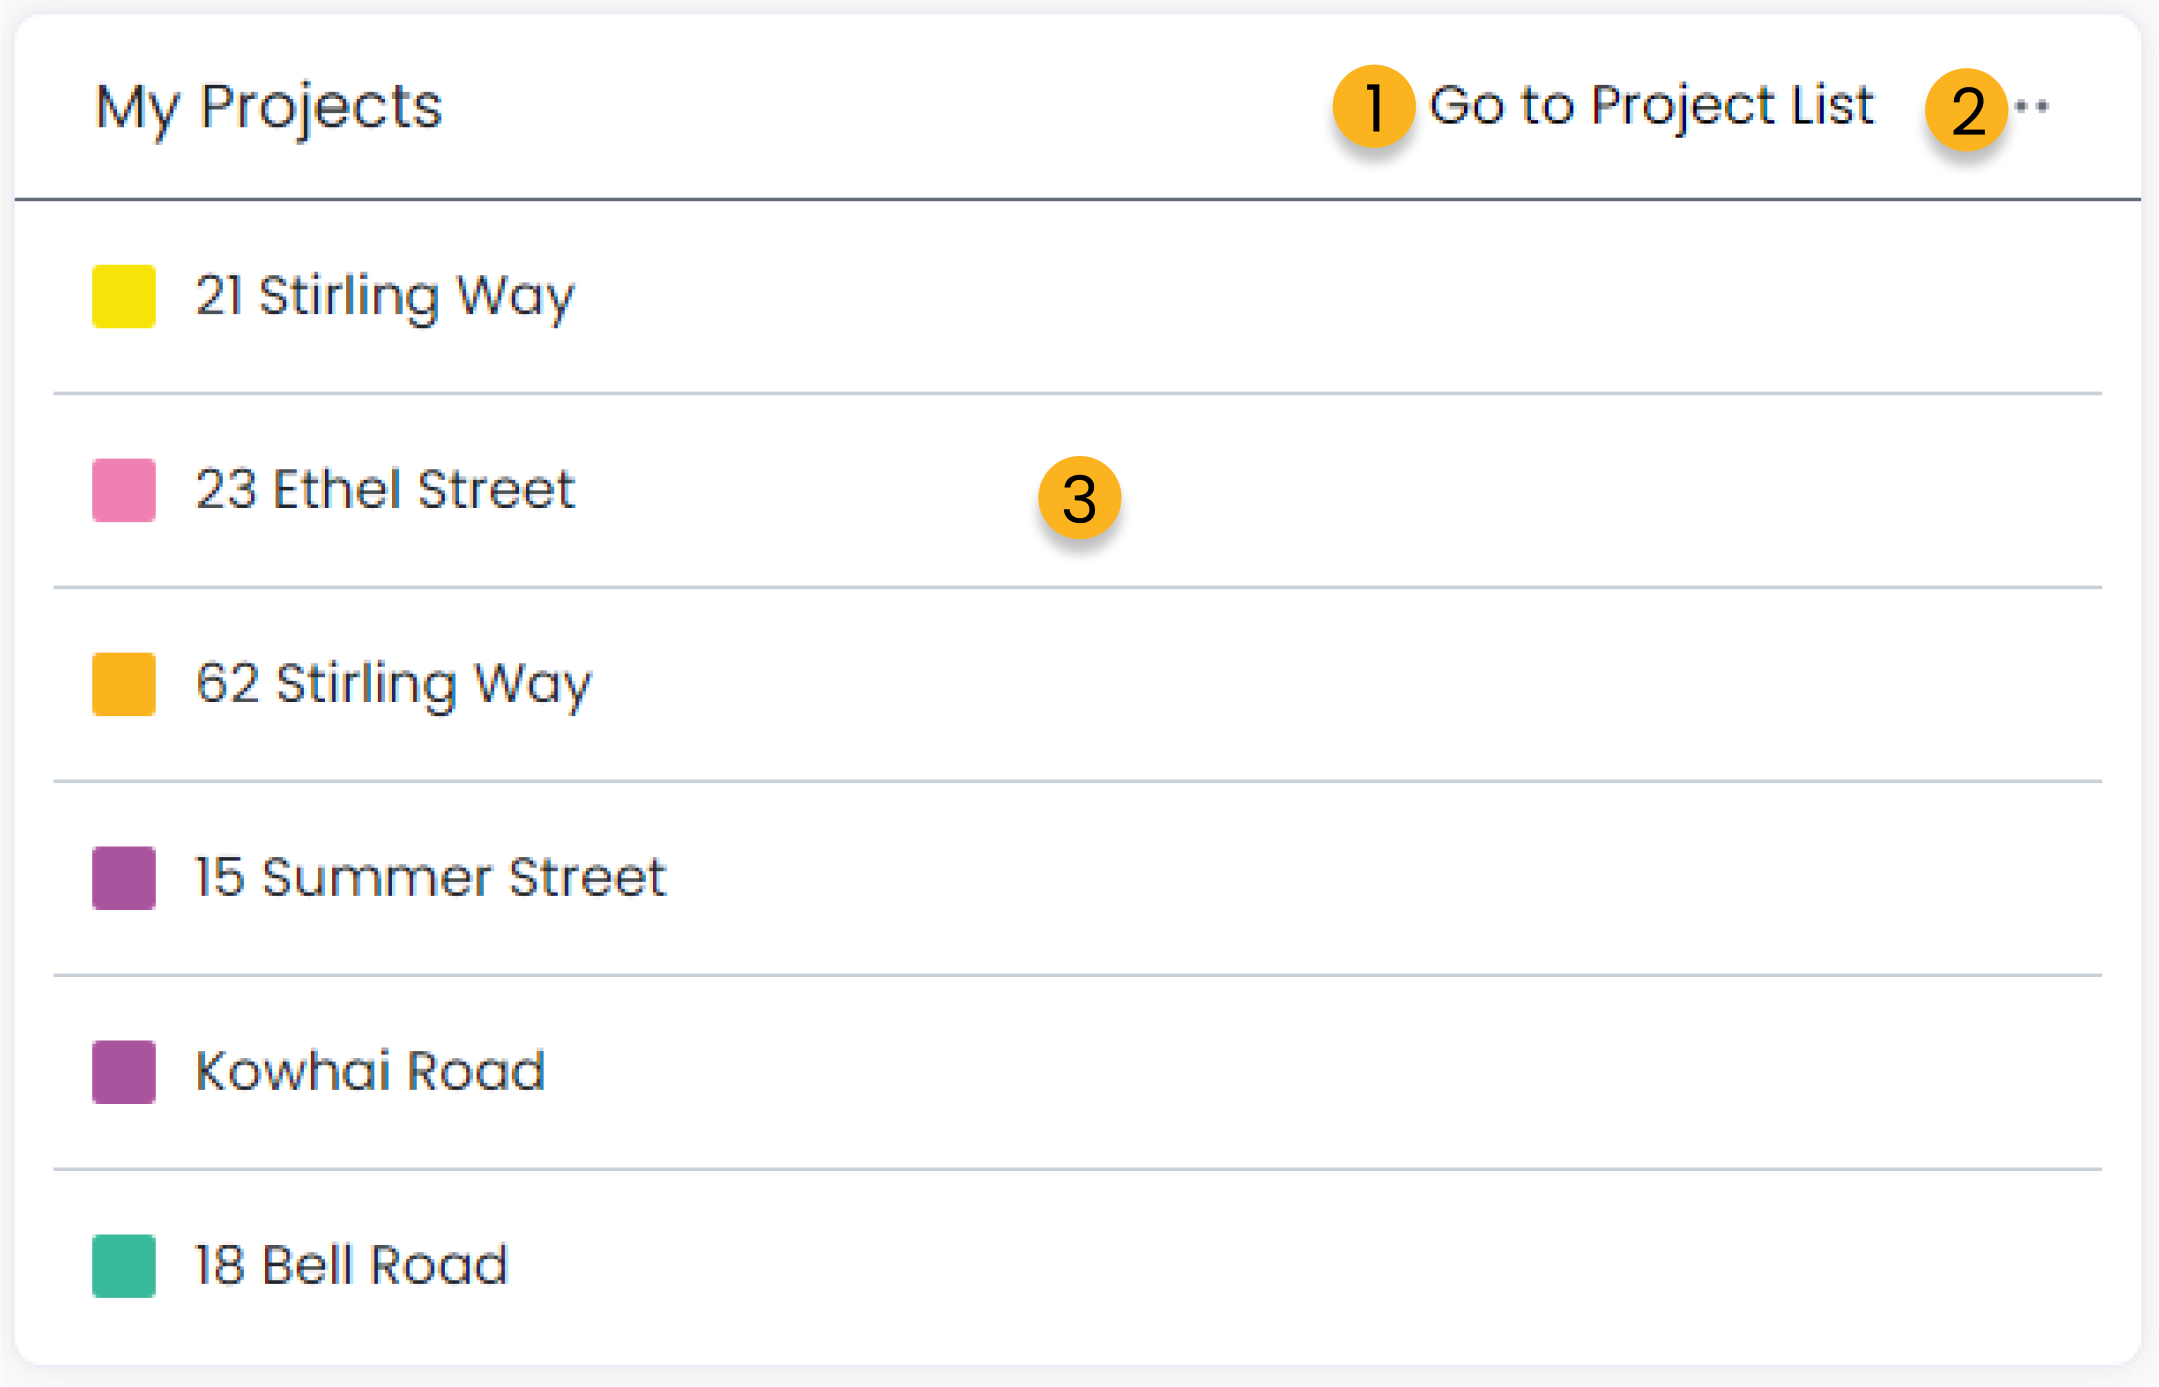
1. Go to full project list.
2. Edit the My Projects widget with options to remove, increase the size of the widget and change the background colour.
3. Click one of your projects to jump to the selected projects workspace.
Time Entry
The Time Entry widget shows the time you’ve logged for the week with quick access to record additional time.
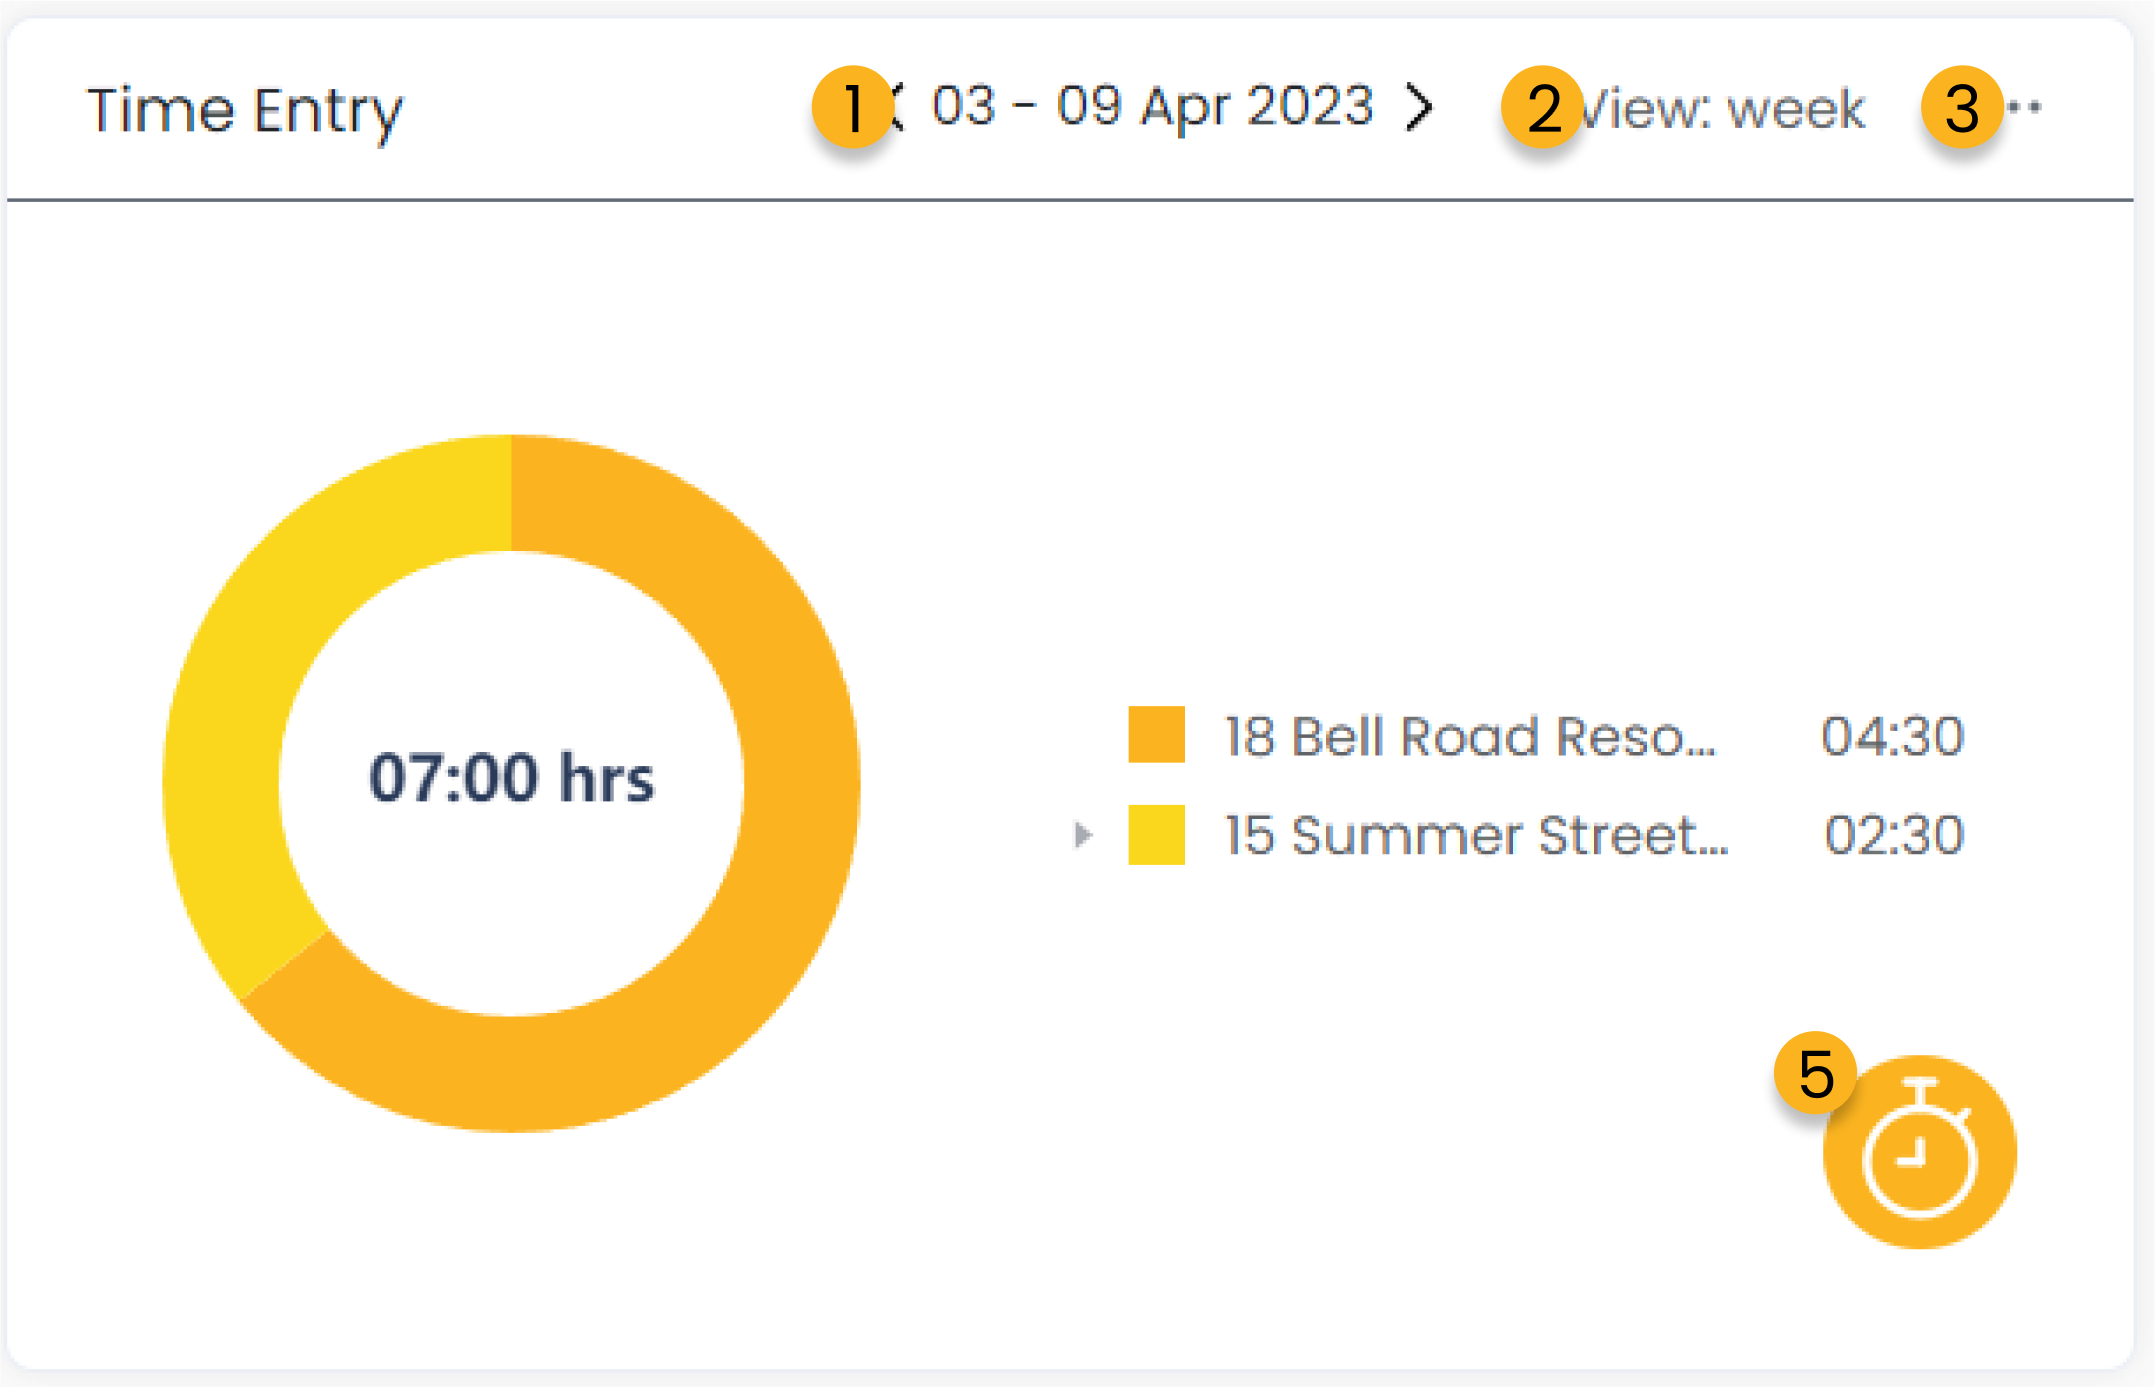
1. Select the date range for which you wish to view your time entries.
2. Change the view to see daily, weekly or monthly time entry data.
3. Edit the Time Entry widget with options to remove, increase the size of the widget and change the background colour.
4. Click to move to time entry function to record additional time entries.
Notes
The Notes widget is a personal note pad for you to leave notes and reminders to yourself.
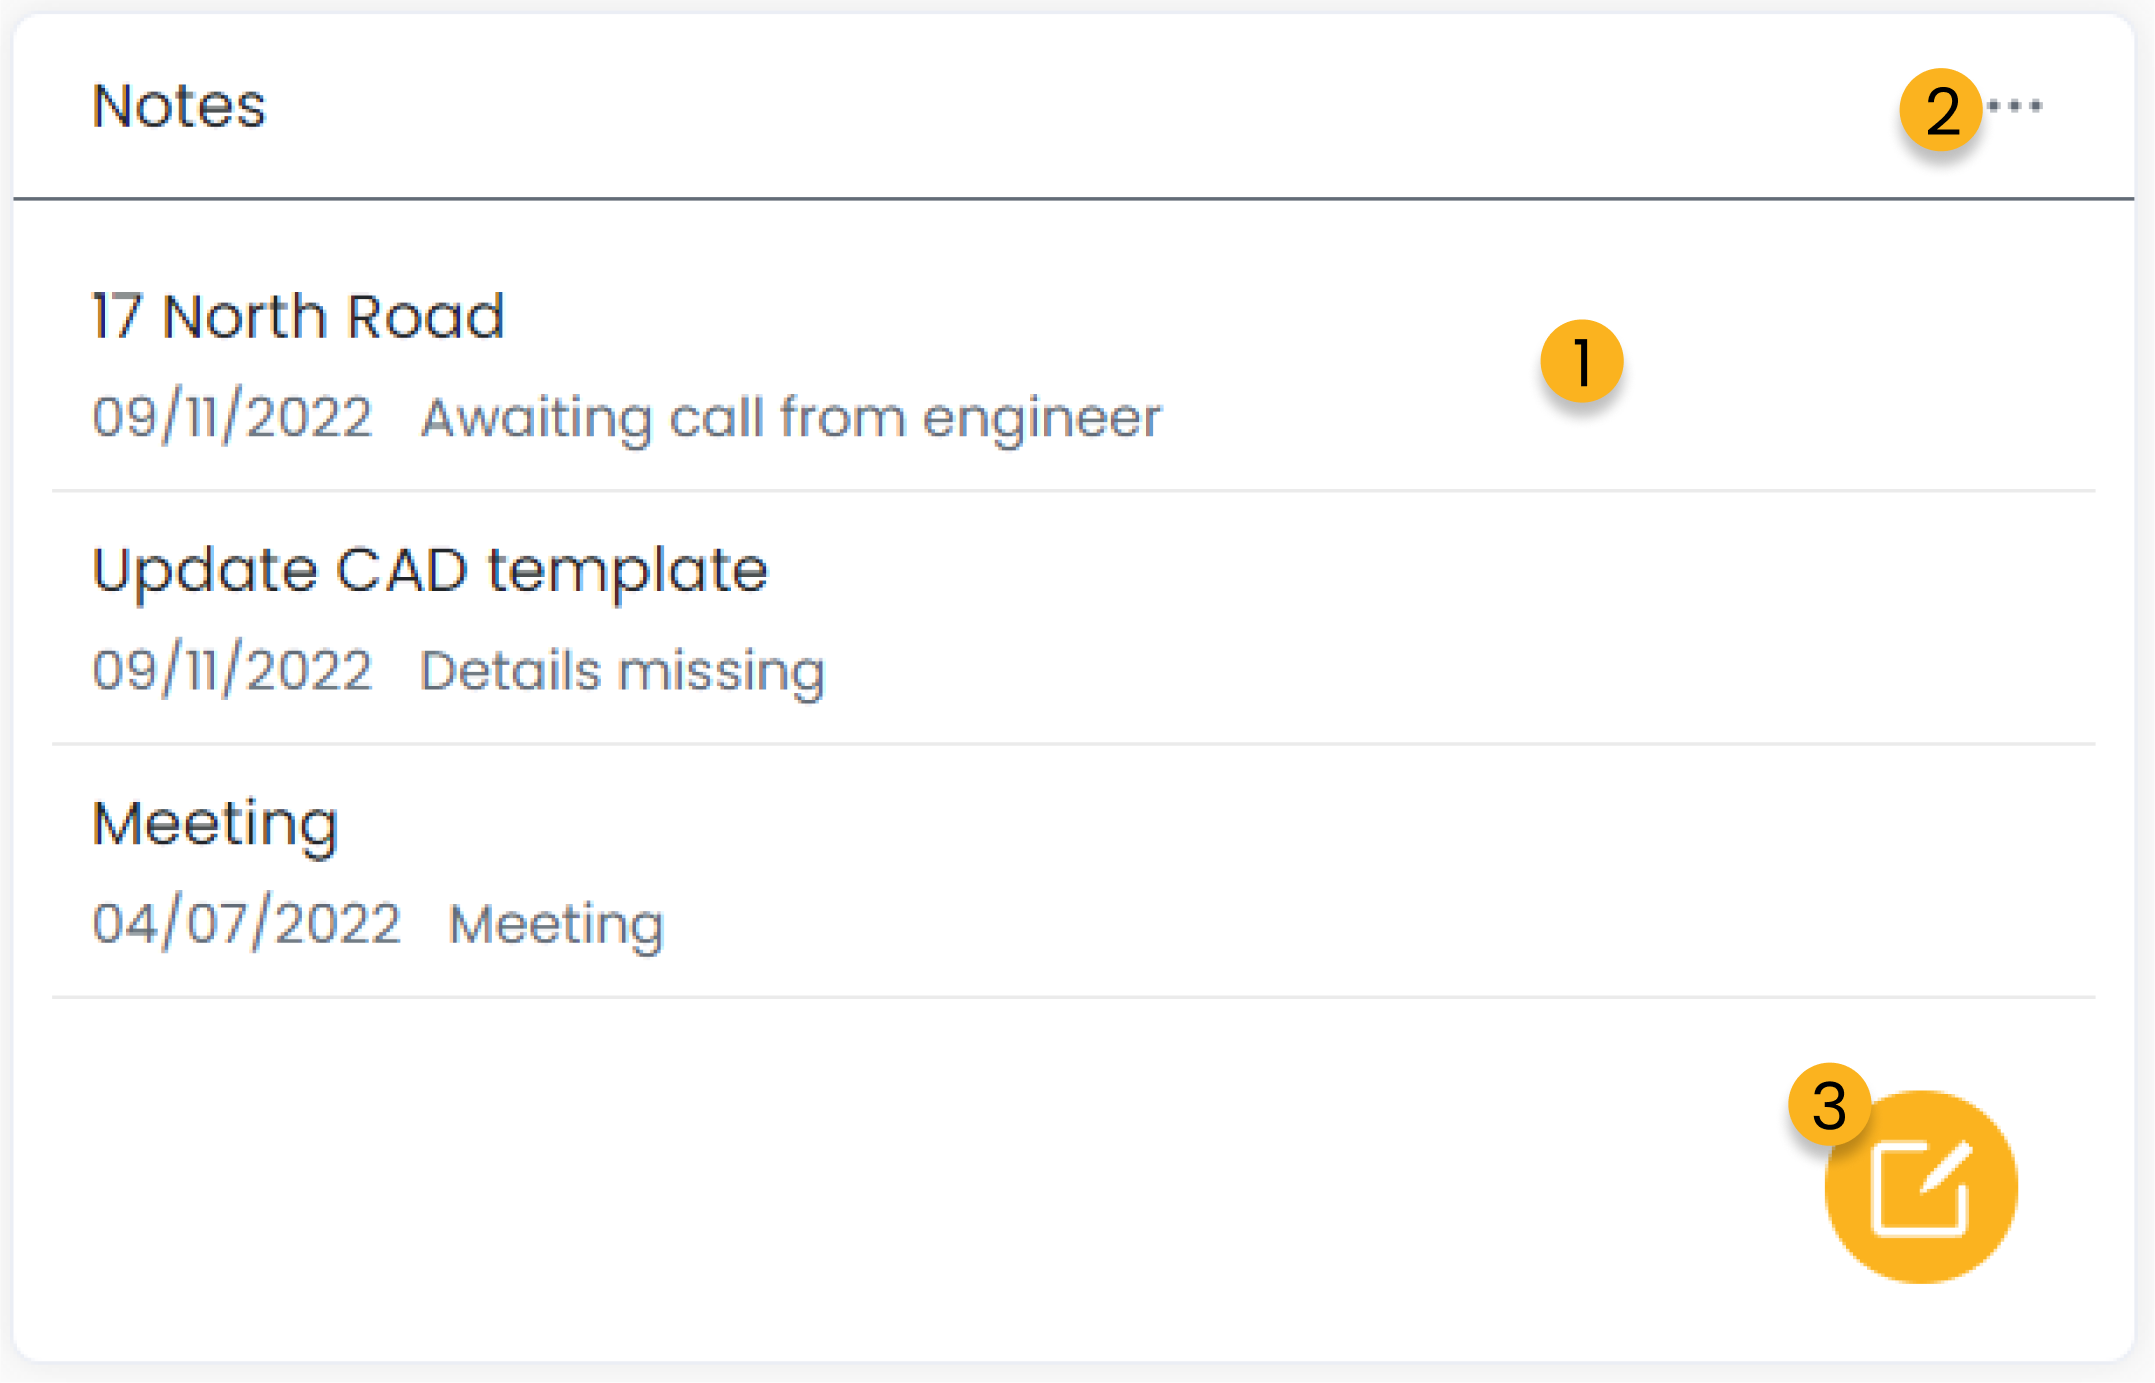
1. Select one of your notes to edit the title and/or note.
2. Edit the Notes widget with options to remove, increase the size of the widget and change the background colour.
3. Click to add a new note to your notepad.
Project Distribution
The Project Distribution widget is a bar graph displaying the distribution of hours across different projects for the chosen date period.
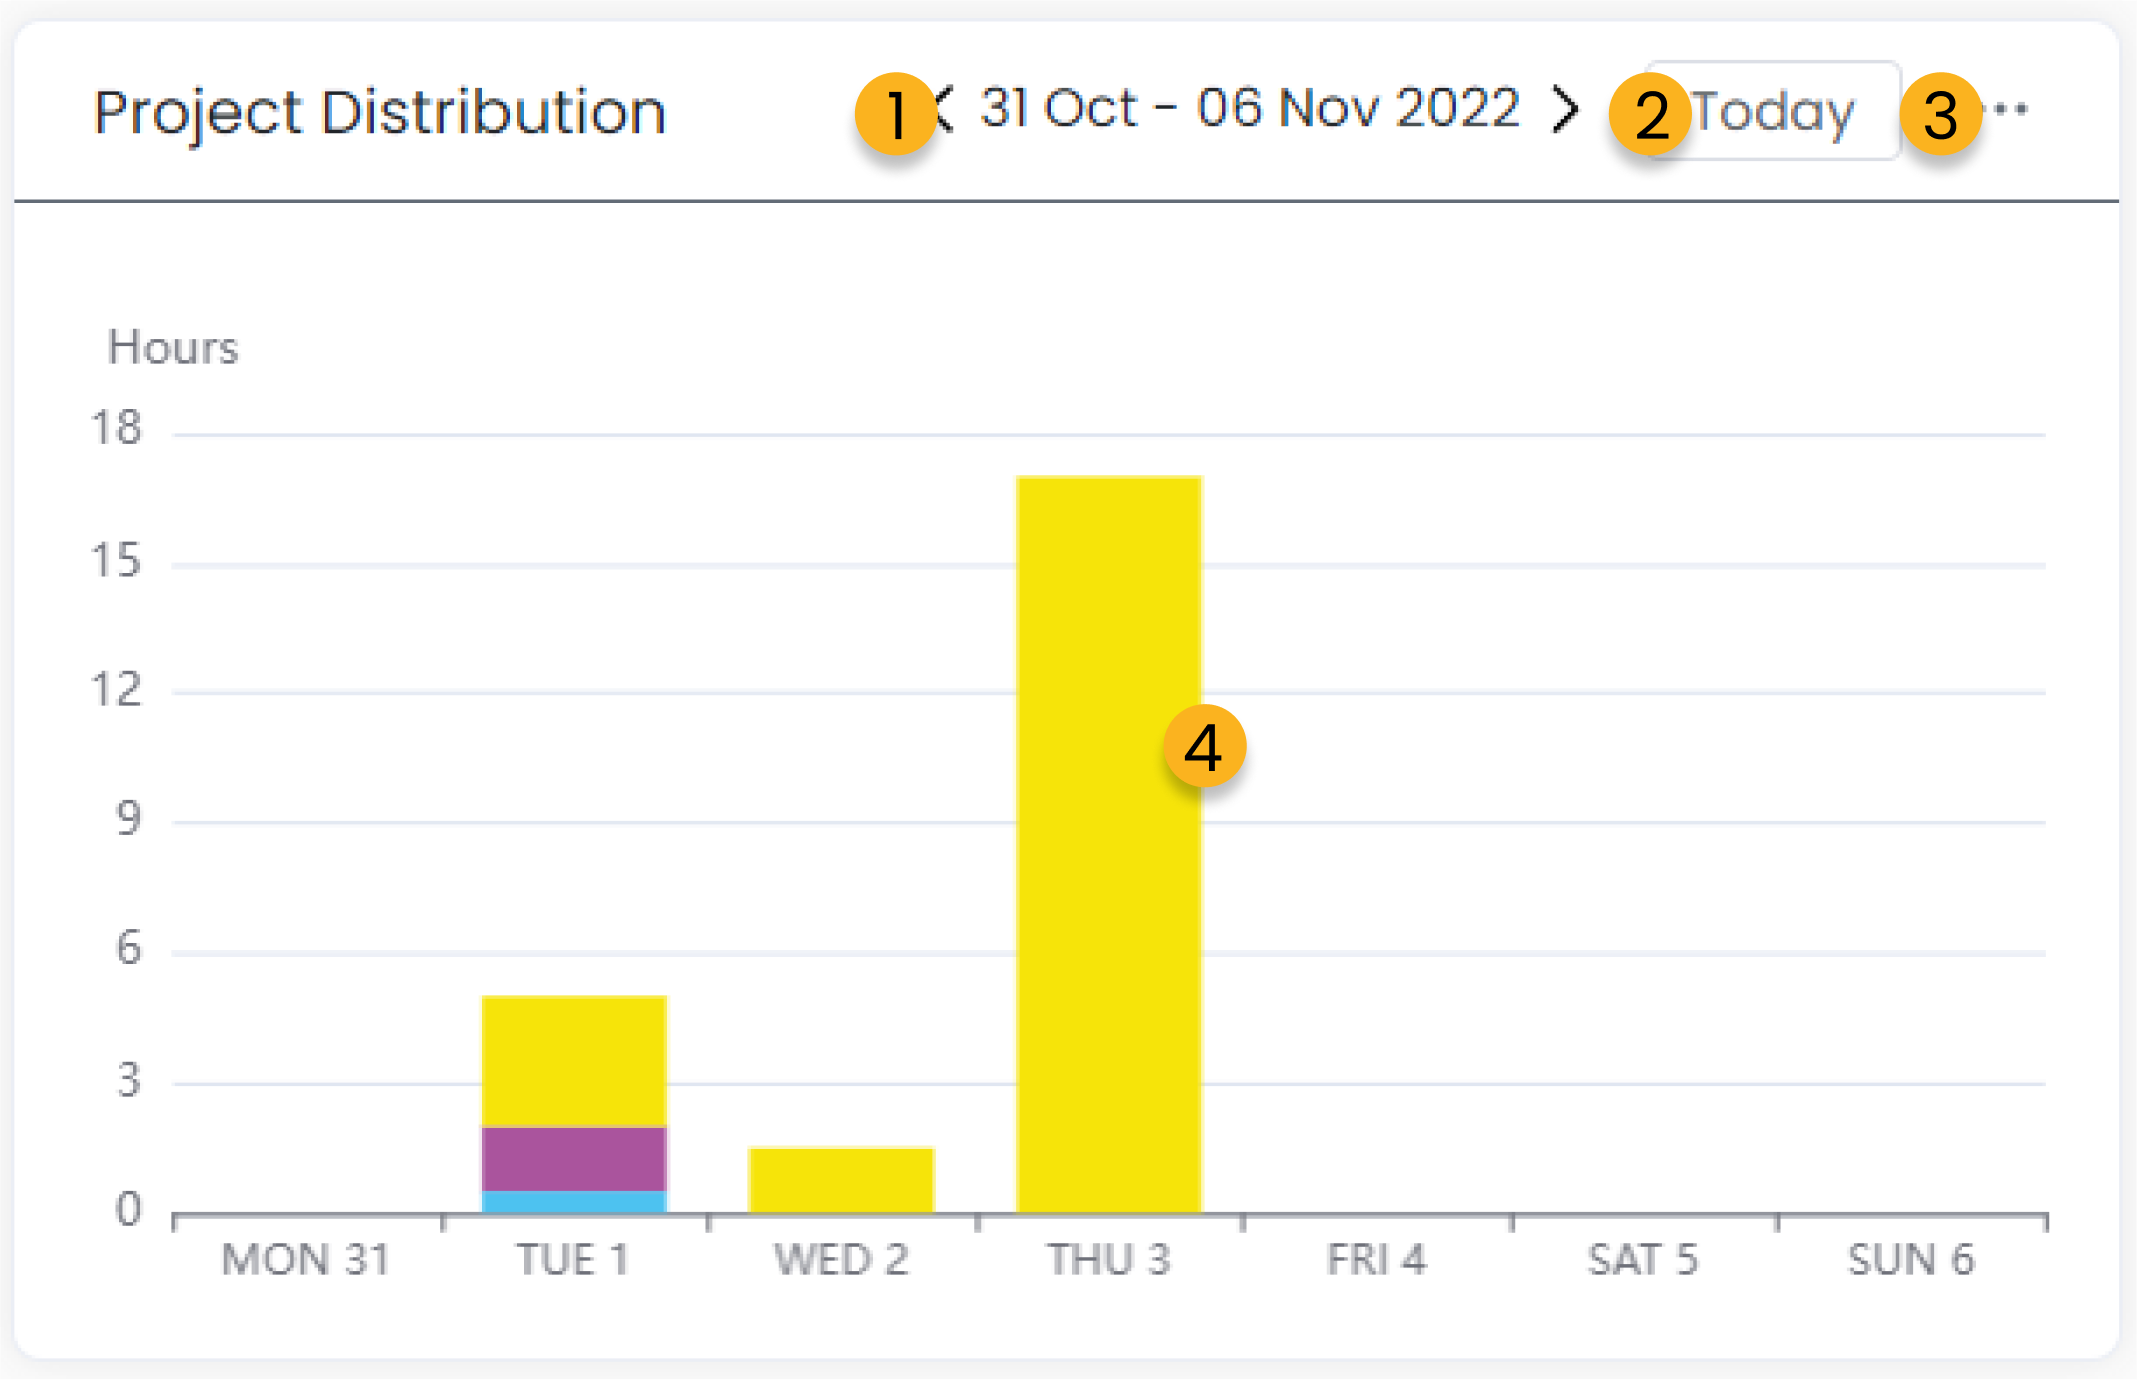
1. Select the date range for which you wish to view your project distribution.
2. Change the date range to the current week.
3. Edit the Notes widget with options to remove, increase the size of the widget and change the background colour.
4. Hover on one of your bar graphs to see the details of that project.
Account Settings
Your account settings are to adjust and manage settings related specifically to your and your account as opposed to your organisation.
Personal Settings
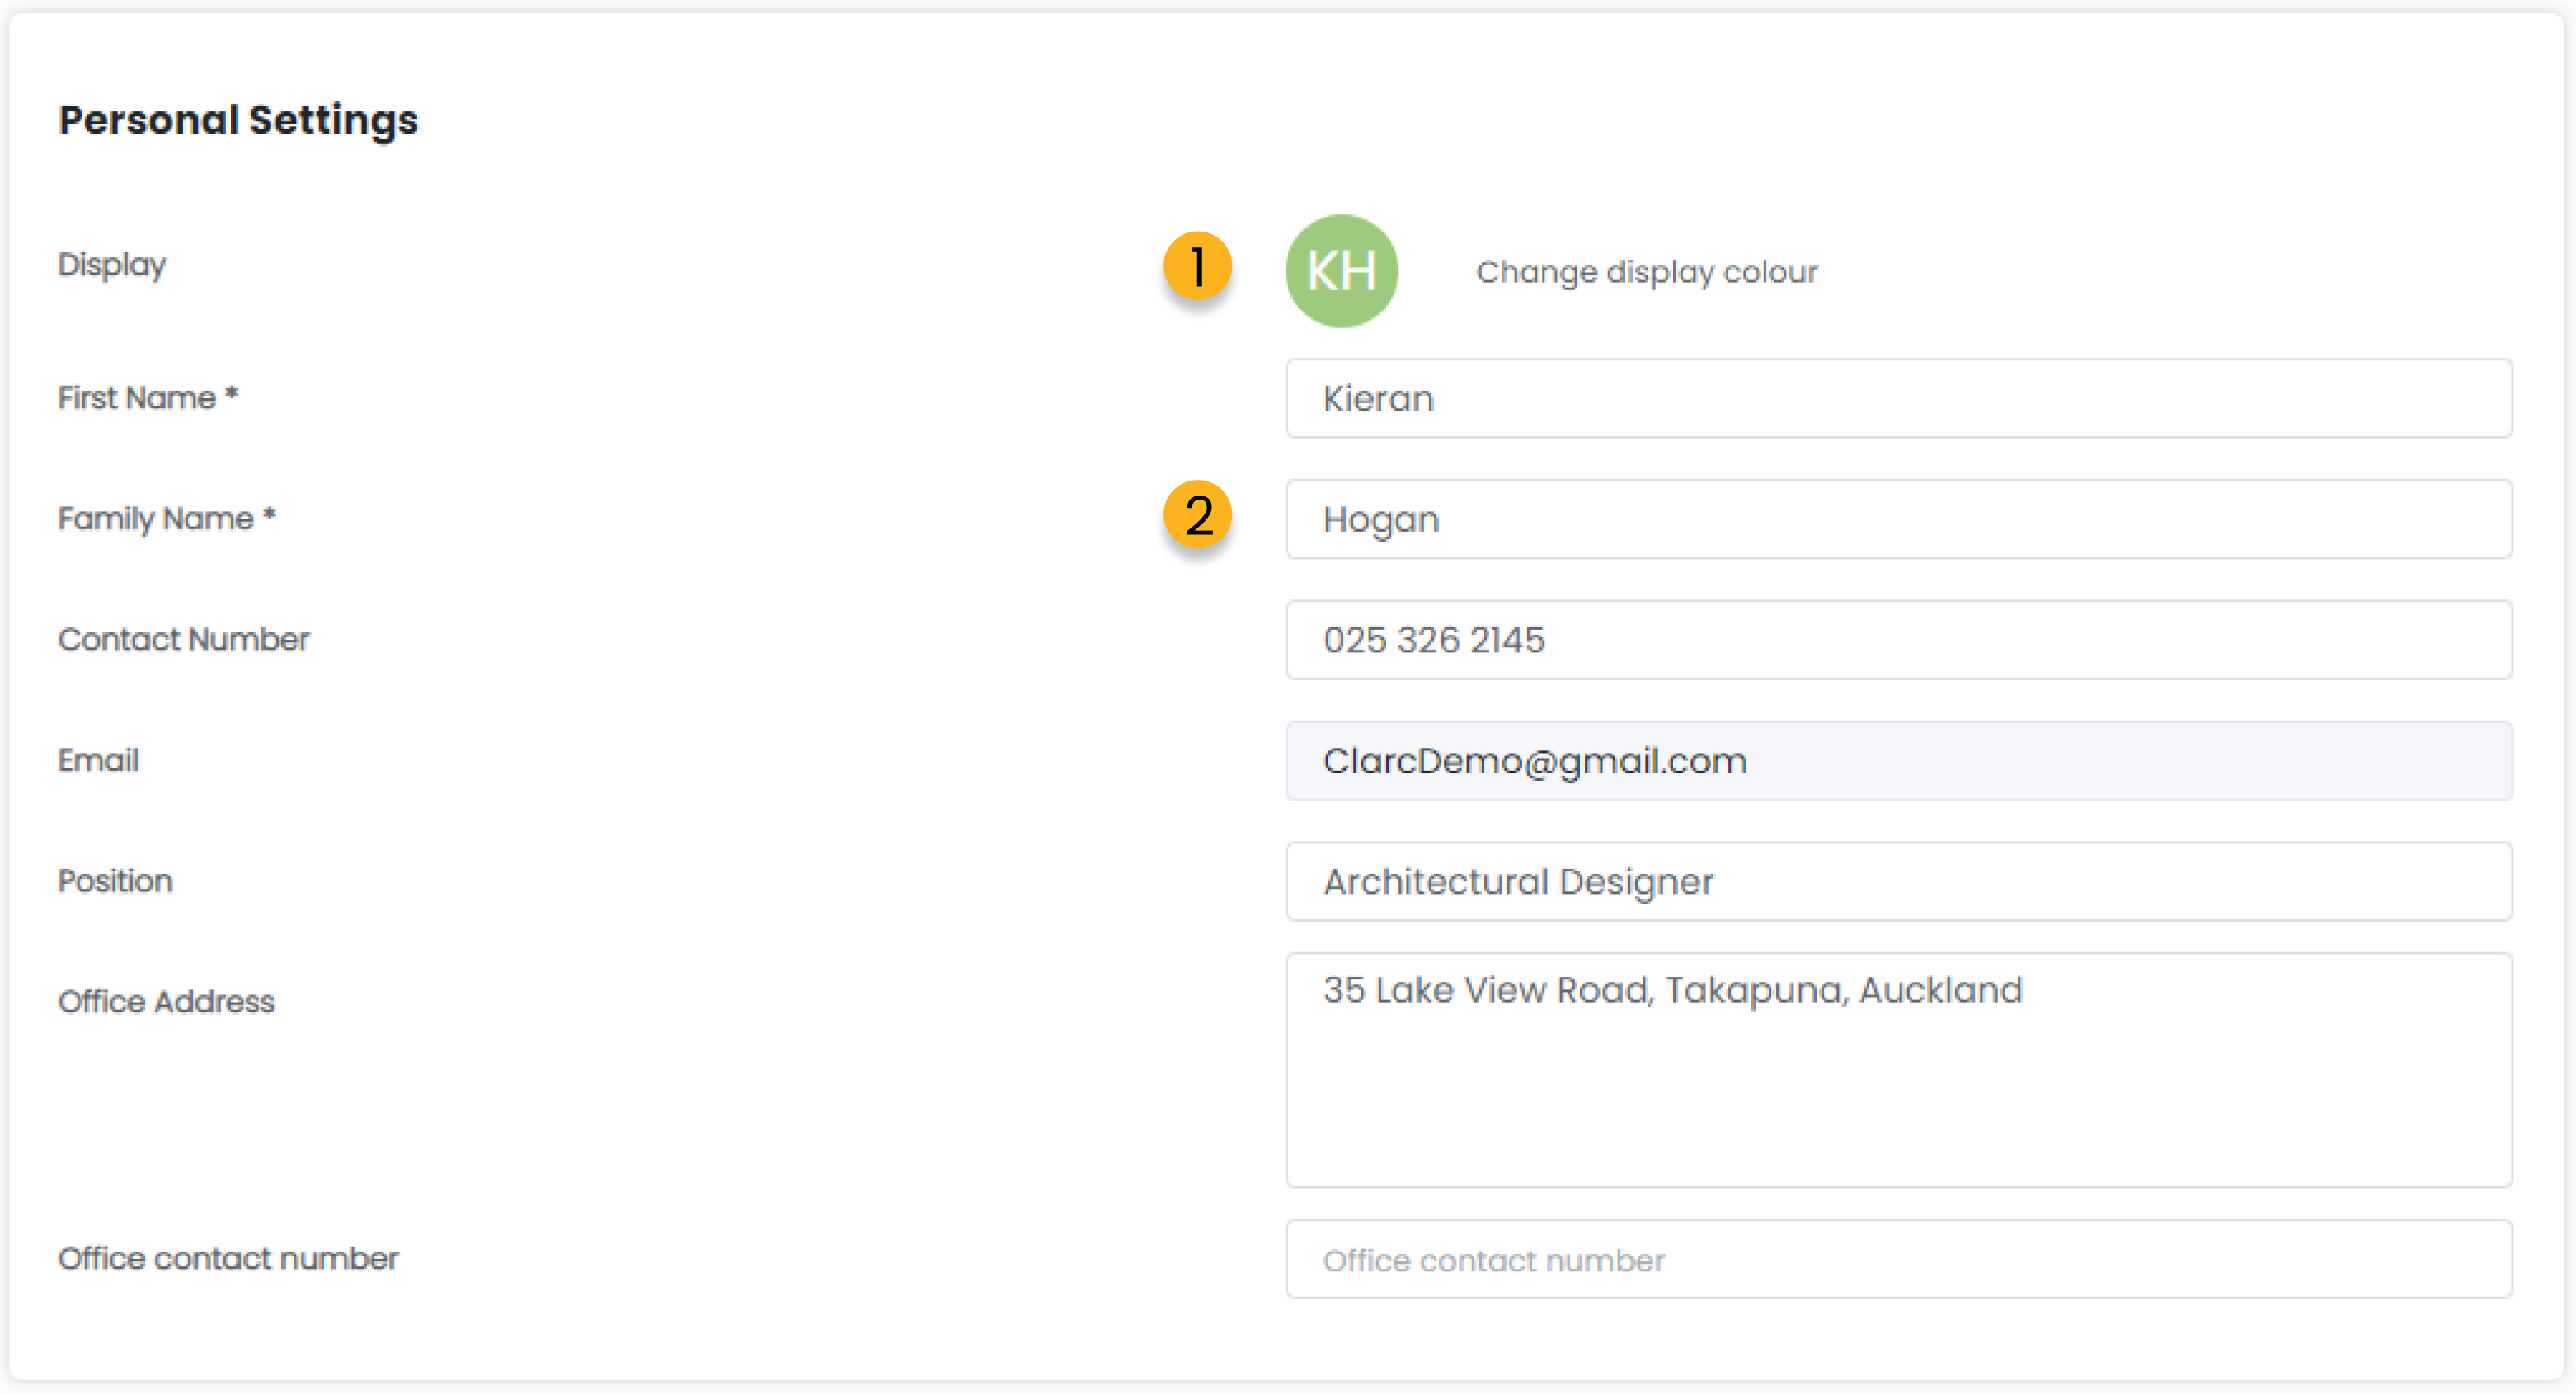
1. Edit your profile colour. This will appear next to your name on assigned tasks, comments and reports.
2. Your contact details will appear on your contact time within the Team function.
Account Settings
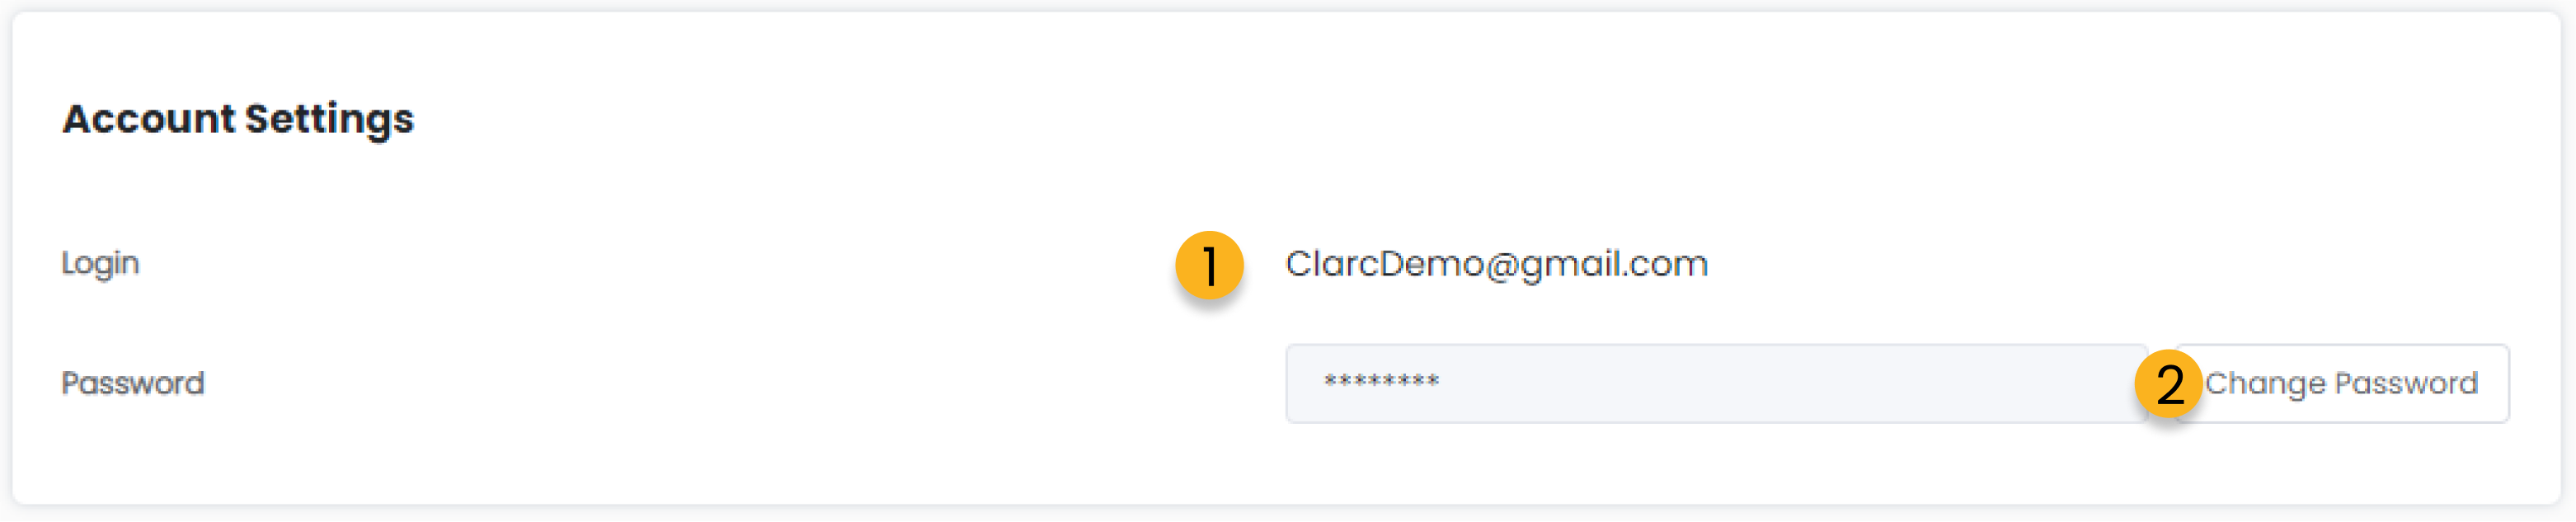
1. Your login email.
2. Click to change your password. (you will need to re-enter your current password).
Calendar Connection

1. Login to your Google accounts to connect your Google calendar to you Clarc calendar.
2. Login to your outlook.live, Hotmail or Microsoft account to connect your third party calendar to your Clarc calendar. Please choosefrom the two options in the drop down when you’re connecting through either a personal account or a company account.
Notification Settings

1. There are two sections for notifications. One for Email notifications that are sent to your inbox and another for Browser notifications which only appear from the notification window within Clarc.
2. Check or uncheck the notifications you wish to receive under each section.
3. Quick button to turn off all notifications under that section.
Organisation Setup
You can find the following actions/options from your admin settings.

Setting up your account is one of the first things you should do when you start to use Clarc. The data in these beginning steps will be used throughout Clarc to facilitate various functions.
Basic Information
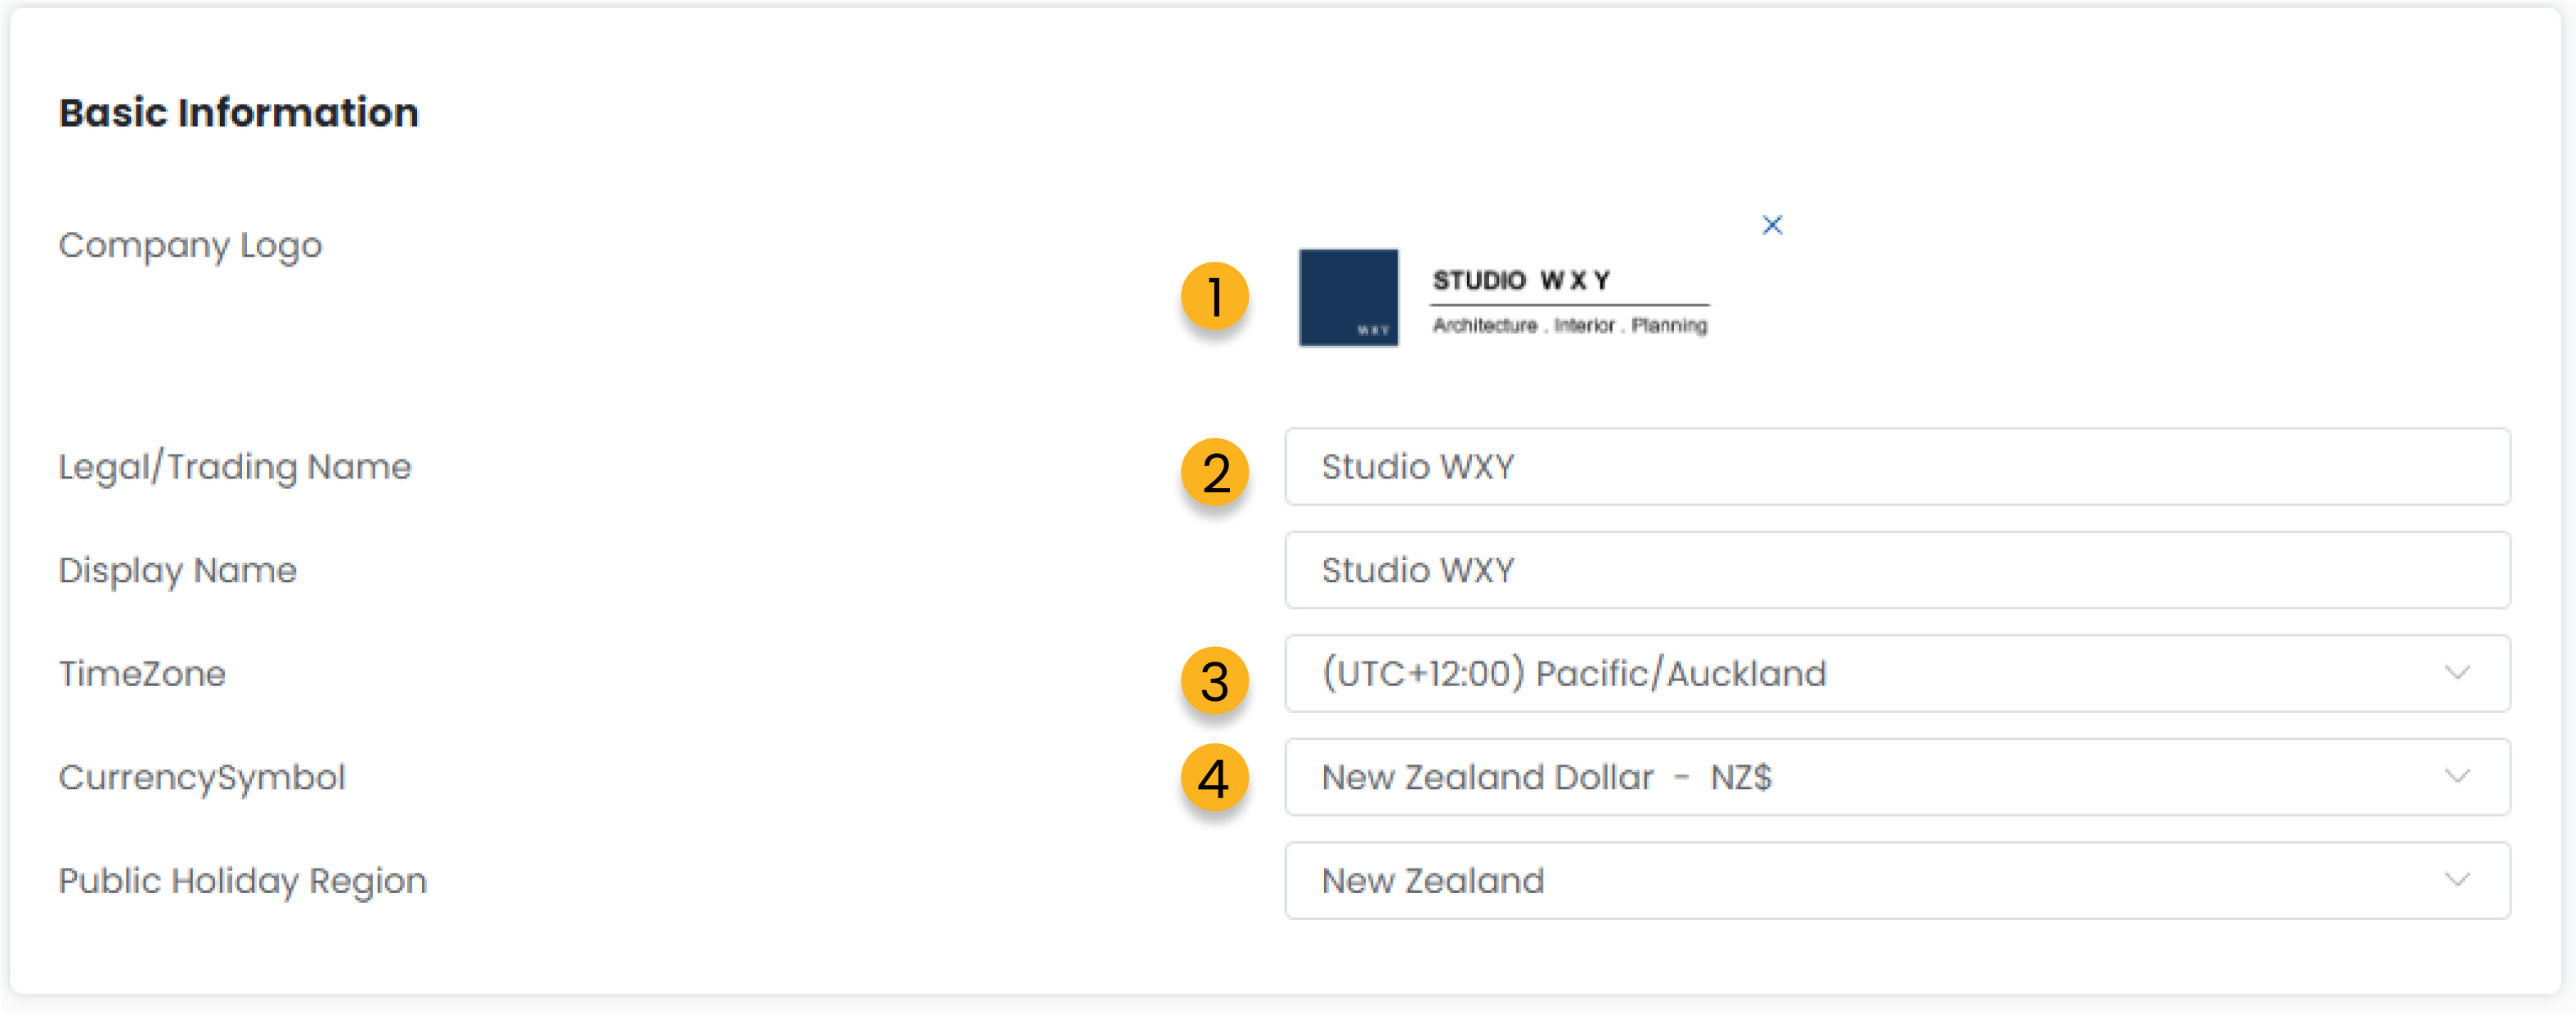
1. Upload your company logo here. This will appear on invoices, contracts and other relevant documents created from within Clarc as well as display on your profile to other organisations.
2. Fill in your basic company information. Your display name can be different to your legal trading name.
3. Select your currency type. This will display in invoice and reporting features.
4. Your public holiday region will prefill all of your national holidays within the attendance and timesheet for your organisation.
Contact Details
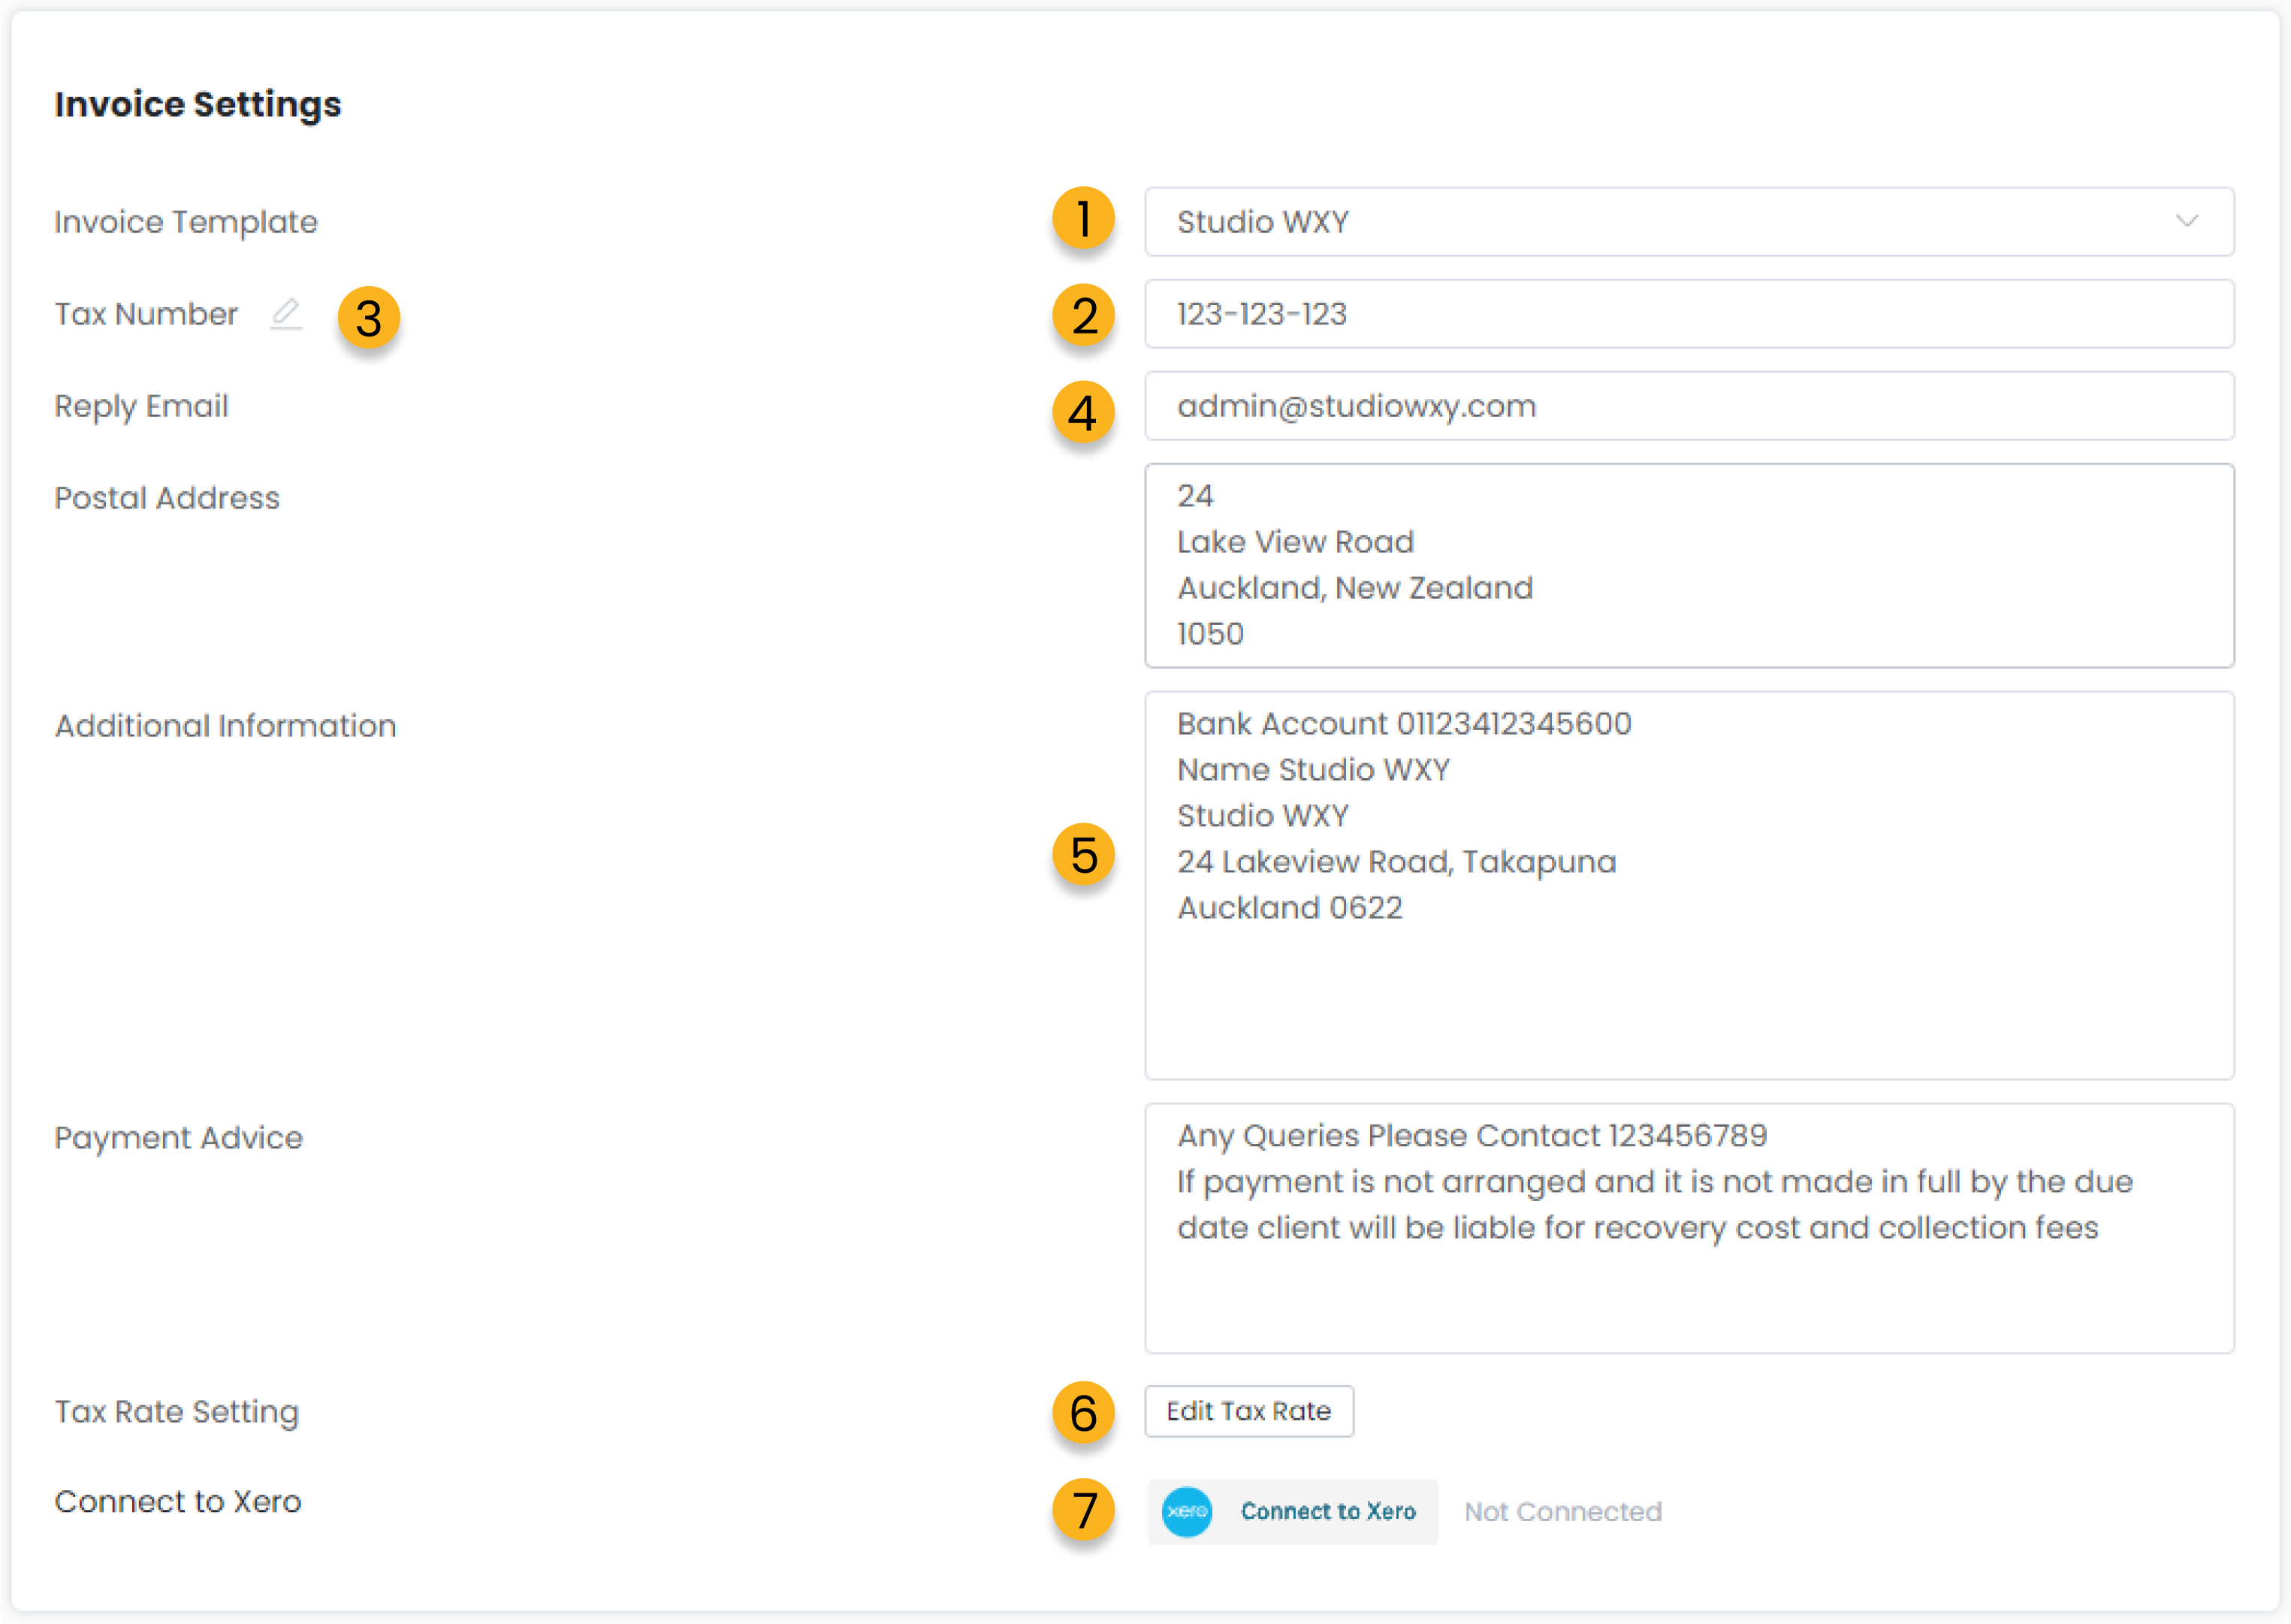
Invoice Settings
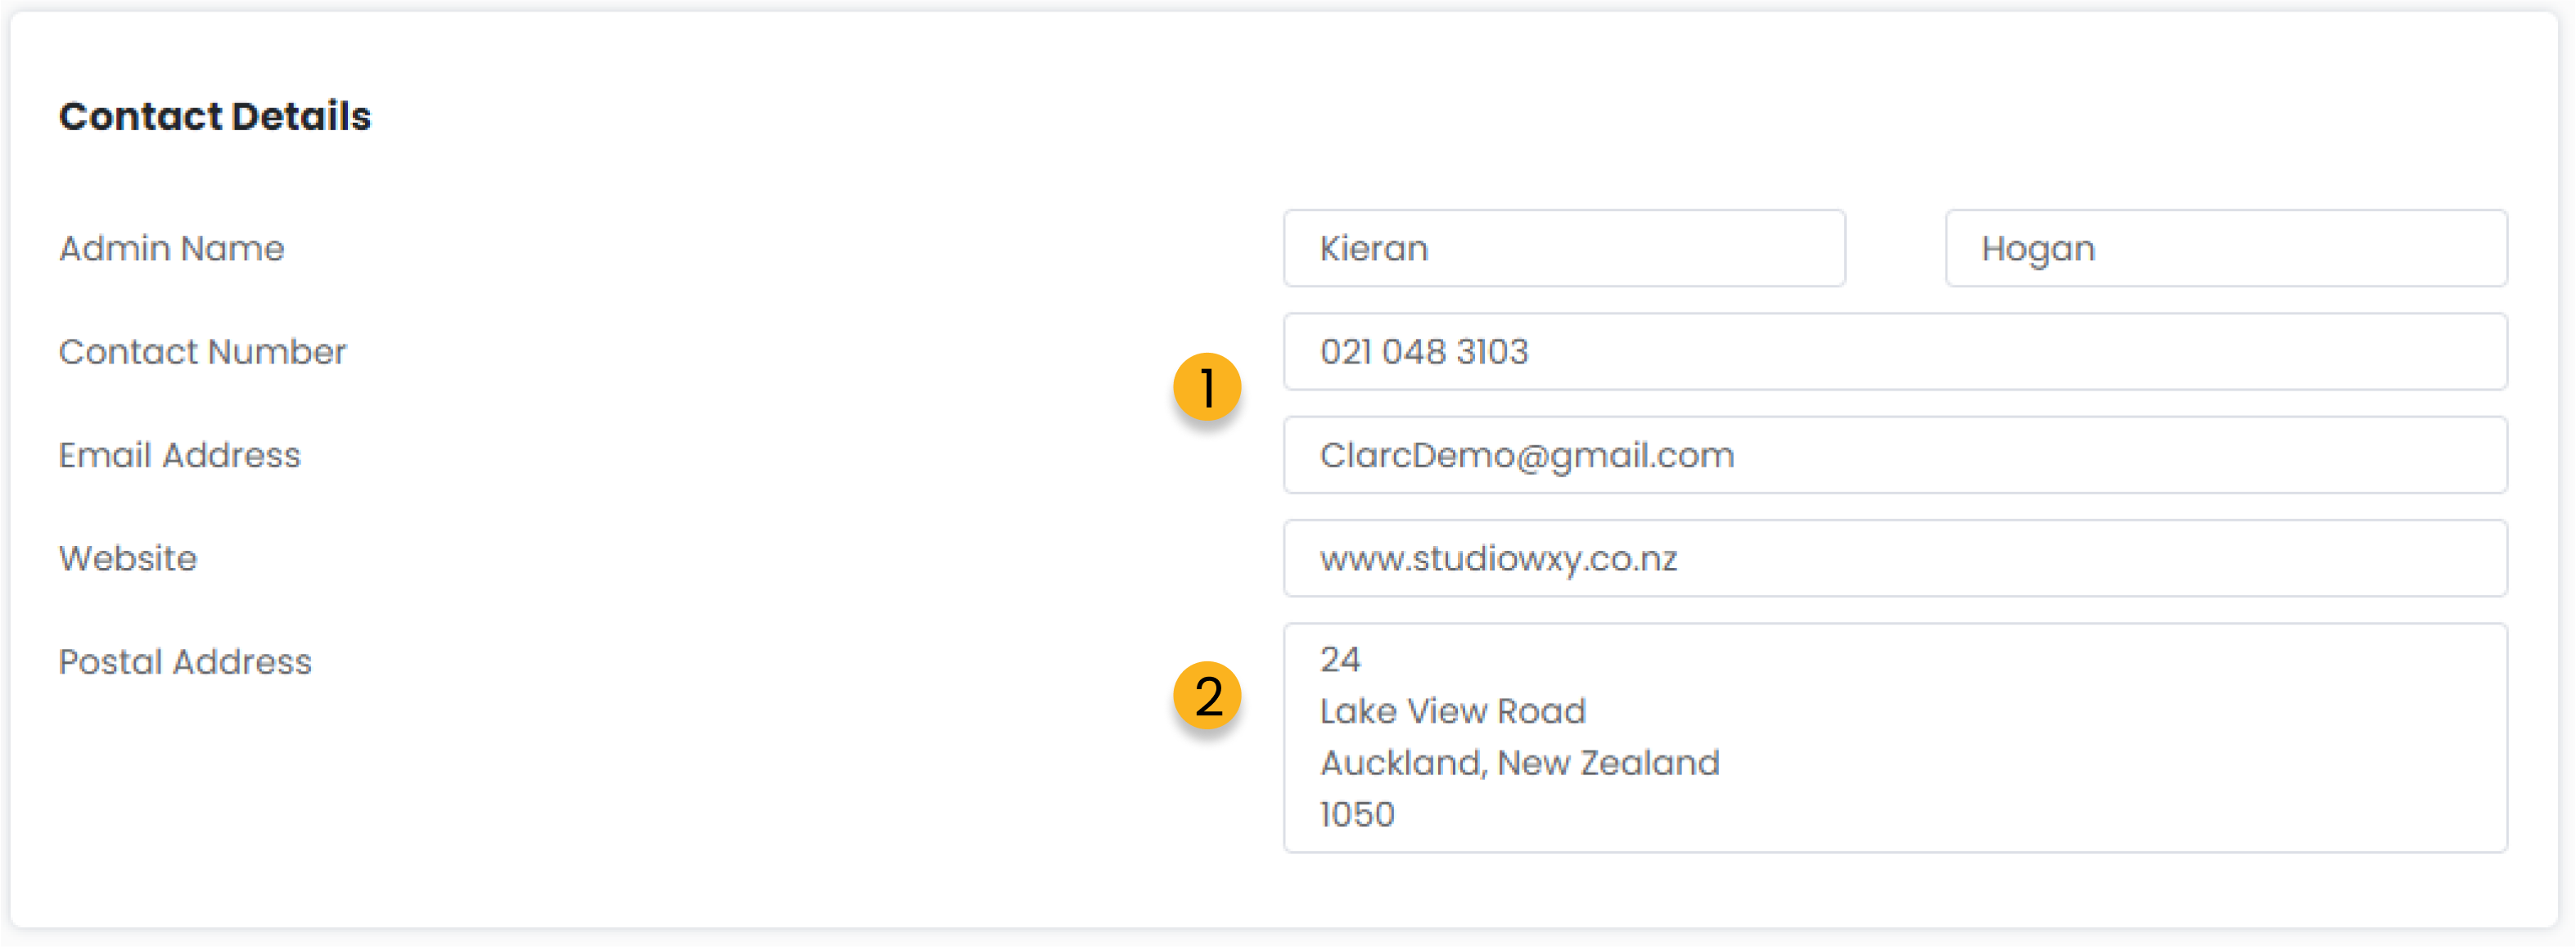
1. Your organisations admin user is the main point of contact for your organisation. Fill in their details here.
2. Your website and address are additional information that may help other users find you.
1. You can have multiple facing companies that you invoice force from one Clarc account. The selected invoice template will display when you create and send invoices at Clarc.
2. Your tax number that will show on your invoice.
3. You can edit the title of your tax number by clicking the pencil icon. e.g. You can change this to ABN for your Australian Business Number.
4. Your reply email is the email that will receive all replies sent by those who you have sent emails to from Clarc. You can change your reply email from your Email Settings.
5. Your postal address and any additional information you enter here will also appear on invoices you generate within Clarc.
6. Edit the automatic tax rate that is applied when creating invoice items. Note that when you are connected to Xero, you should match your tax rates in Clarc so that they are the same as what you have in the Xero system. Tax rates that have been applied to an existing invoice cannot be edited or removed from Clarc.
7. Synchronise your invoices in real time by logging into your Xero account and allowing the connection between the two. Any invoice created or updated in either platform will automatically update in the other.
Team Settings
You can find the following actions/options from your admin settings.
.png)
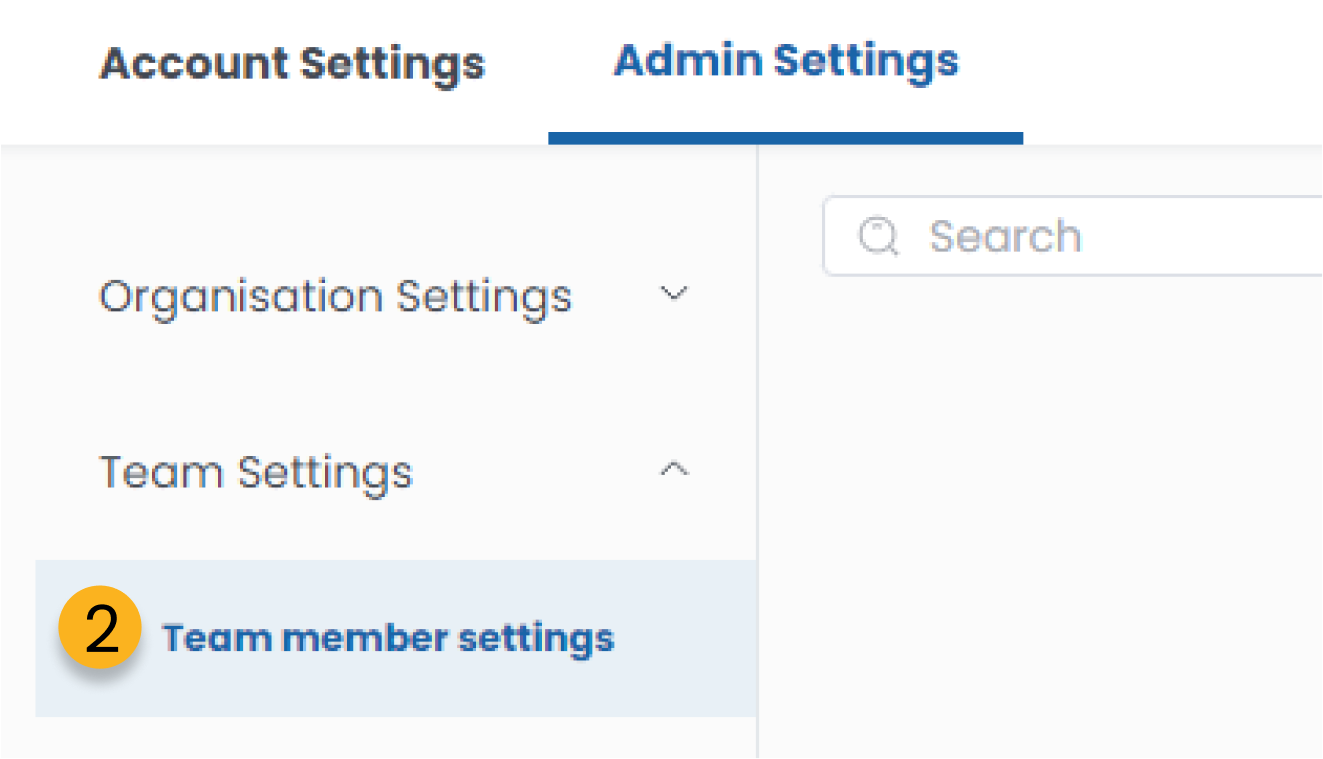
From your admin settings, head to the Team Settings - Team member settings tab.
Your team member settings will allow you to setup the contract and role for each of your team members which in turn decides what the can and cannot do within Clarc through role authorities.
Navigating your team member settings

1. Edit role allows you to add, edit and remove roles from your organisation

How to edit your organisations roles?
a. Click the pencil icon to edit the name of the selected role.
b. Click the x icon to delete the selected role.
c. To add a new role click the + Add Role button to add a new line item.
d. Once changes are made, make sure to click the save changes button before closing the popup window.
2. Edit the employment contract types within your organisation
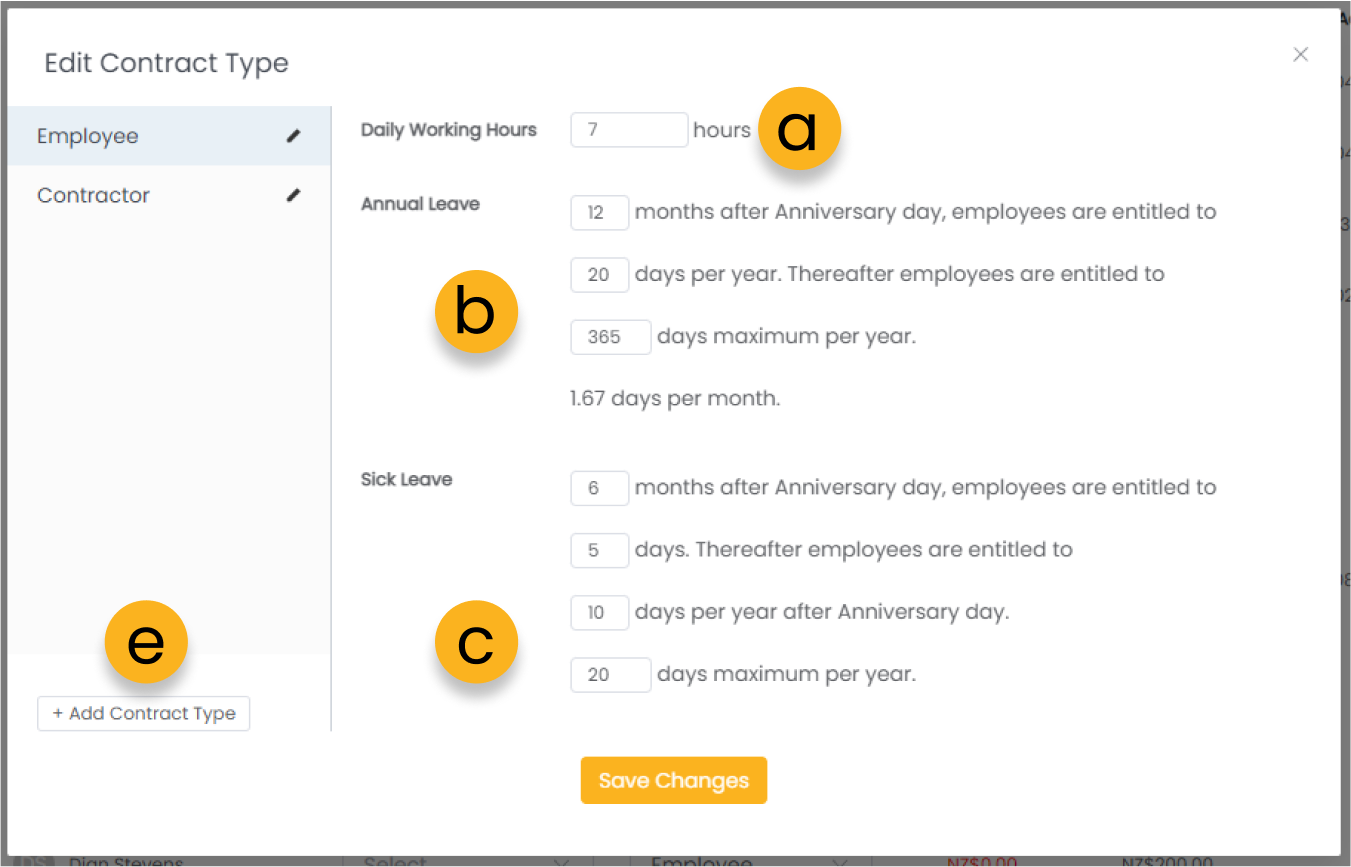
How to create and edit employment contract types?
a. Set the daily work hours associated with the selected contract type.
b. Set the Annual leave parameters associated with the selected contract type. The days per month are calculated automatically from the numbers you input.
c. Set the Sick Leave parameters associated with the selected contract type.
d. Click the pencil icon to edit the name of the selected contract type
e. Once changes are made, make sure to click the save changes button before closing the popup window.
3. Allows you to transfer the admin rights for your organisation to another team member

How to transfer your organisations admin title to another team member?
a. First, ensure you are logged in as the current admin of your organisation.
b. Click the Transfer Admin button within Team member settings.
c. Click the drop down box and select the person you wish to transfer the admin rights to.
d. Click confirm to finalise your selection.
4. The Edit member button allows you to select multiple team members and bulk change their role, contract type, hourly cost and hourly rate
5. Use the checkboxes to multi-select team members.
6. Click the drop-down box to change the selected team members role
7. Click the drop-down box to change the selected team members contract type
8. The hourly cost is the cost the corresponding employee generates against the business. This is generally calculated from their salary cost to the business converted into an hourly cost.
9. The hourly rate is the hourly charge out rate for the corresponding team member that will be used to generate invoices and is the amount you would generally charge per hour for this team members time.
10. Shows when the corresponding team member last logged in to Clarc.
11. This button allows you to view the history of changes for the corresponding team member. e.g. Change of role or change of hourly cost etc.
12. Determine whether the amounts shown in hourly cost and hourly rate are including our excluding tax.
How to set authority and permissions for your team
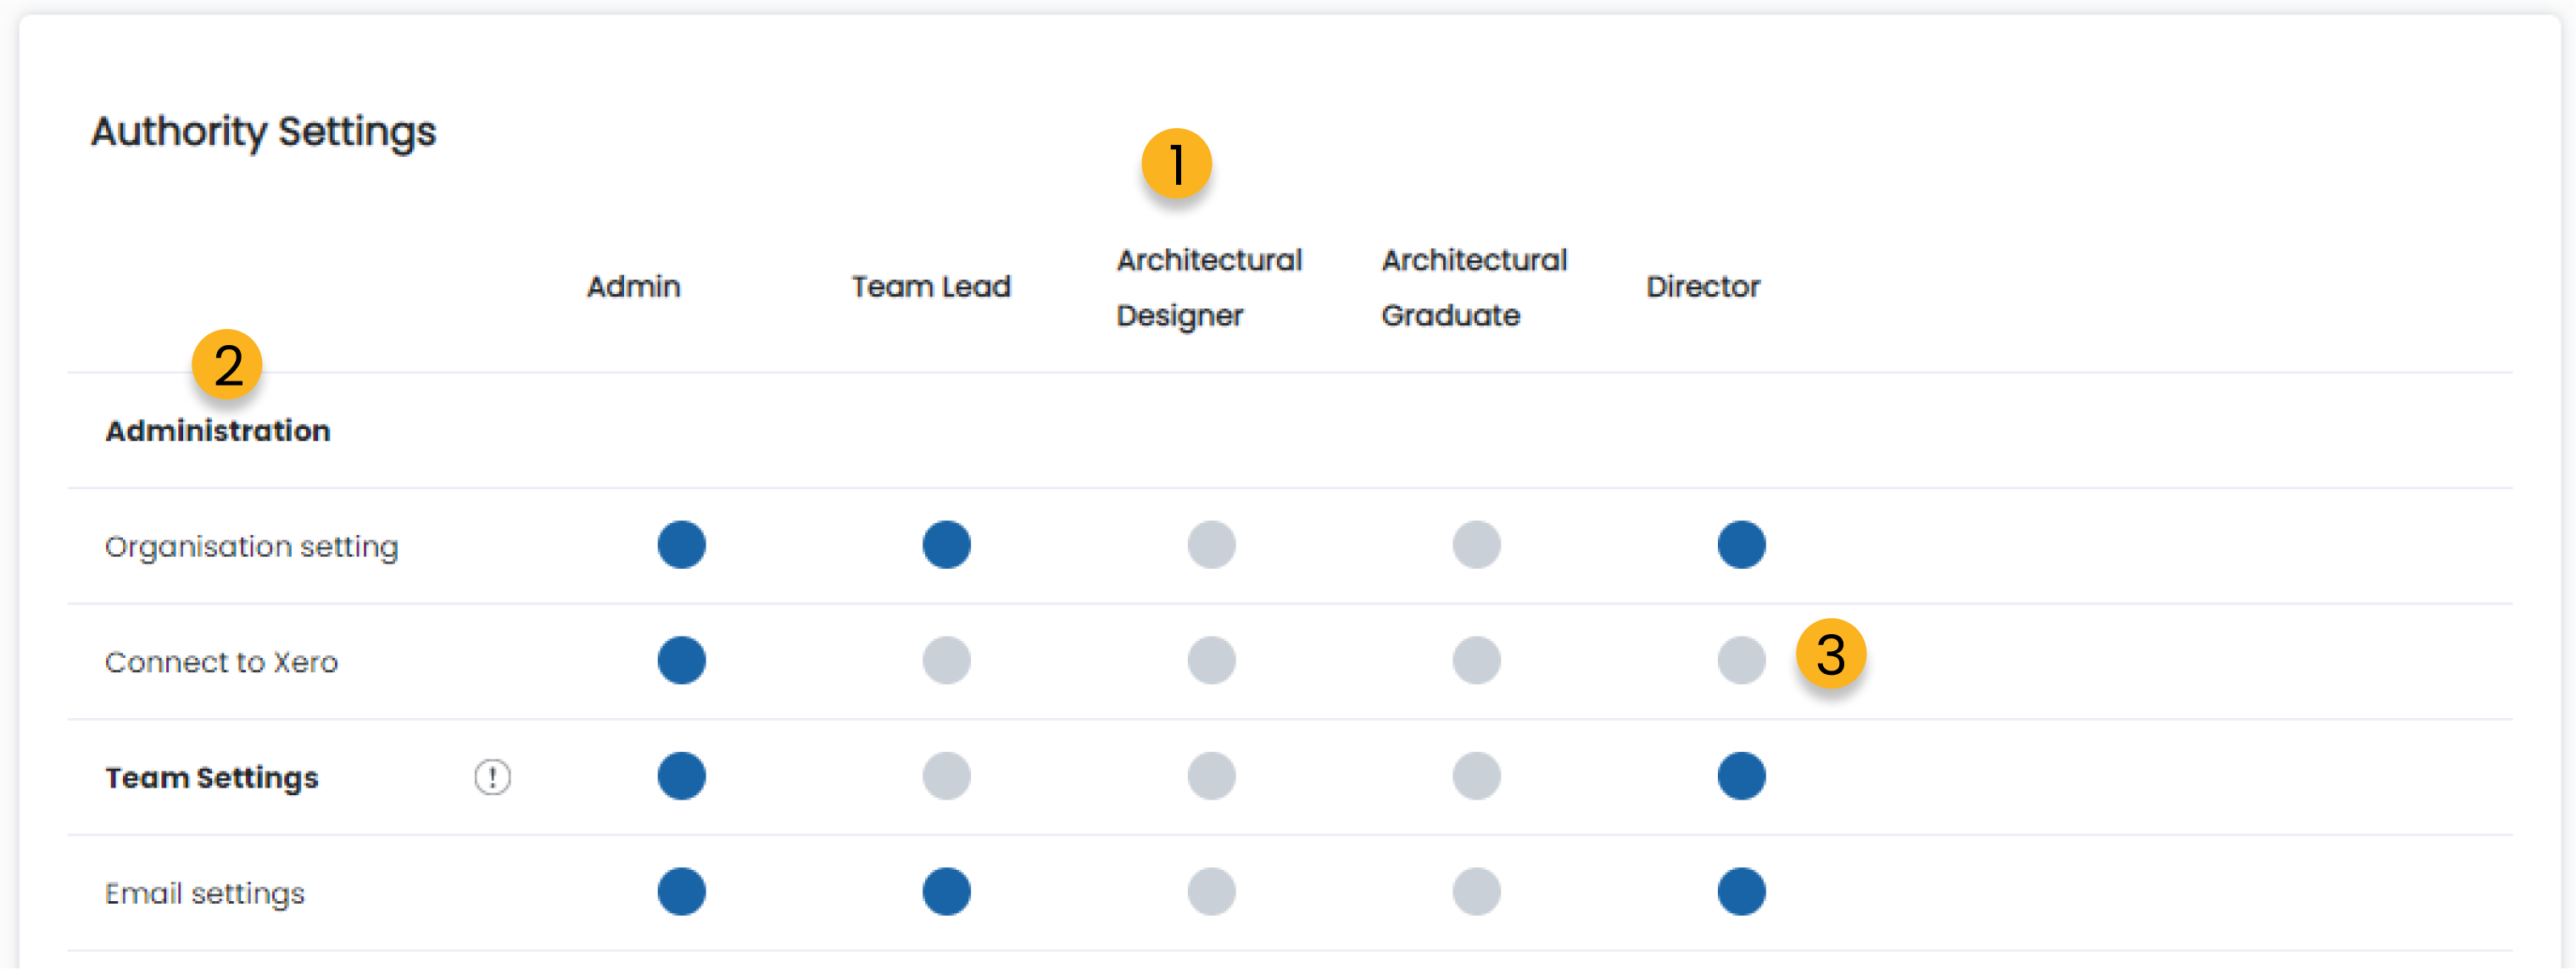
1. These are the role titles within your organisation. Each role can have different authority settings determining what they can and cannot do within Clarc.
2. Each line item is a separate action that can be conducted within Clarc.
3. Clicking the dots shown will change the colour of the dot. When it is greyed out you have turned off authority to access the feature in that row for the role in that column. When the dot is coloured, you have turned on the authority.
Contract Template
From your admin settings, head to the Contract Template tab.
Your contract template will allow you to make new contracts with ease. Preset all of your descriptions and fee builder to make creating new contracts easy. You can also create and edit contract templates from the Contract function.
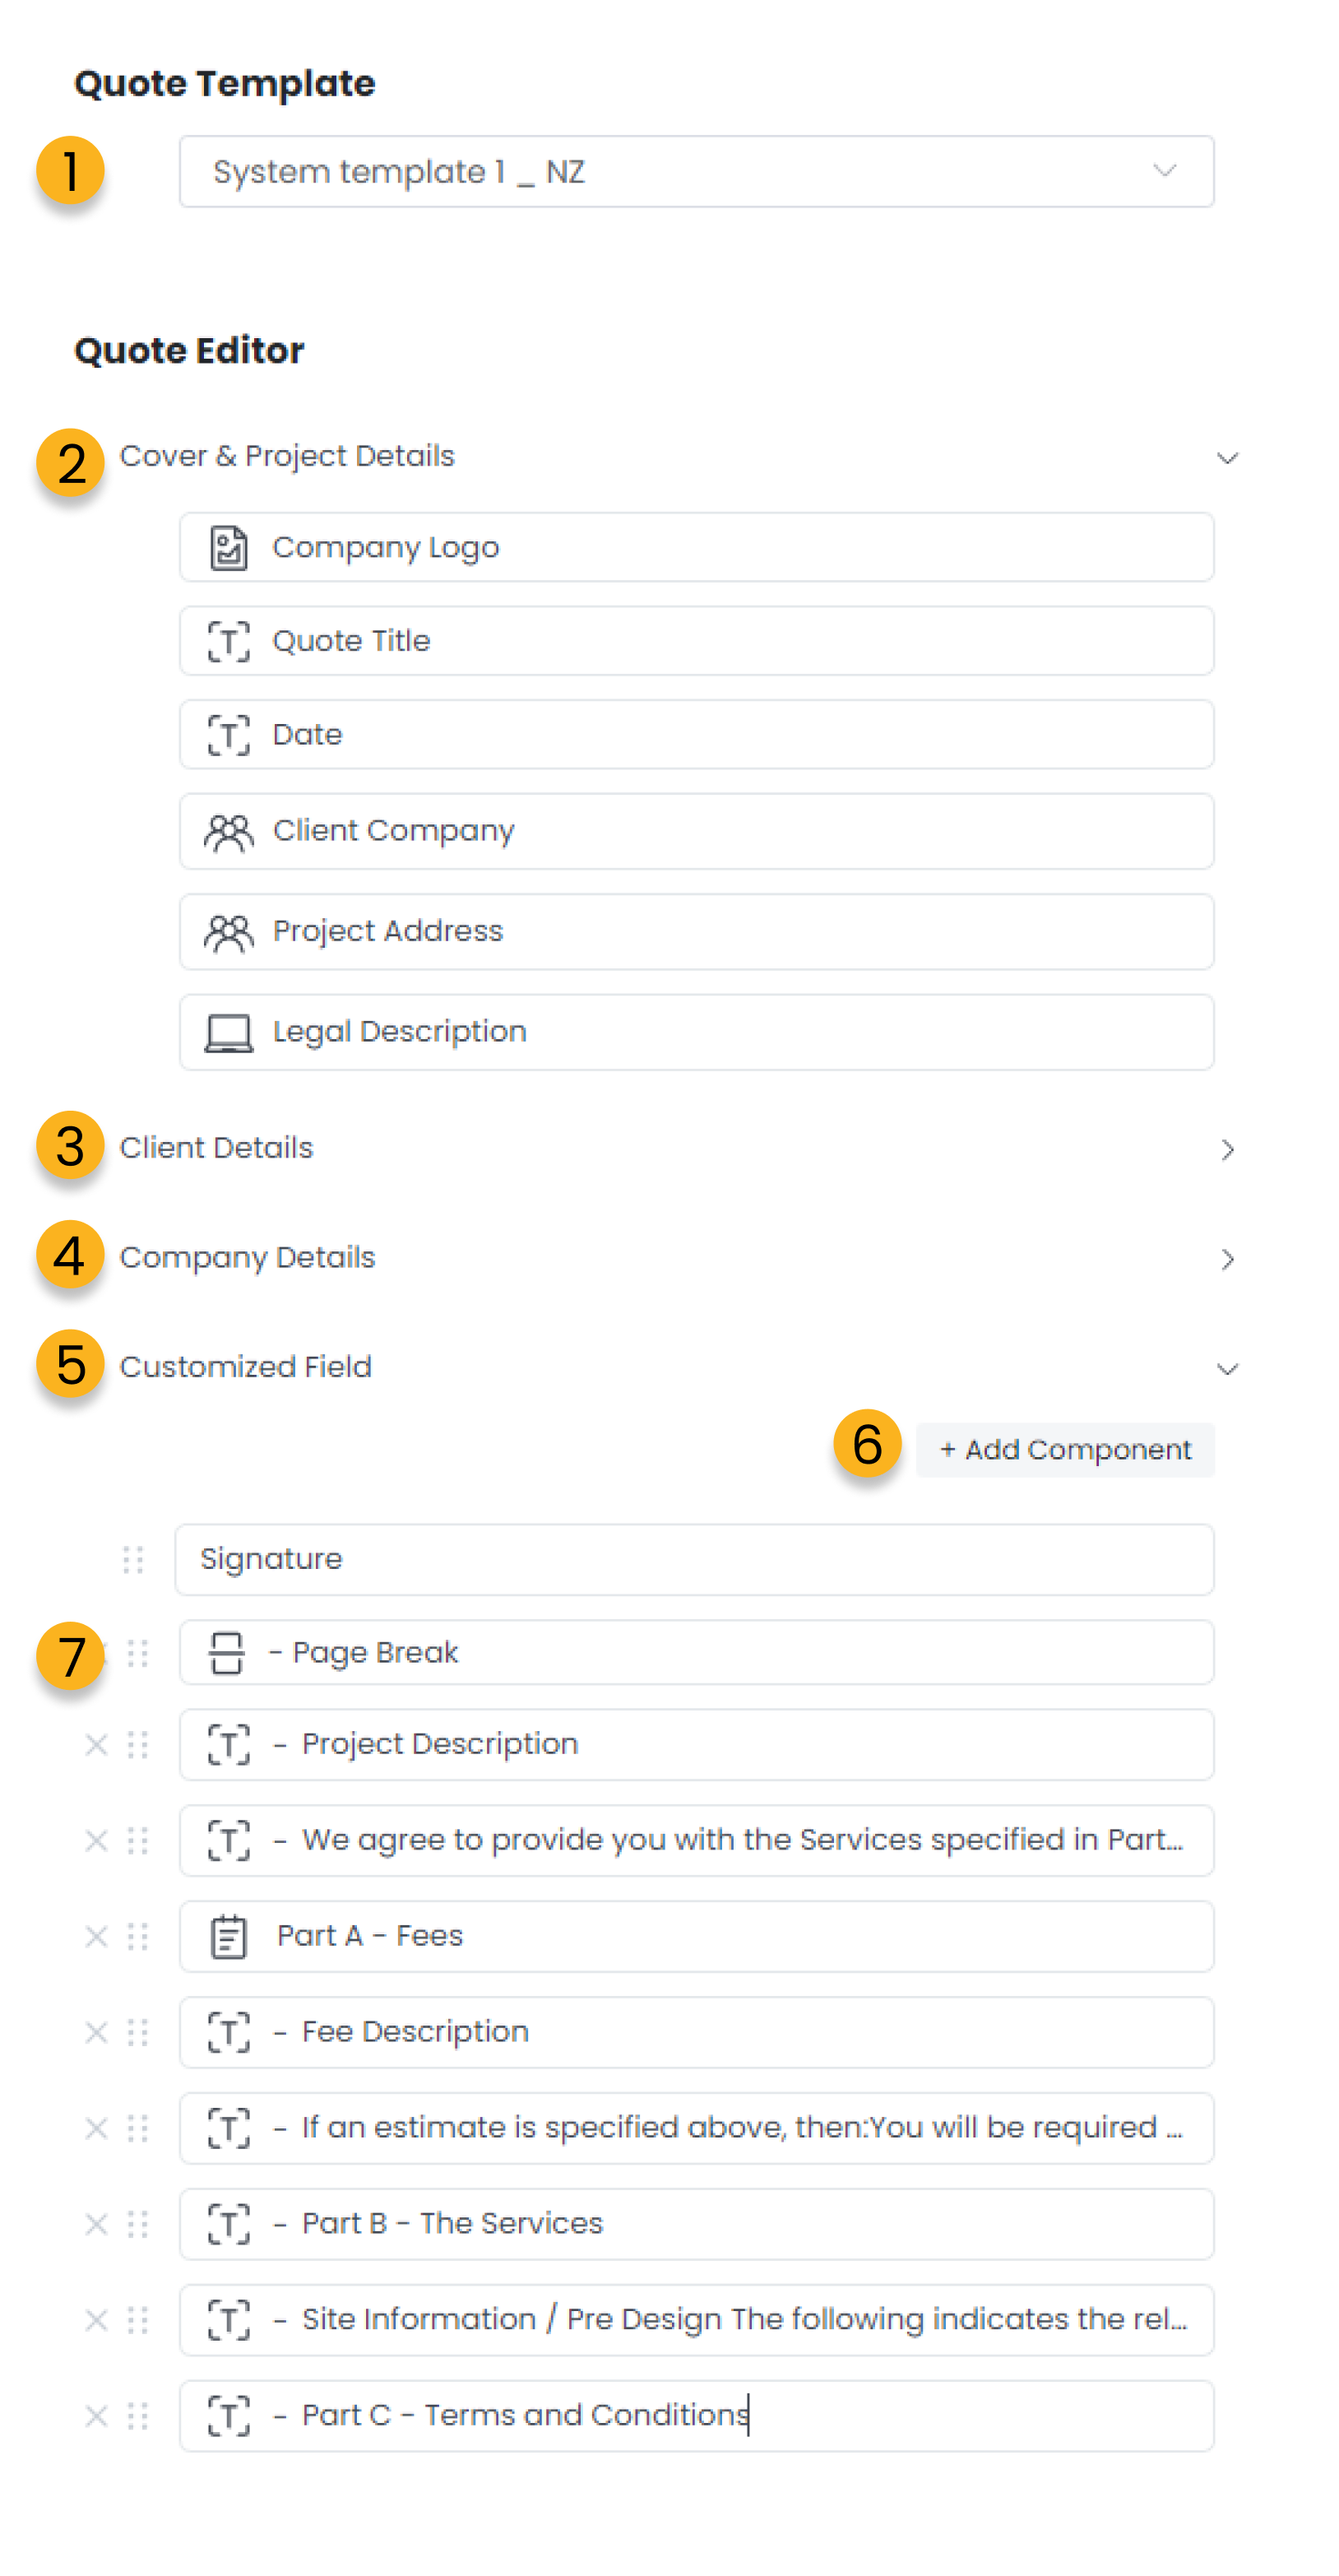
What are the contract template functions?
.png)
1. You can create and edit multiple different contract types and store them within your Clarc account. Use this dropdown box to select or add a new template.
2.These are the default sections to every contract template within Clarc. You can prefill the sections related to your organisation to make new conracts easier to create.
3. The clients details can be filled by you when you create a new contract or your client can fill these sections out when you send a new contract to them.
4. You can prefill your company details within the template.
5. Customized fields are all remaining sections within your template.
6. You can add any of the inbuilt templates or additional text and image sections to your template through clicking this button.
7. These are all the individual sections within your current contract template.
How to fill in your contract details
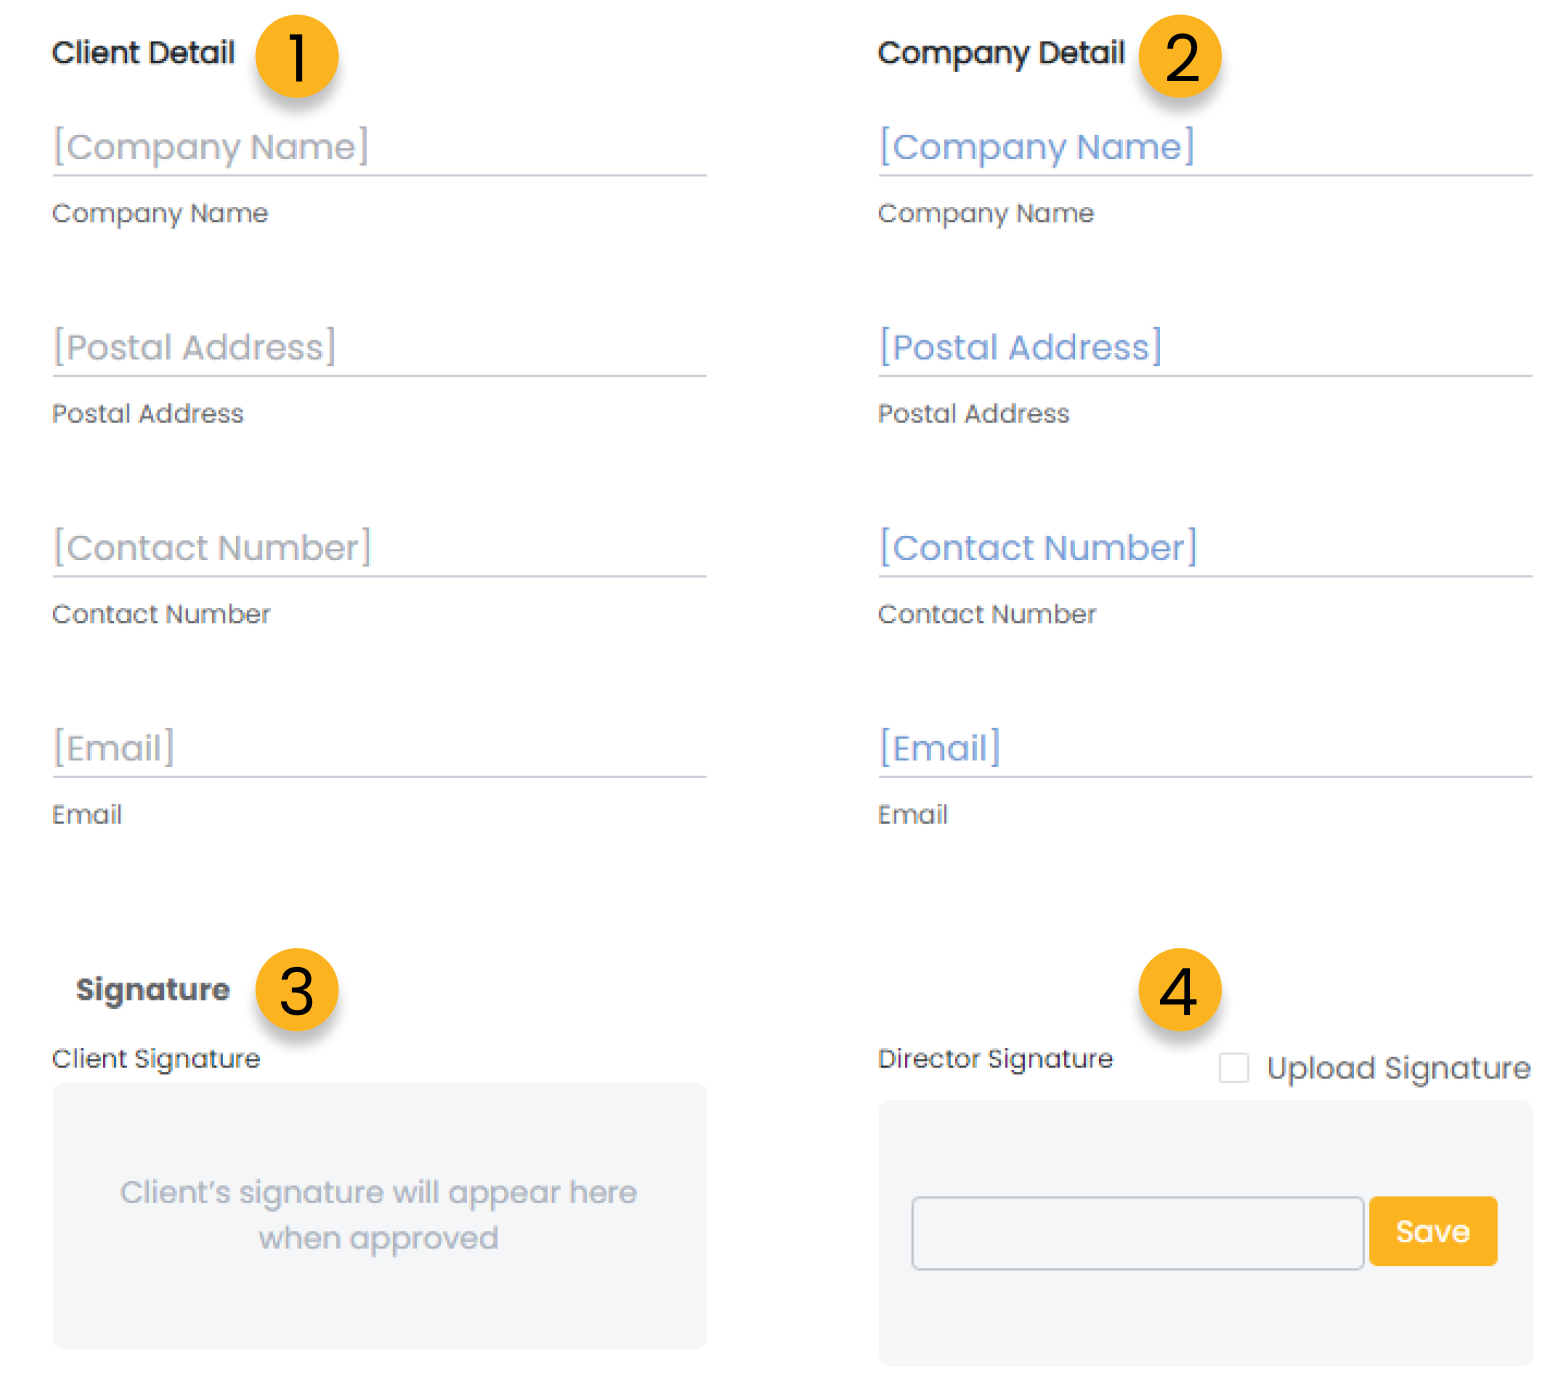
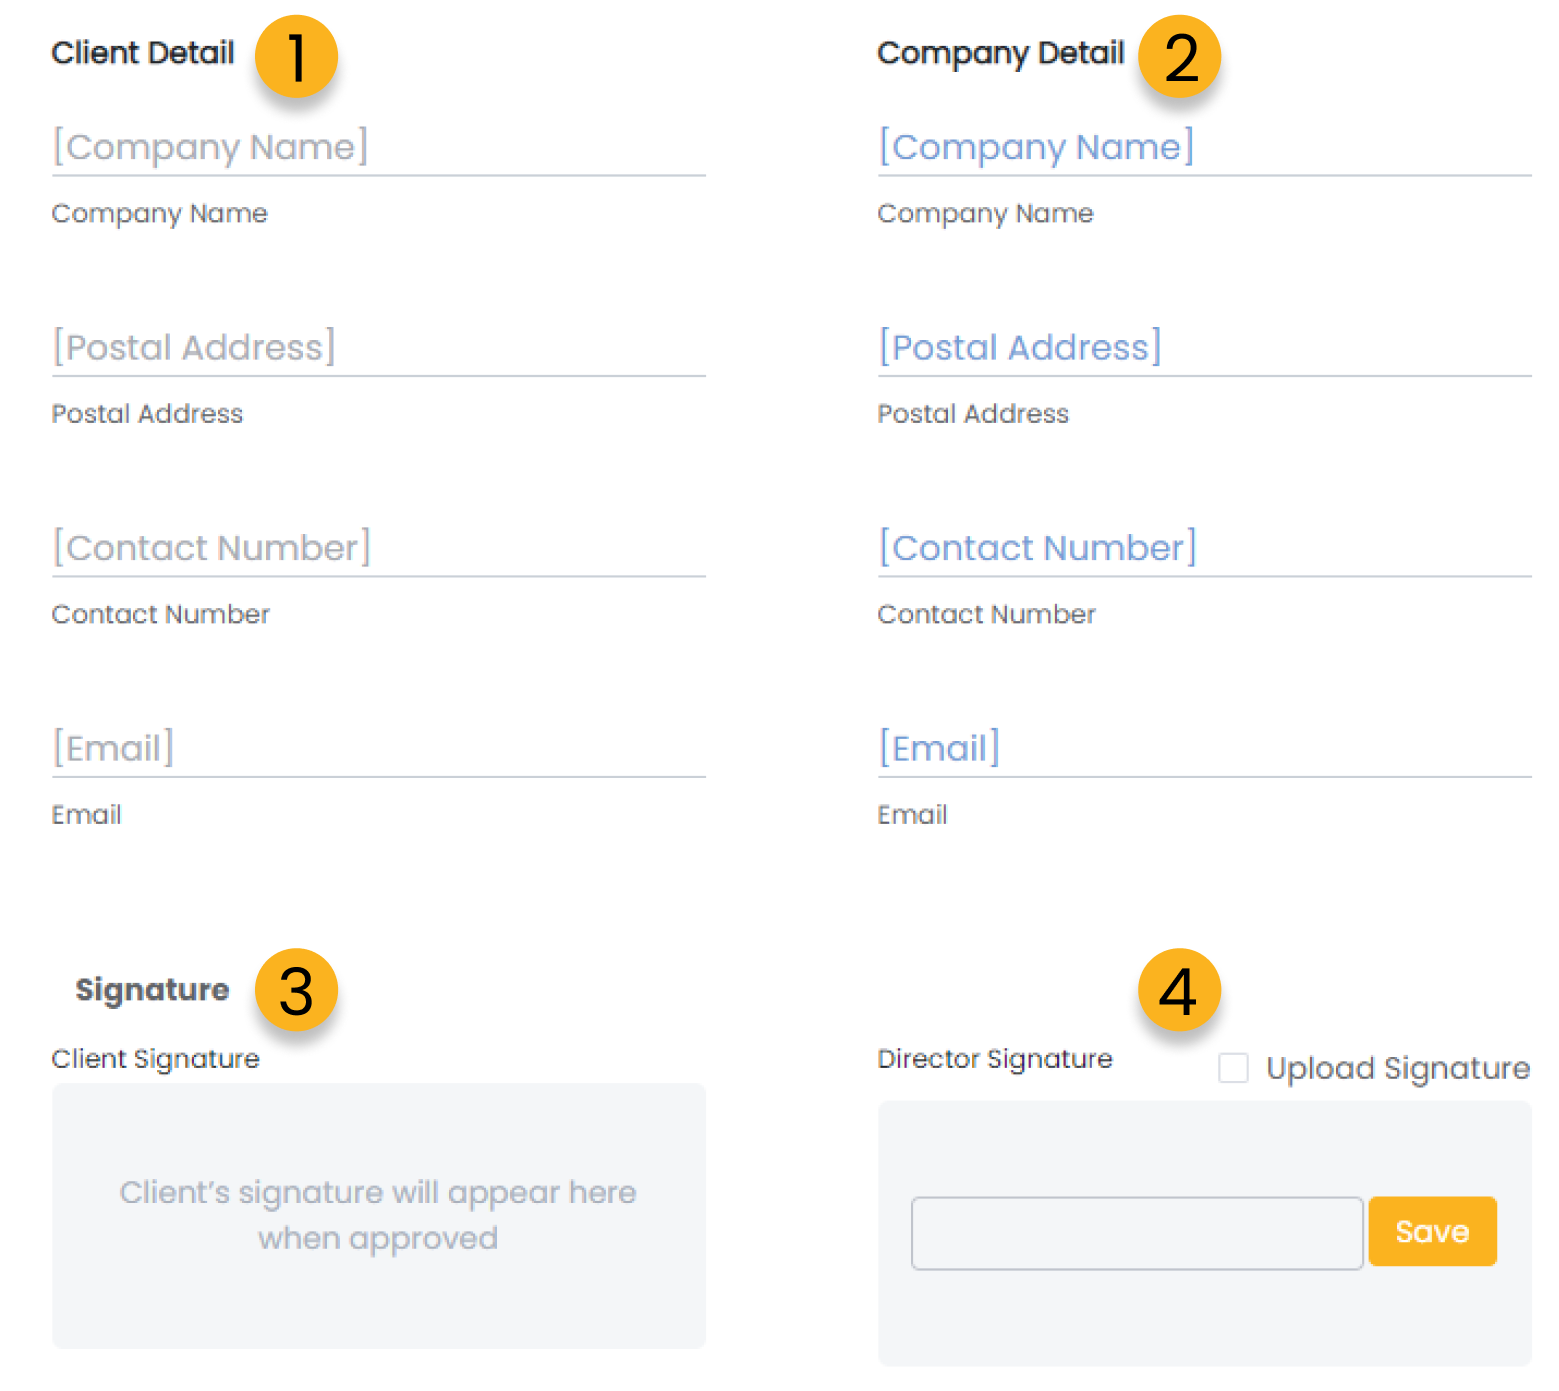
1. The clients details can be filled by you when you create a new contract or your client can fill these sections out when you send a new contract to them.
2. You can prefill your company details within the template.
3. Your client will be able to sign your contract online. Their signature will appear here once they have confirmed the document.
4. You can presign your contract template, or add your signature to each new contract.
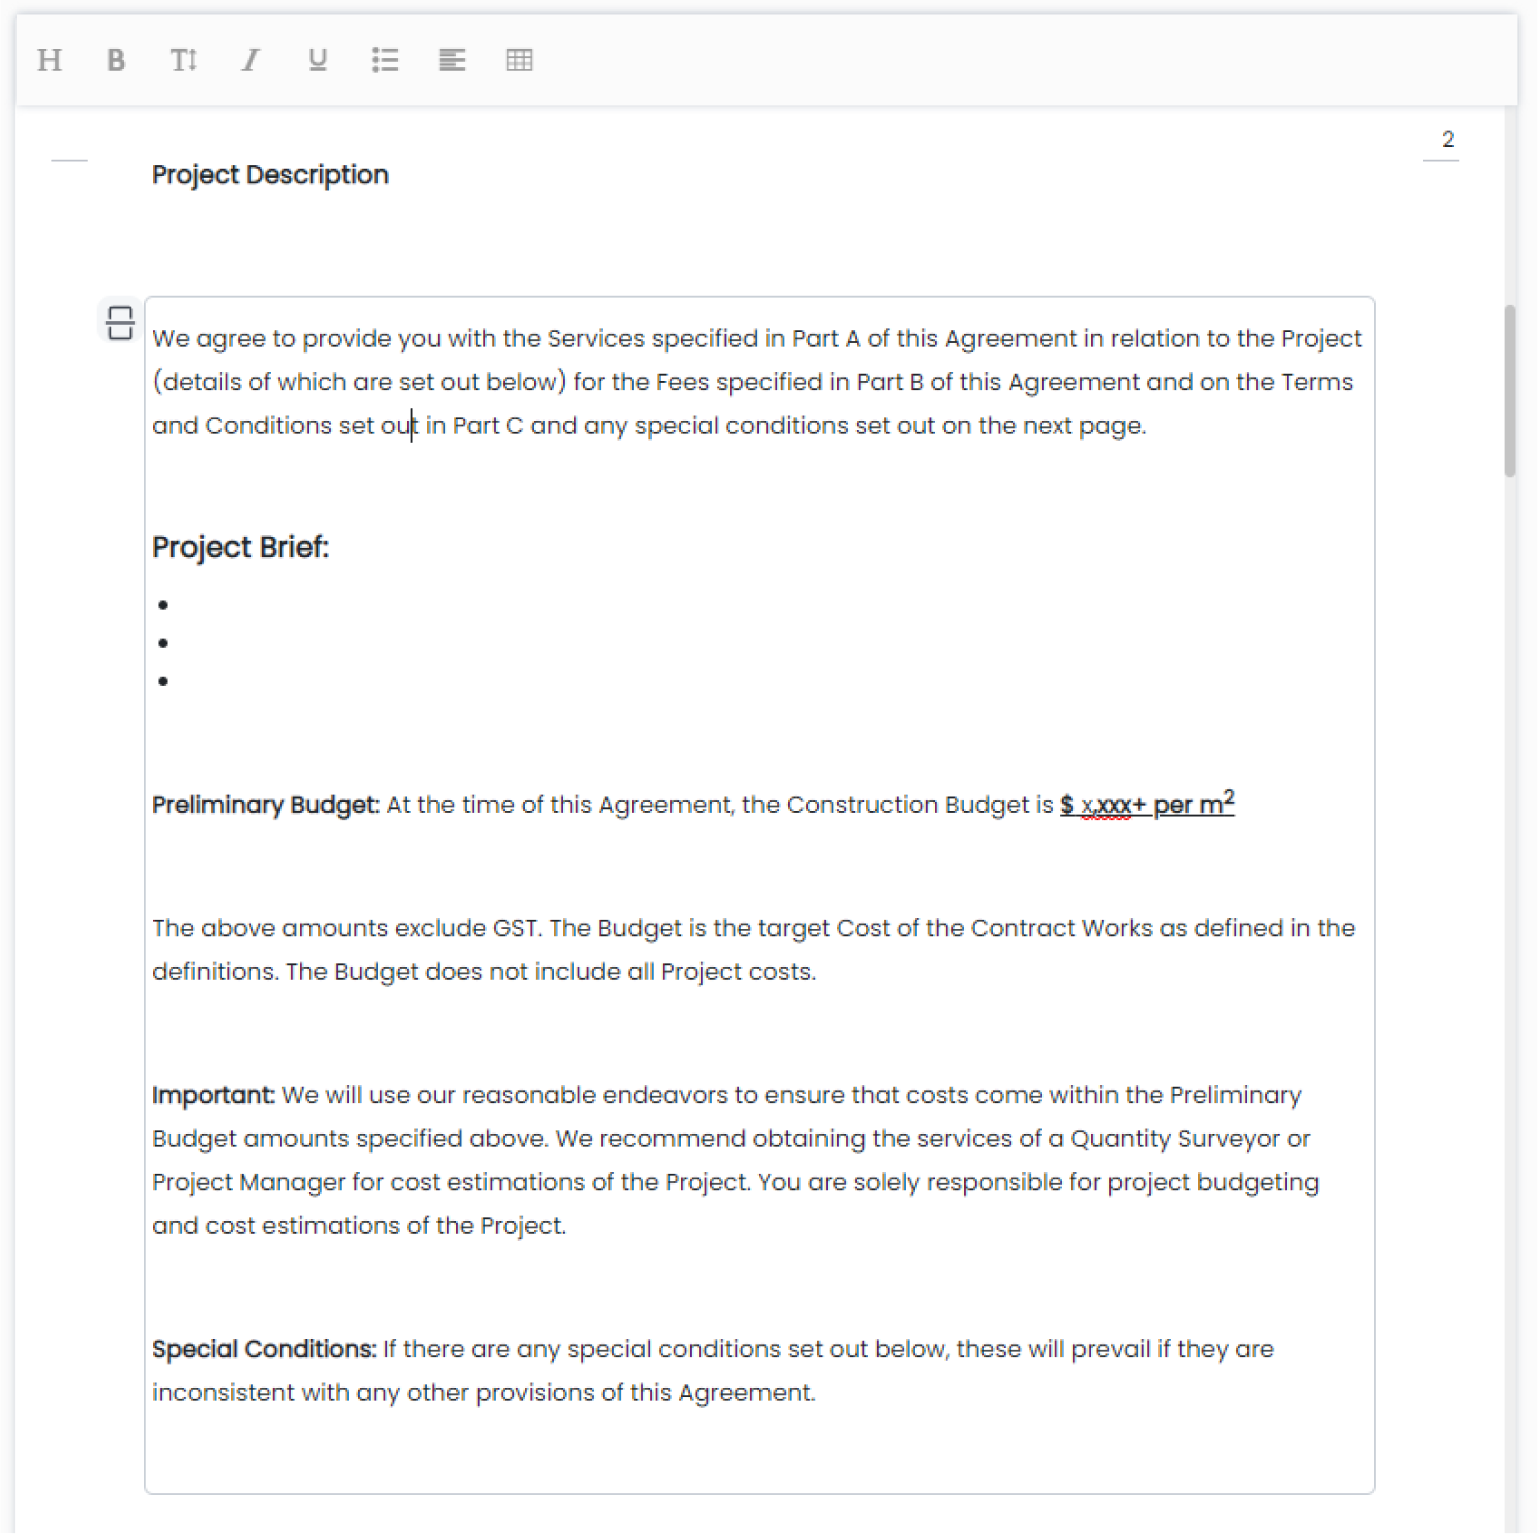
Contract description and text
You can add as many text and image sections to your contract as nececssary. You can also copy the text from your current template and paste that into a new Clarc contract template.This makes Clarc contract builder completely customizable and able to cater to each organisations own way of building their contract.
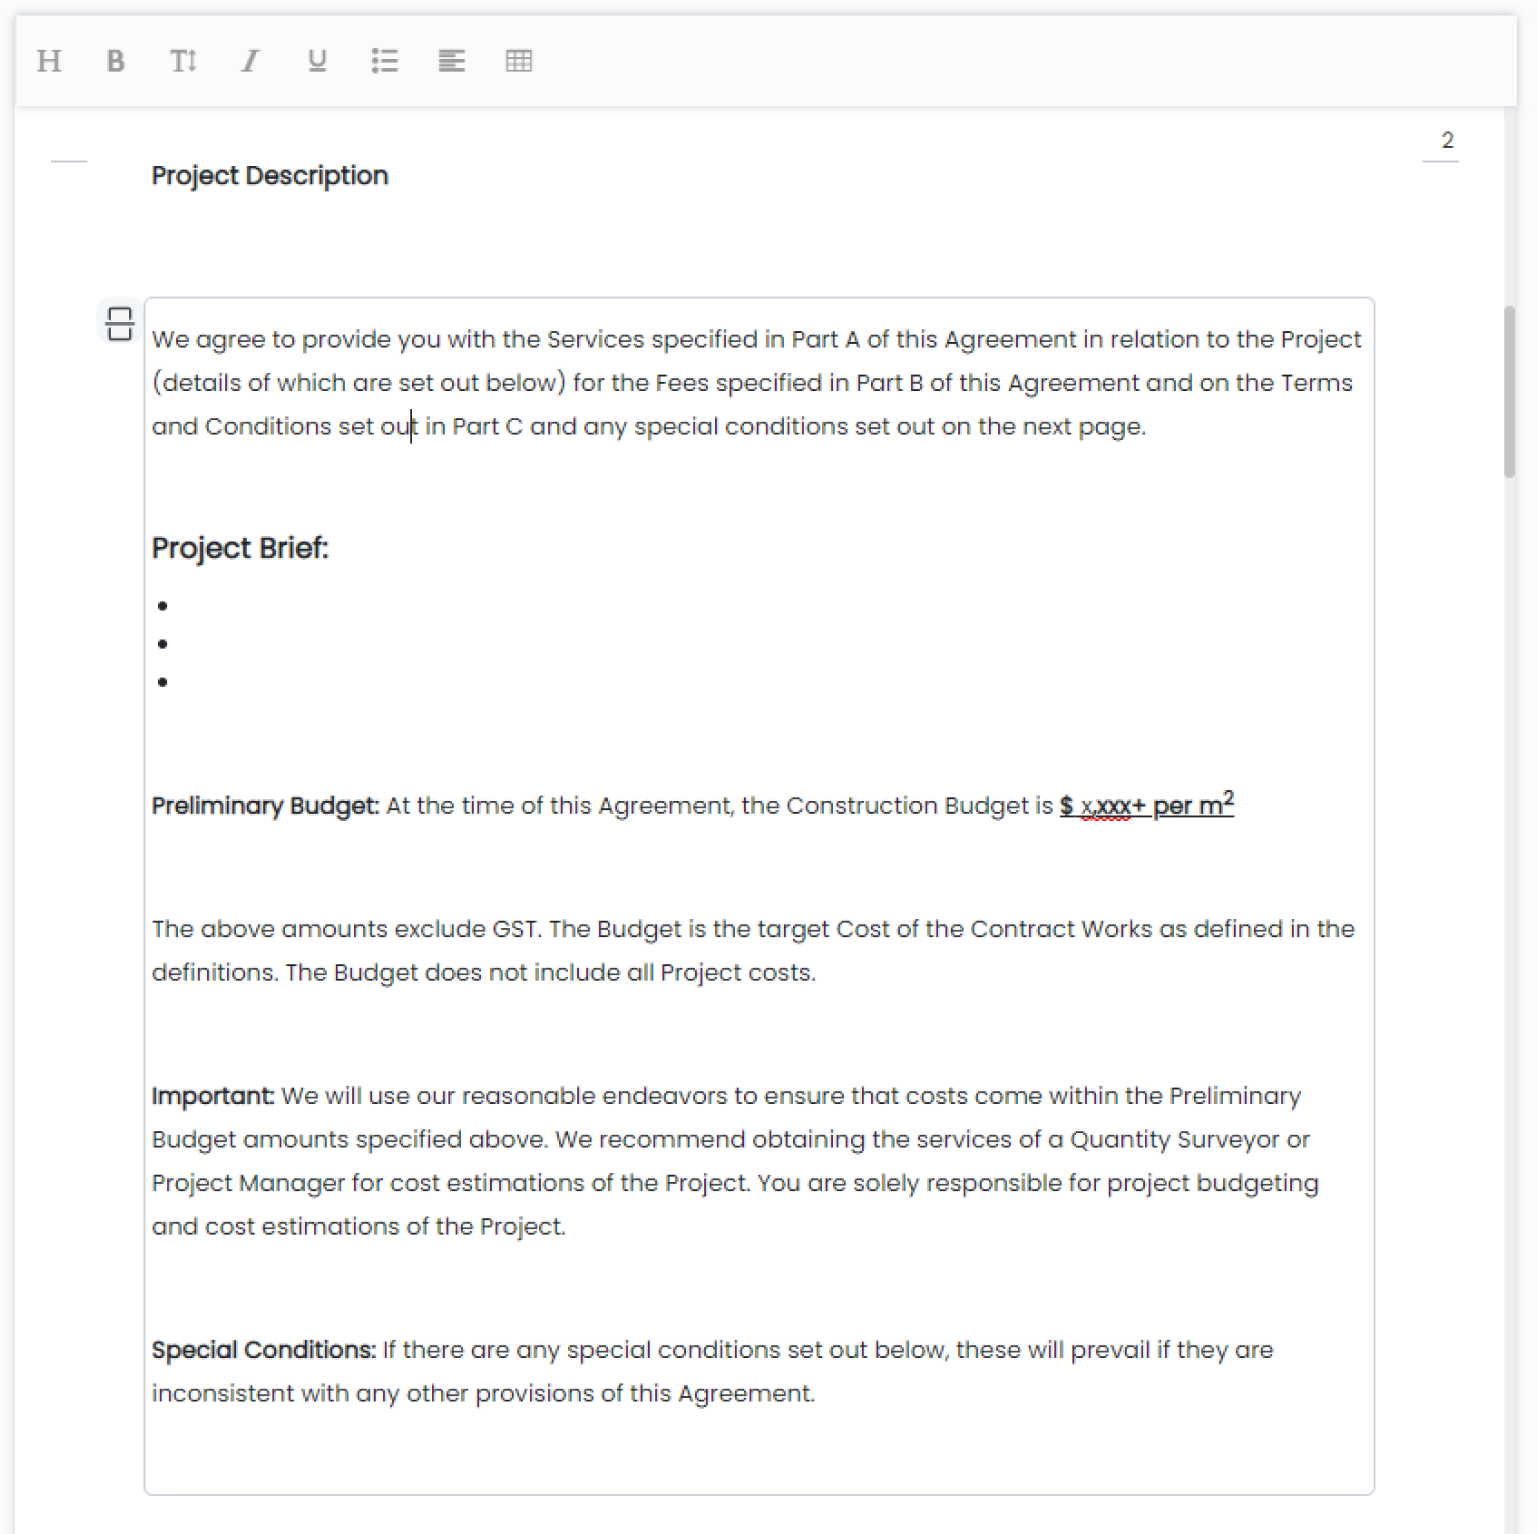
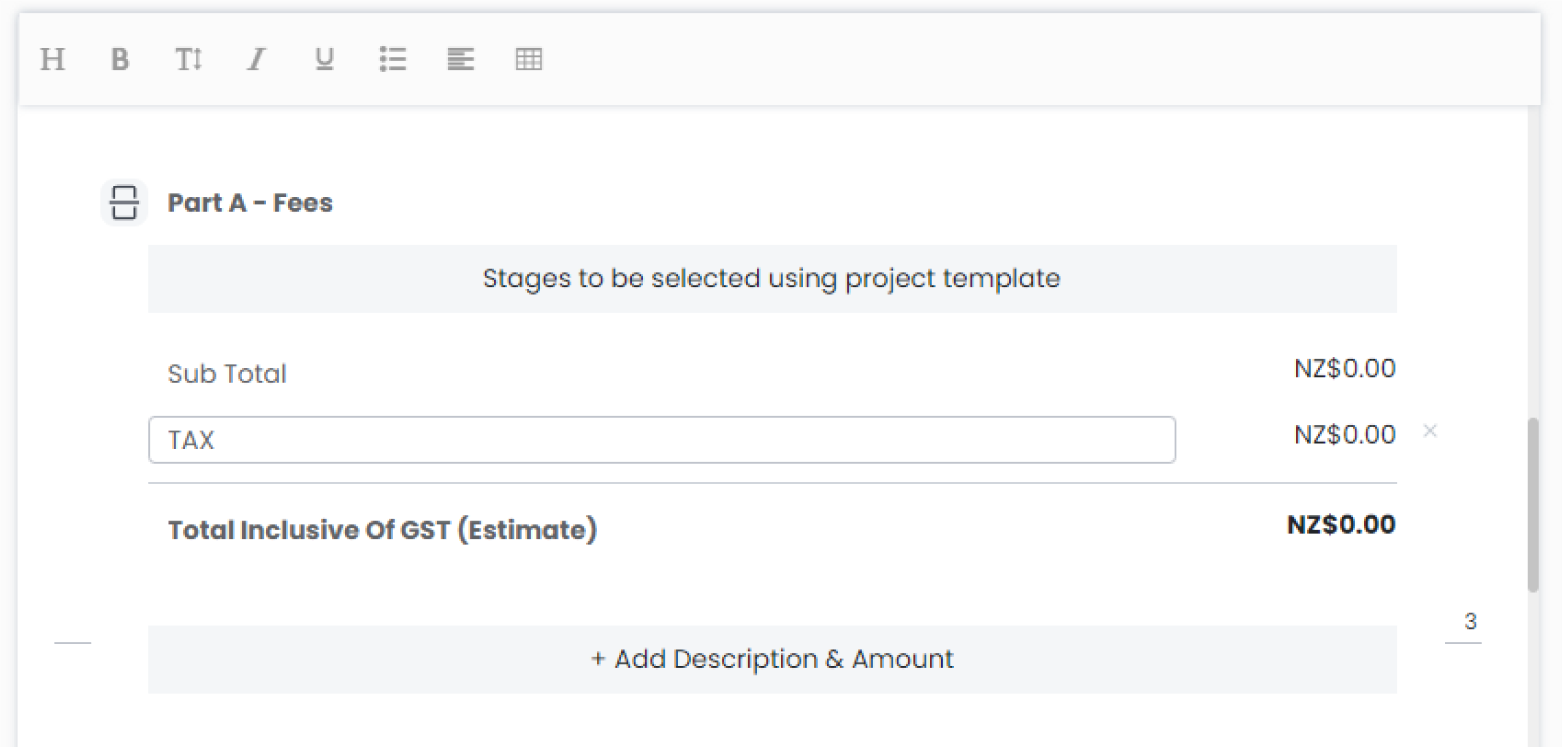
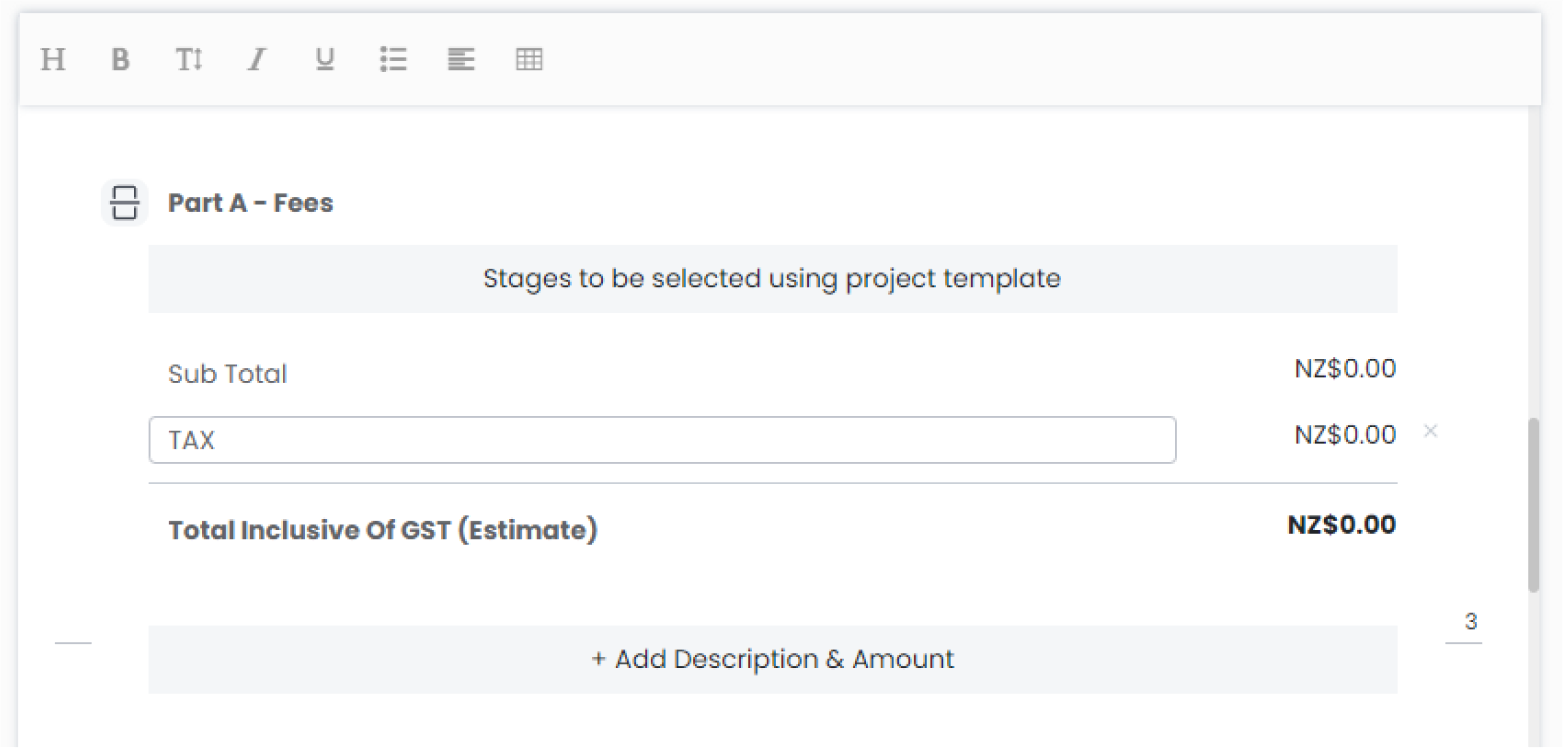
Contract fee builder
One of the key features of Clarc’s contract function is the fee builder.
This function connects directly to your project budgets to automate project setup and streamline invoicing.
The fee builder is not part of the contract template itself but can be populated from project templates when creating a new contract.
Email Settings
From your admin settings, head to the Email Settings tab. Your email settings determine all the outgoing emails you send from Clarc.
Reply email

1. This is your current reply email. This is the email that will receive all replies to emails that you send out from Clarc.
2. To change your reply email, type the new email into the email text box and click the verify button to verify the new email address. The button will update to ‘Verified’ once you have done this.
Email templates
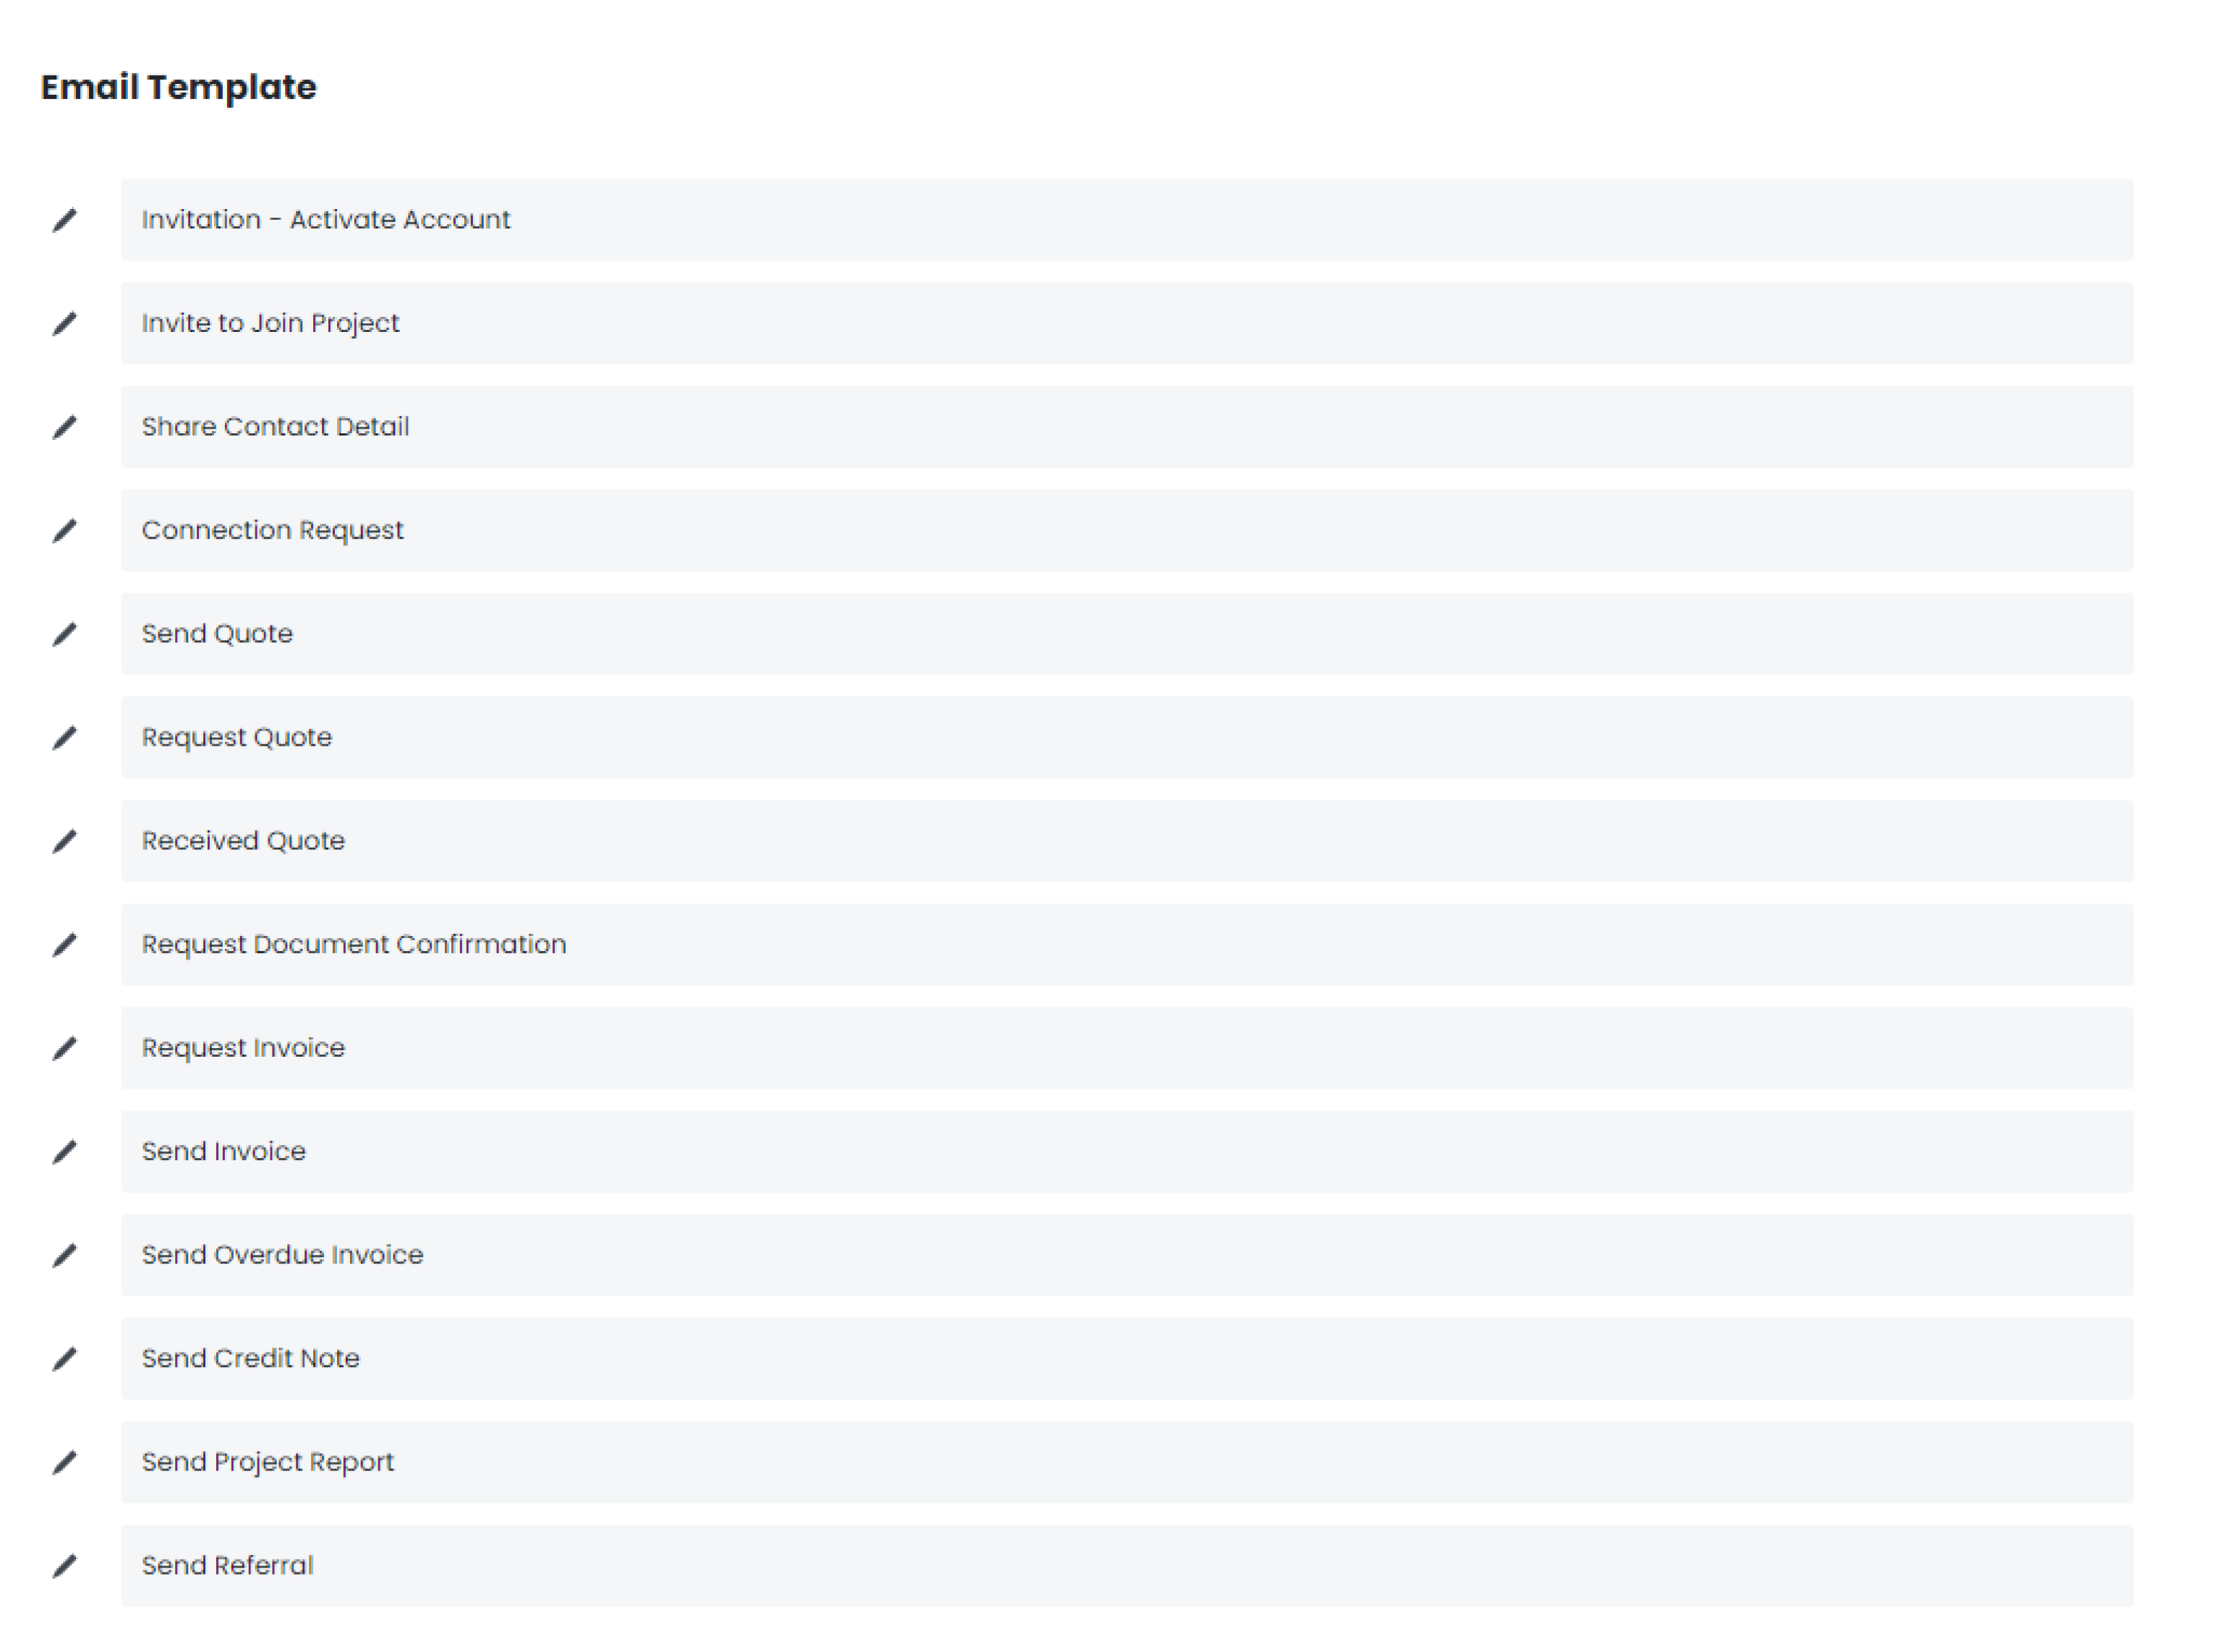
Clicking on any of the edit buttons to the left of each email template will allow you to edit the selected template. Email templates are used for all information that is sent out from your Clarc account. Customising these templates allows you to add an extra layer of personalisation to outgoing emails that your clients and others receive from your Clarc account.
How to edit email template
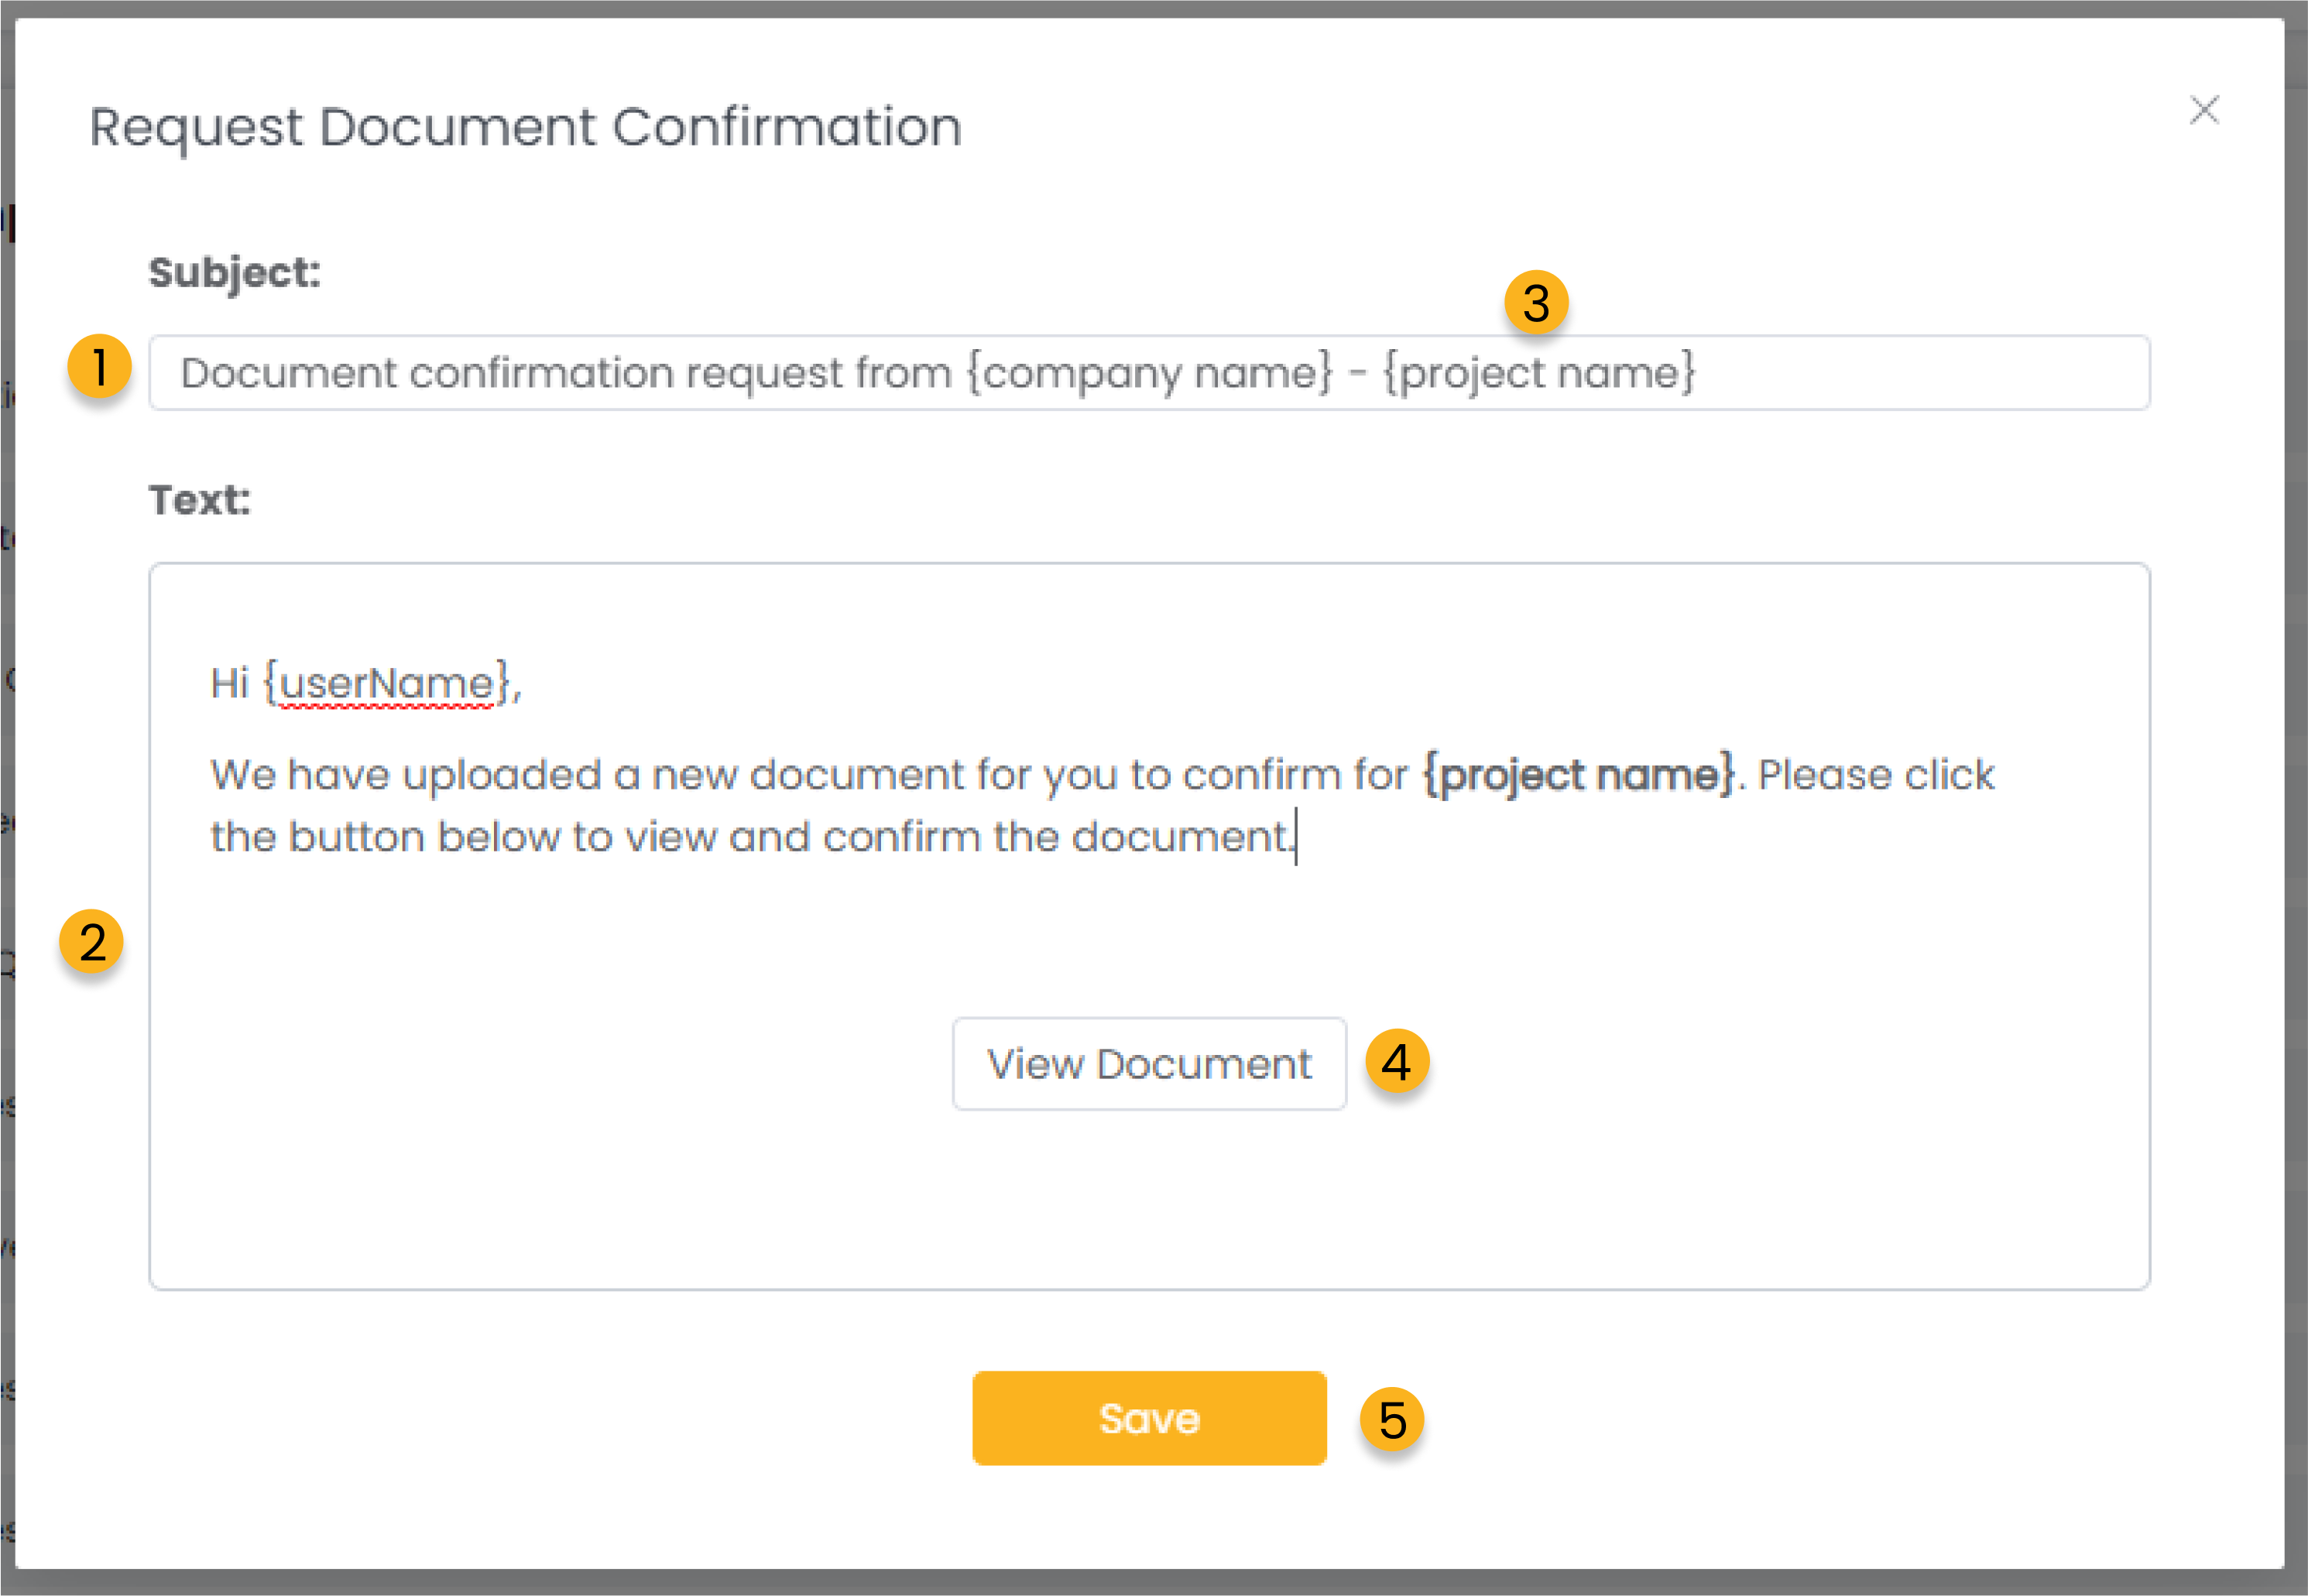
After you click the edit button on one of your email templates you’ll be presented with a pop-up window similar to this one.
1. Fill in the subject line of your email similar to the way you would from your traditional emailing tool.
2. Edit and add any text you would like to have templated for the relevant email template. The one shown is for document confirmations sent out from Clarc.
3. All items show in {brackets} are connected to information points within Clarc. These will automatically fulfill with the relevant information of the person and project you are sending this document for.
4. Any buttons that appear in your email template are fixed and cannot be changed.
5. Once you have finished editing your email template, click the save button to close the window.
Sent email history
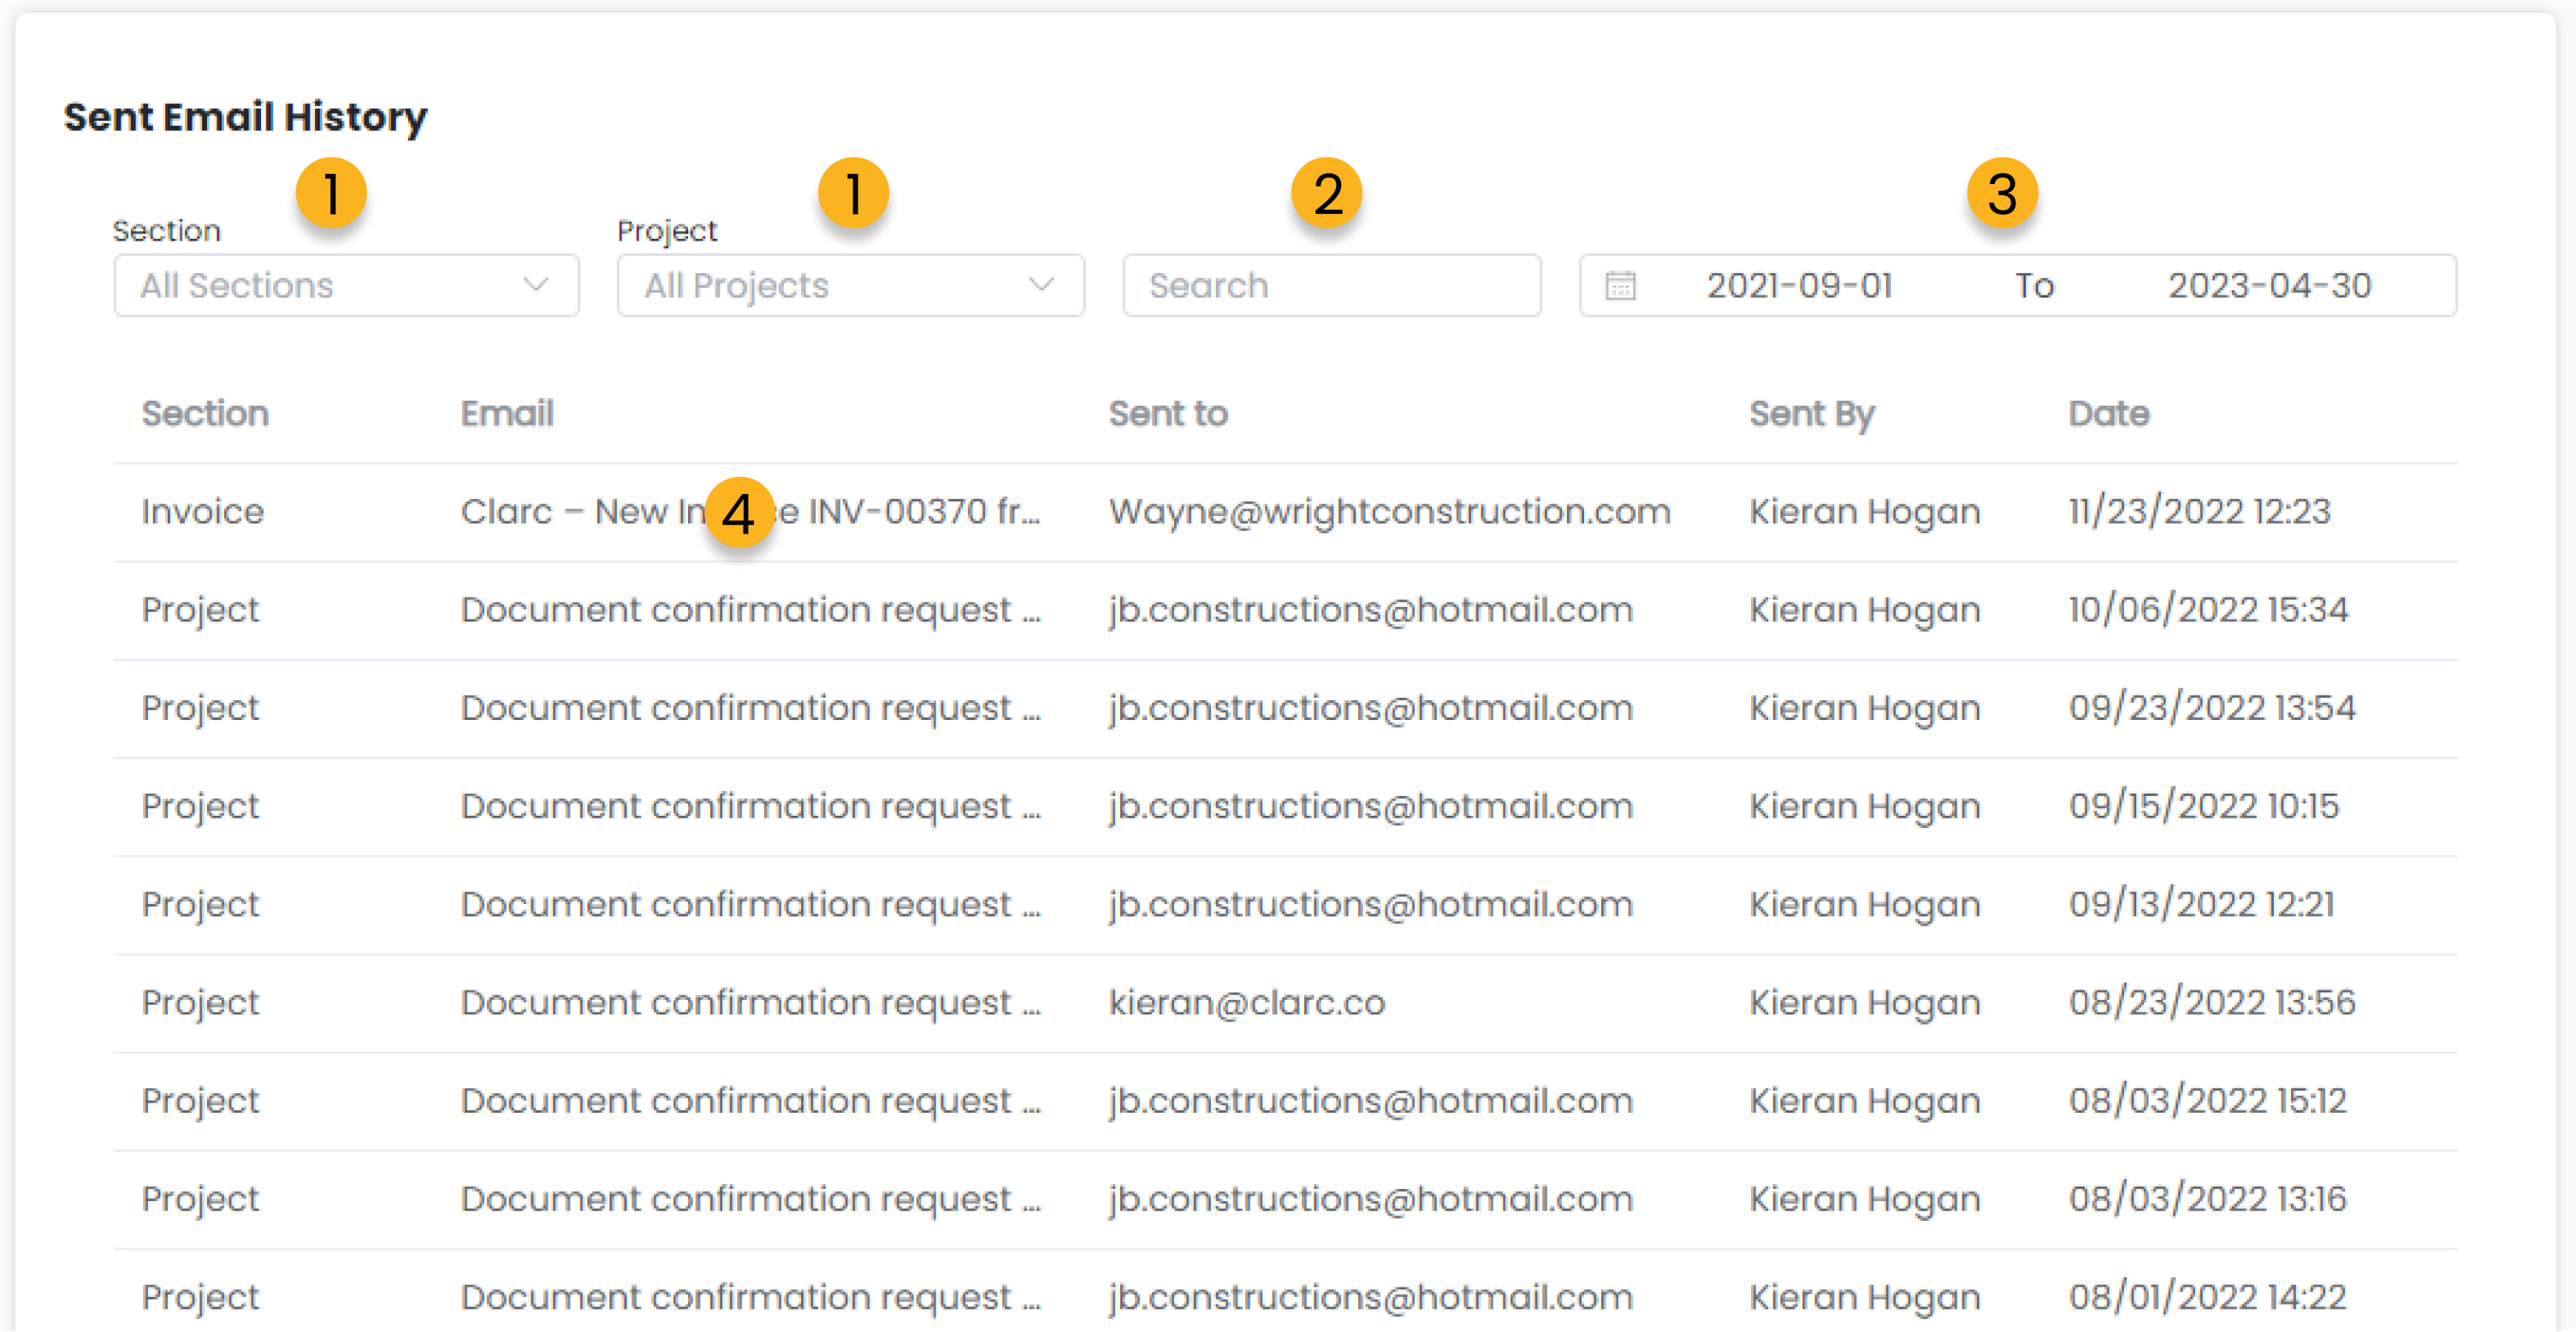
1. Select the filters you wish to view sent emails for.
2. Search for specific emails in your sent history.
3. Select a date range you wish to view sent emails for.
4. Click the email type in the sent history to preview the email itself.
Payment & Billing
From your admin settings, head to the Payment & Billing tab.
From here to can manage your payment details and update or change your subscription model.
Payment details
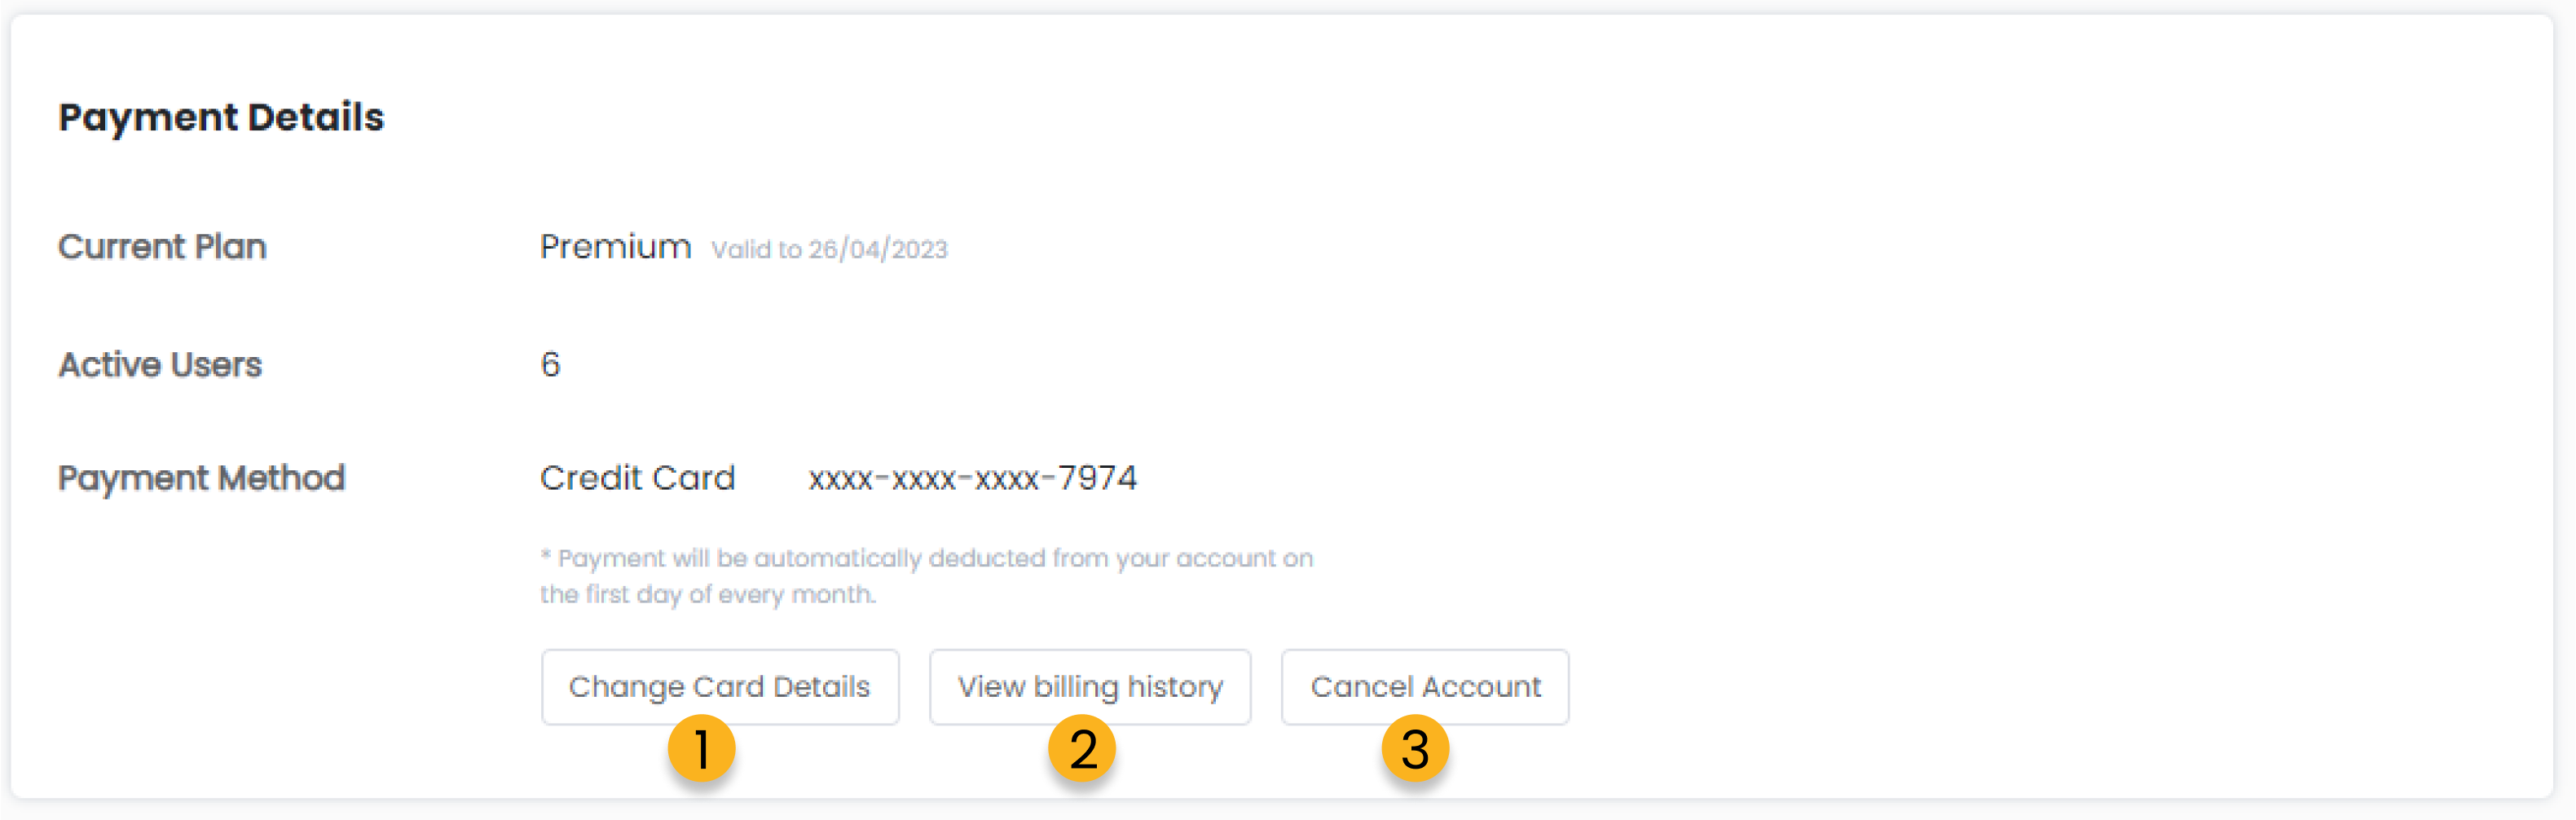
1. Change your credit/debit card details that your subscription fee is billed to.
2. View all charges to your card from Clarc.
3. Cancel your current subscription.
Billing Address
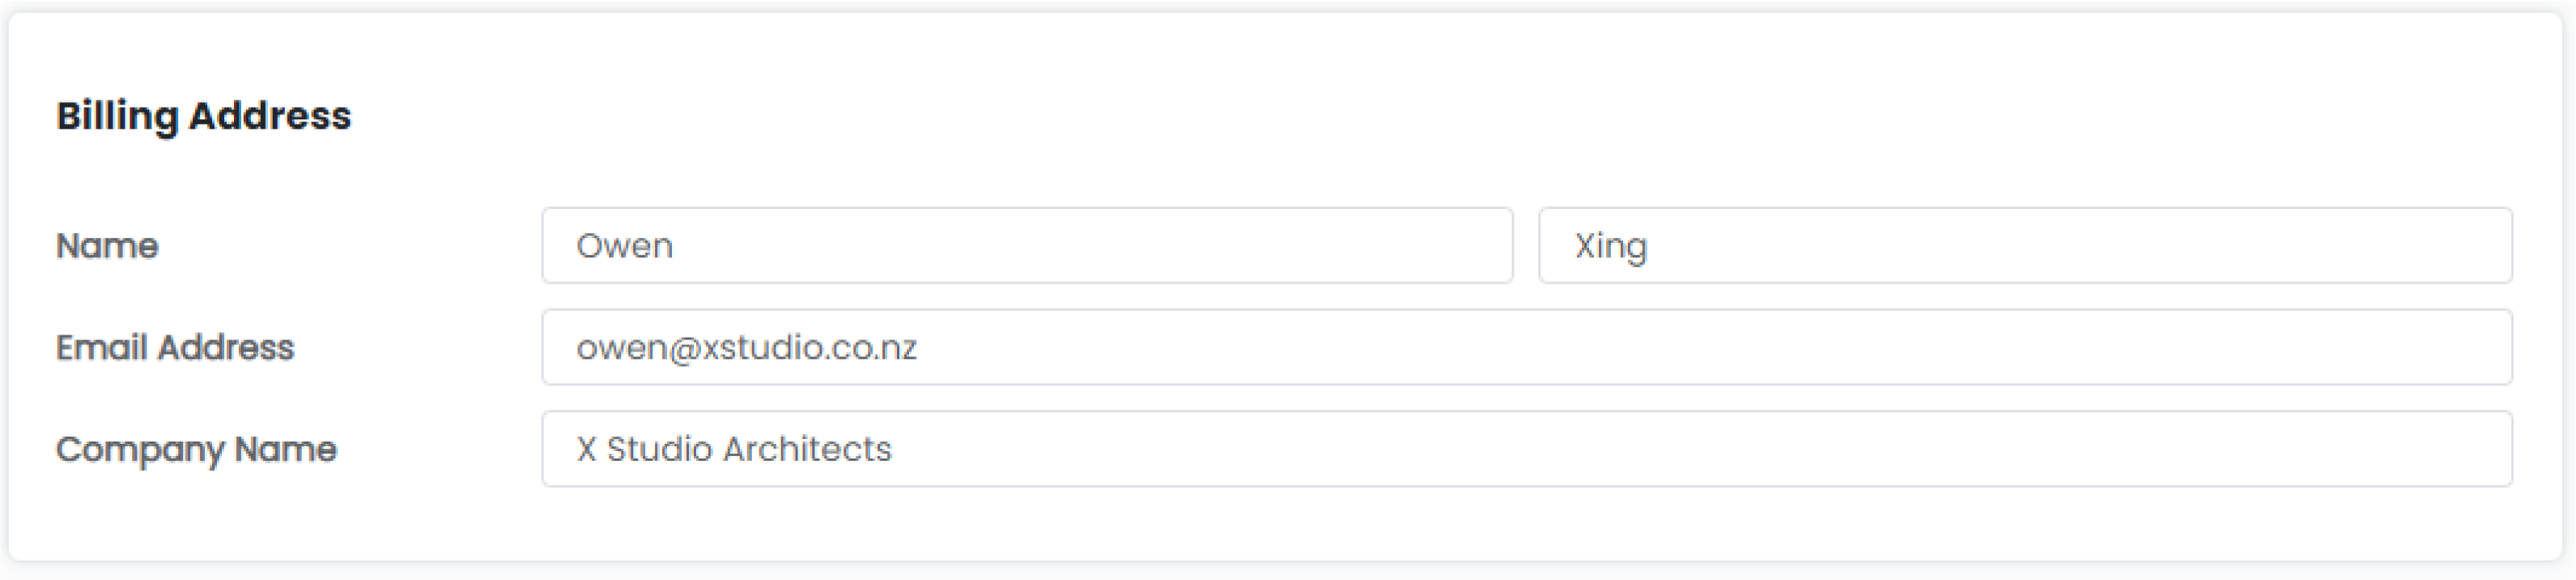
You can change your billing address at any time.
Pricing Details
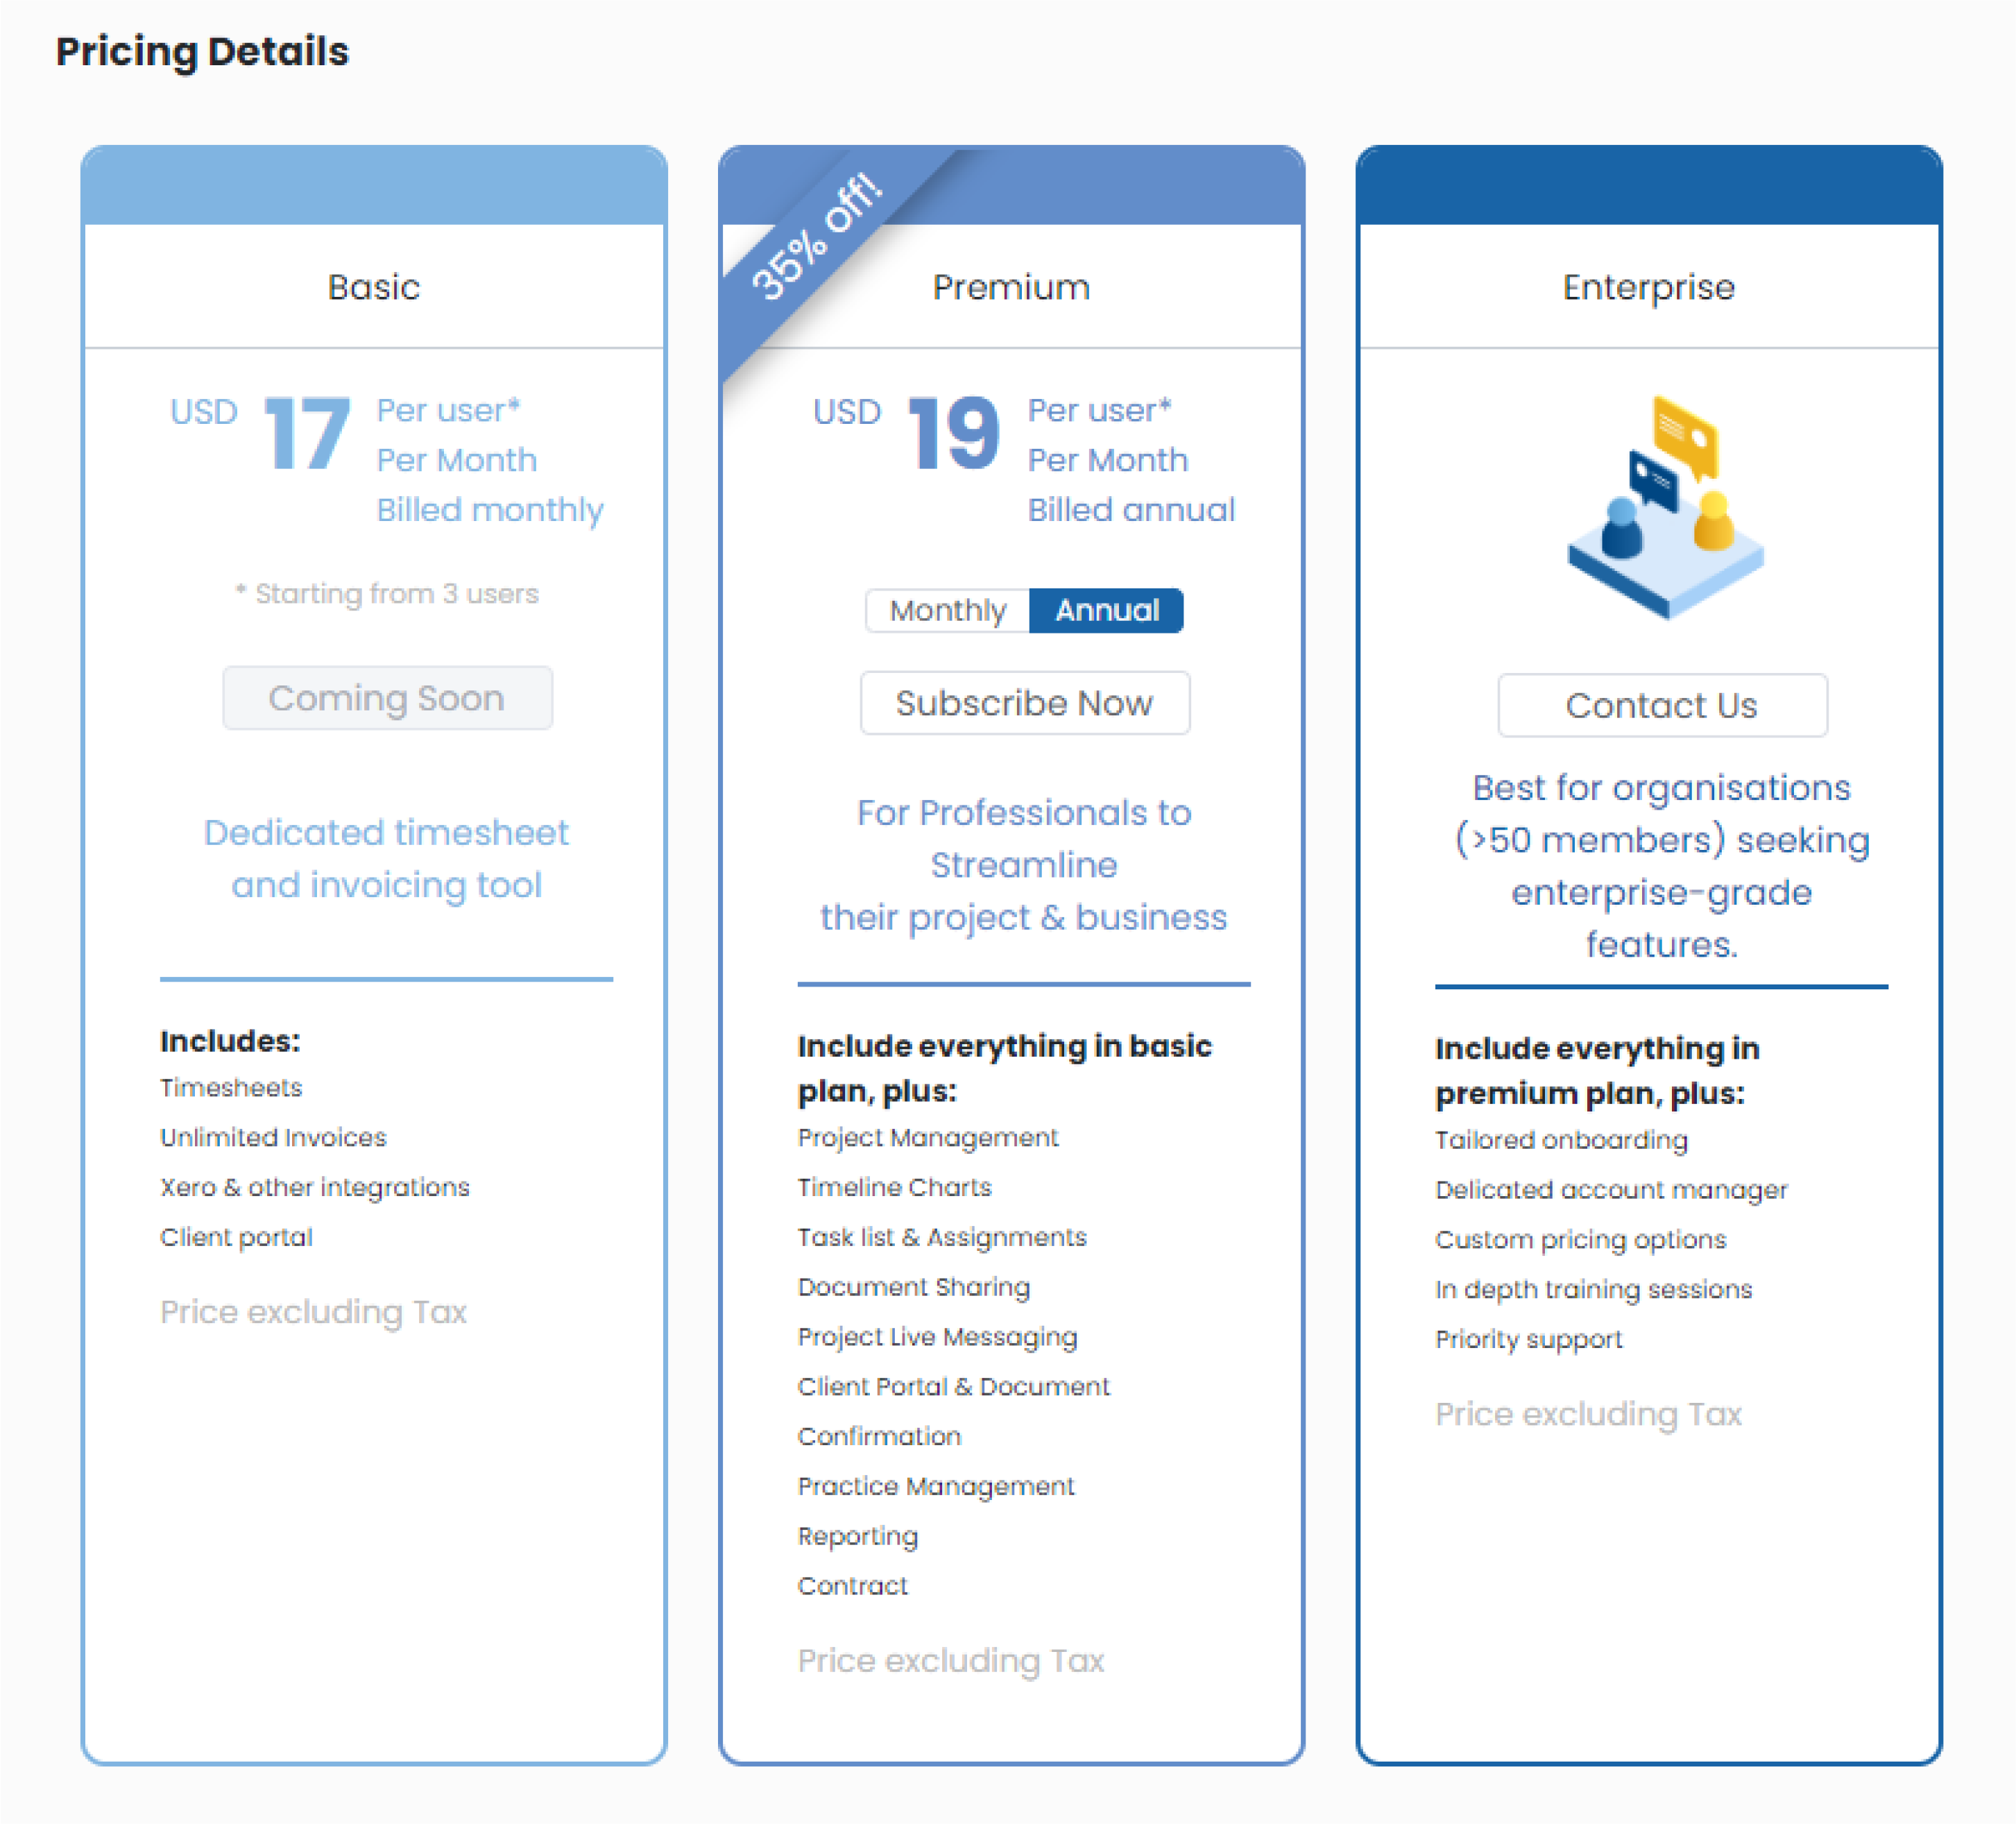
From here you can manage your current subscription type and upgrade/downgrade to another subscription level.
Field Settings
From your admin settings, head to the Field Settings tab.
From here to can edit/add fields to the new project, contact and team member creation windows.
New Project Fields
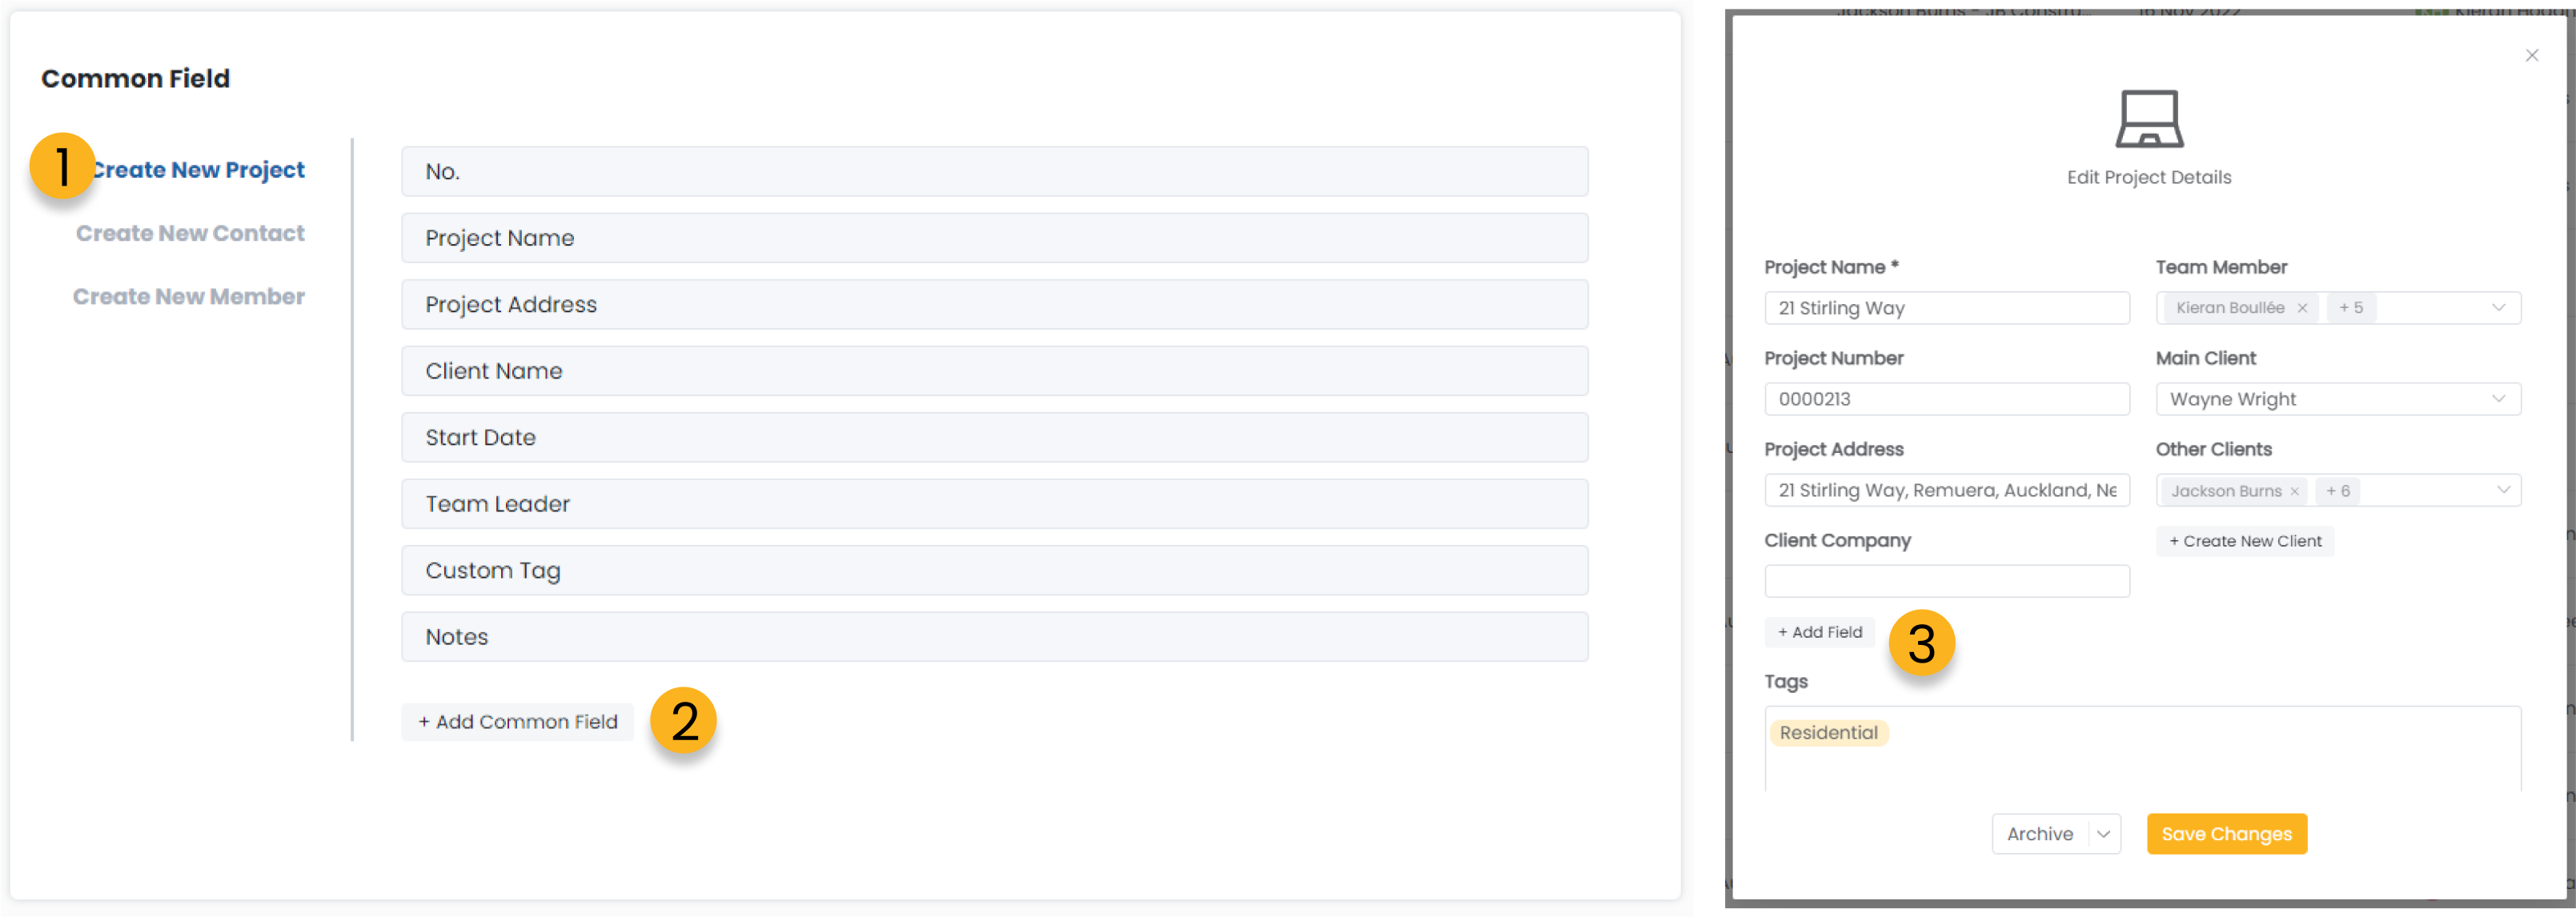
1. Select the creation popup you wish to add/edit custom fields for.
2. Click to add a new field line.
3. In the popup window your new line will appear here by default. You can also add a new line from the project creation window, but this will be custom only to this project. If you wish to see the custom field for all of your projects you must create that custom field1 from the admin settings.
New Contact & Team Member Fields
Adding fields for team members and contacts functions exactly the same as the project custom fields. Any fields added in the admin settings will appear in the details of the creation windows for the respective contact creation. Adding a field from the creation window will only appear for the selected contact/team member.
Timesheet & Budget Settings
From your admin settings, head to the Timesheet & Budget Settings tab.
Edit additional timesheet information and requirements for your team to input when completing their timesheets.
Project Budget & Profit Setting
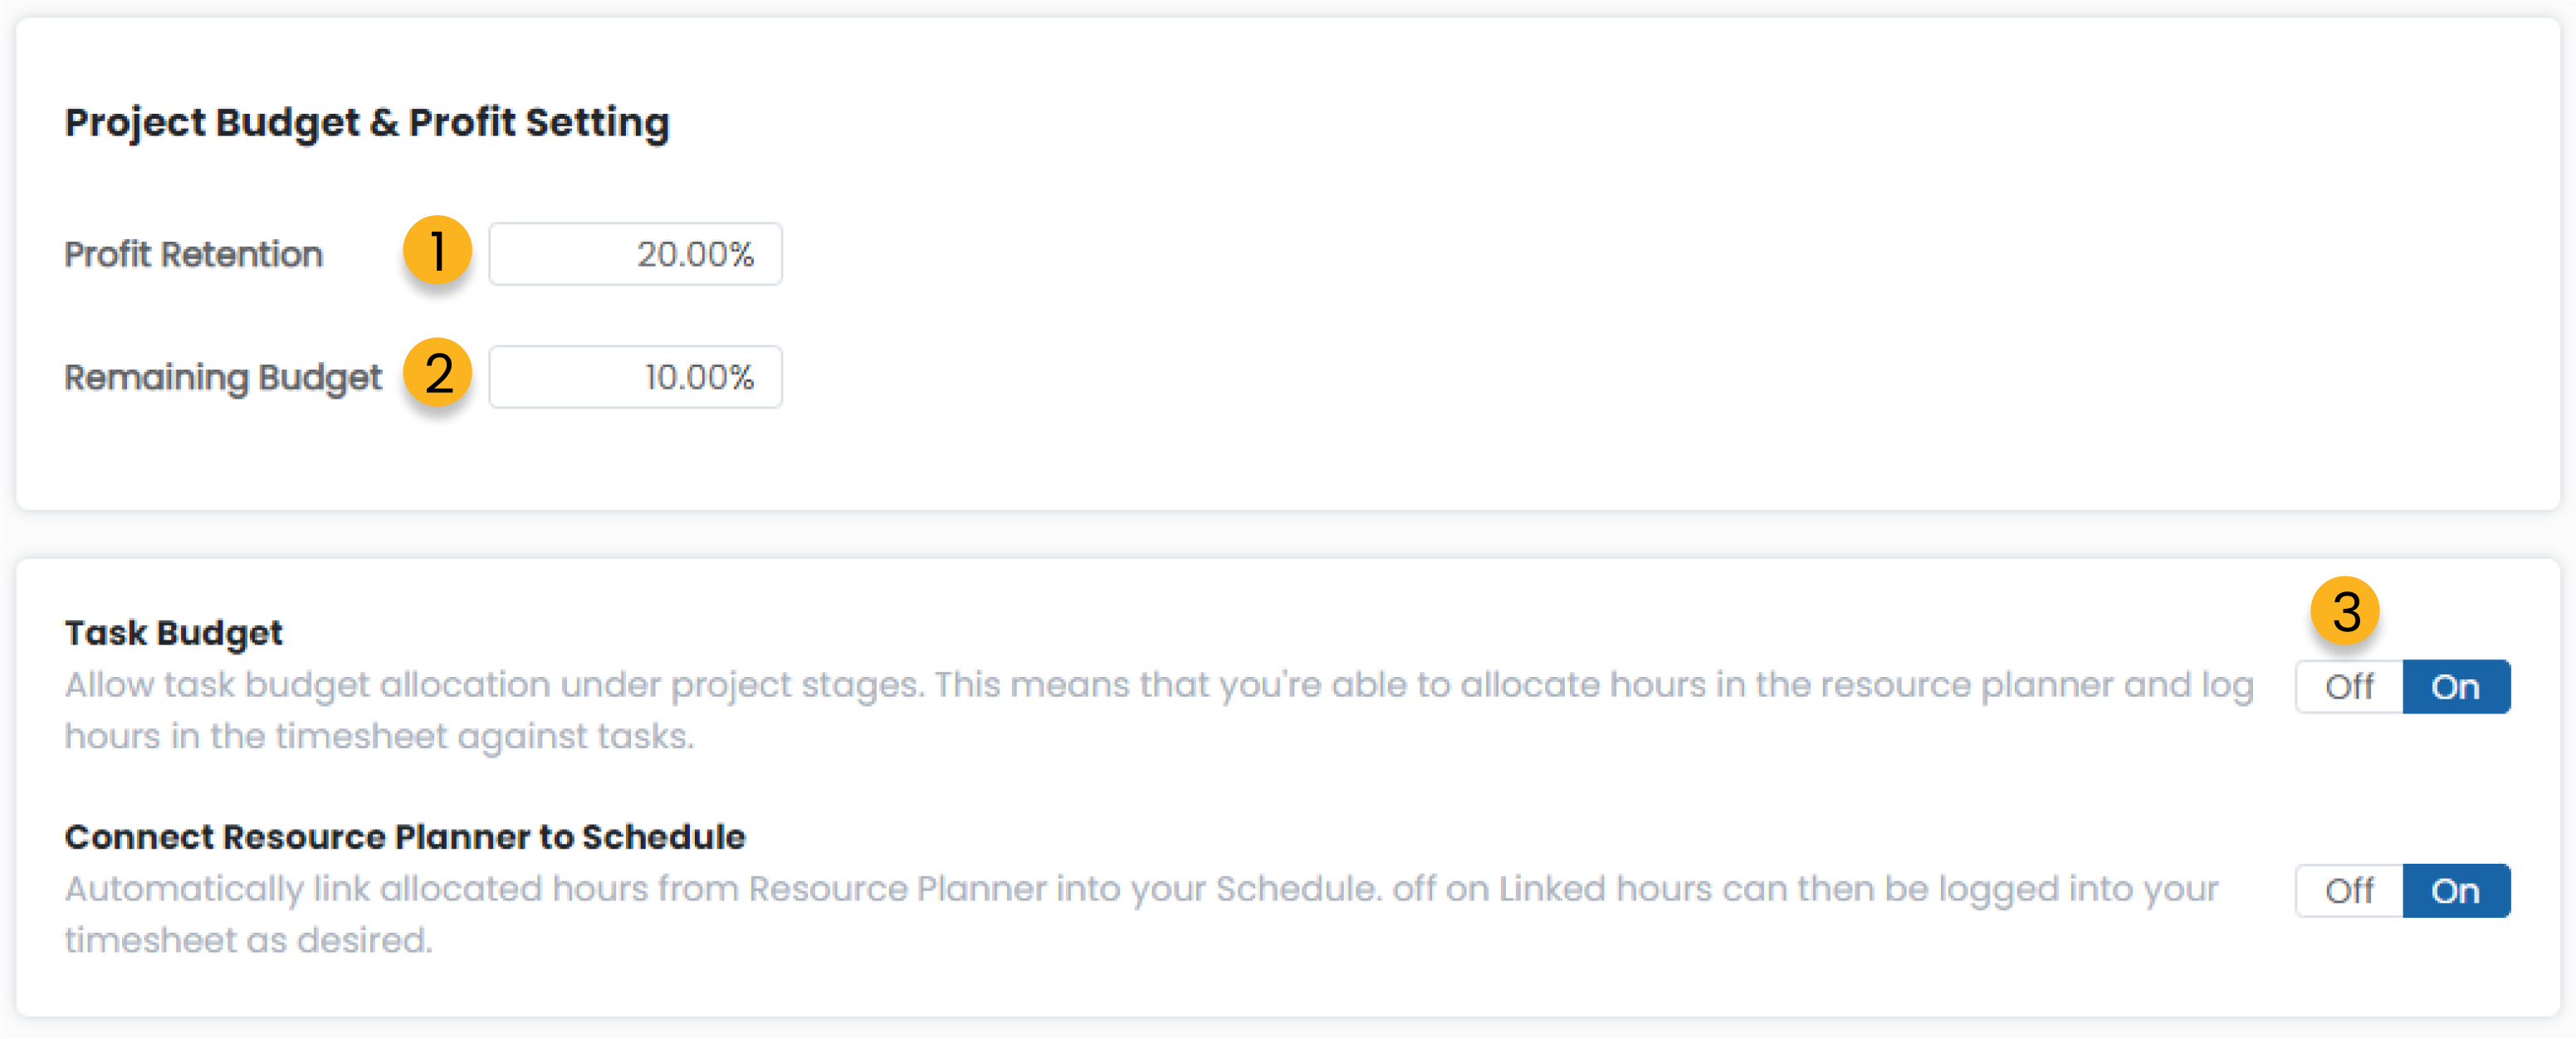
1. Profit retention value is the amount automatically separated from the overall contract budget that you wish to retain as profit for your projects. The remaining (in this case 80%) will be distributed as budget to your stages/tasks.
2. Remaining budget is the leeway you want to allow for potential overruns in your stage/task budgets. In this given example, the total budget is 80% of the contract value, 10% of that will then be held and the remainder will be distributed to your stage/task budgets. If one of your stages/tasks is to then overrun it’s own budget, rather than eating into your profit retention it will begin to use the remaining budget first.
3. To enable budgets on tasks for more granular budget management, toggle this function on. Once toggled on, your team will now be able to enter their time toward tasks as well as stages.
How to turn on/off notes in timesheets

1. Toggle notes requirements on/off for your teams time entry.
Referrals & Credits
You can find the following actions/options from your admin settings.
From your admin settings, head to the Referrals & Credits tab.Referring other companies earns you credits for discounted subsciptions and gives your referee a discount too!
How to refer a friend
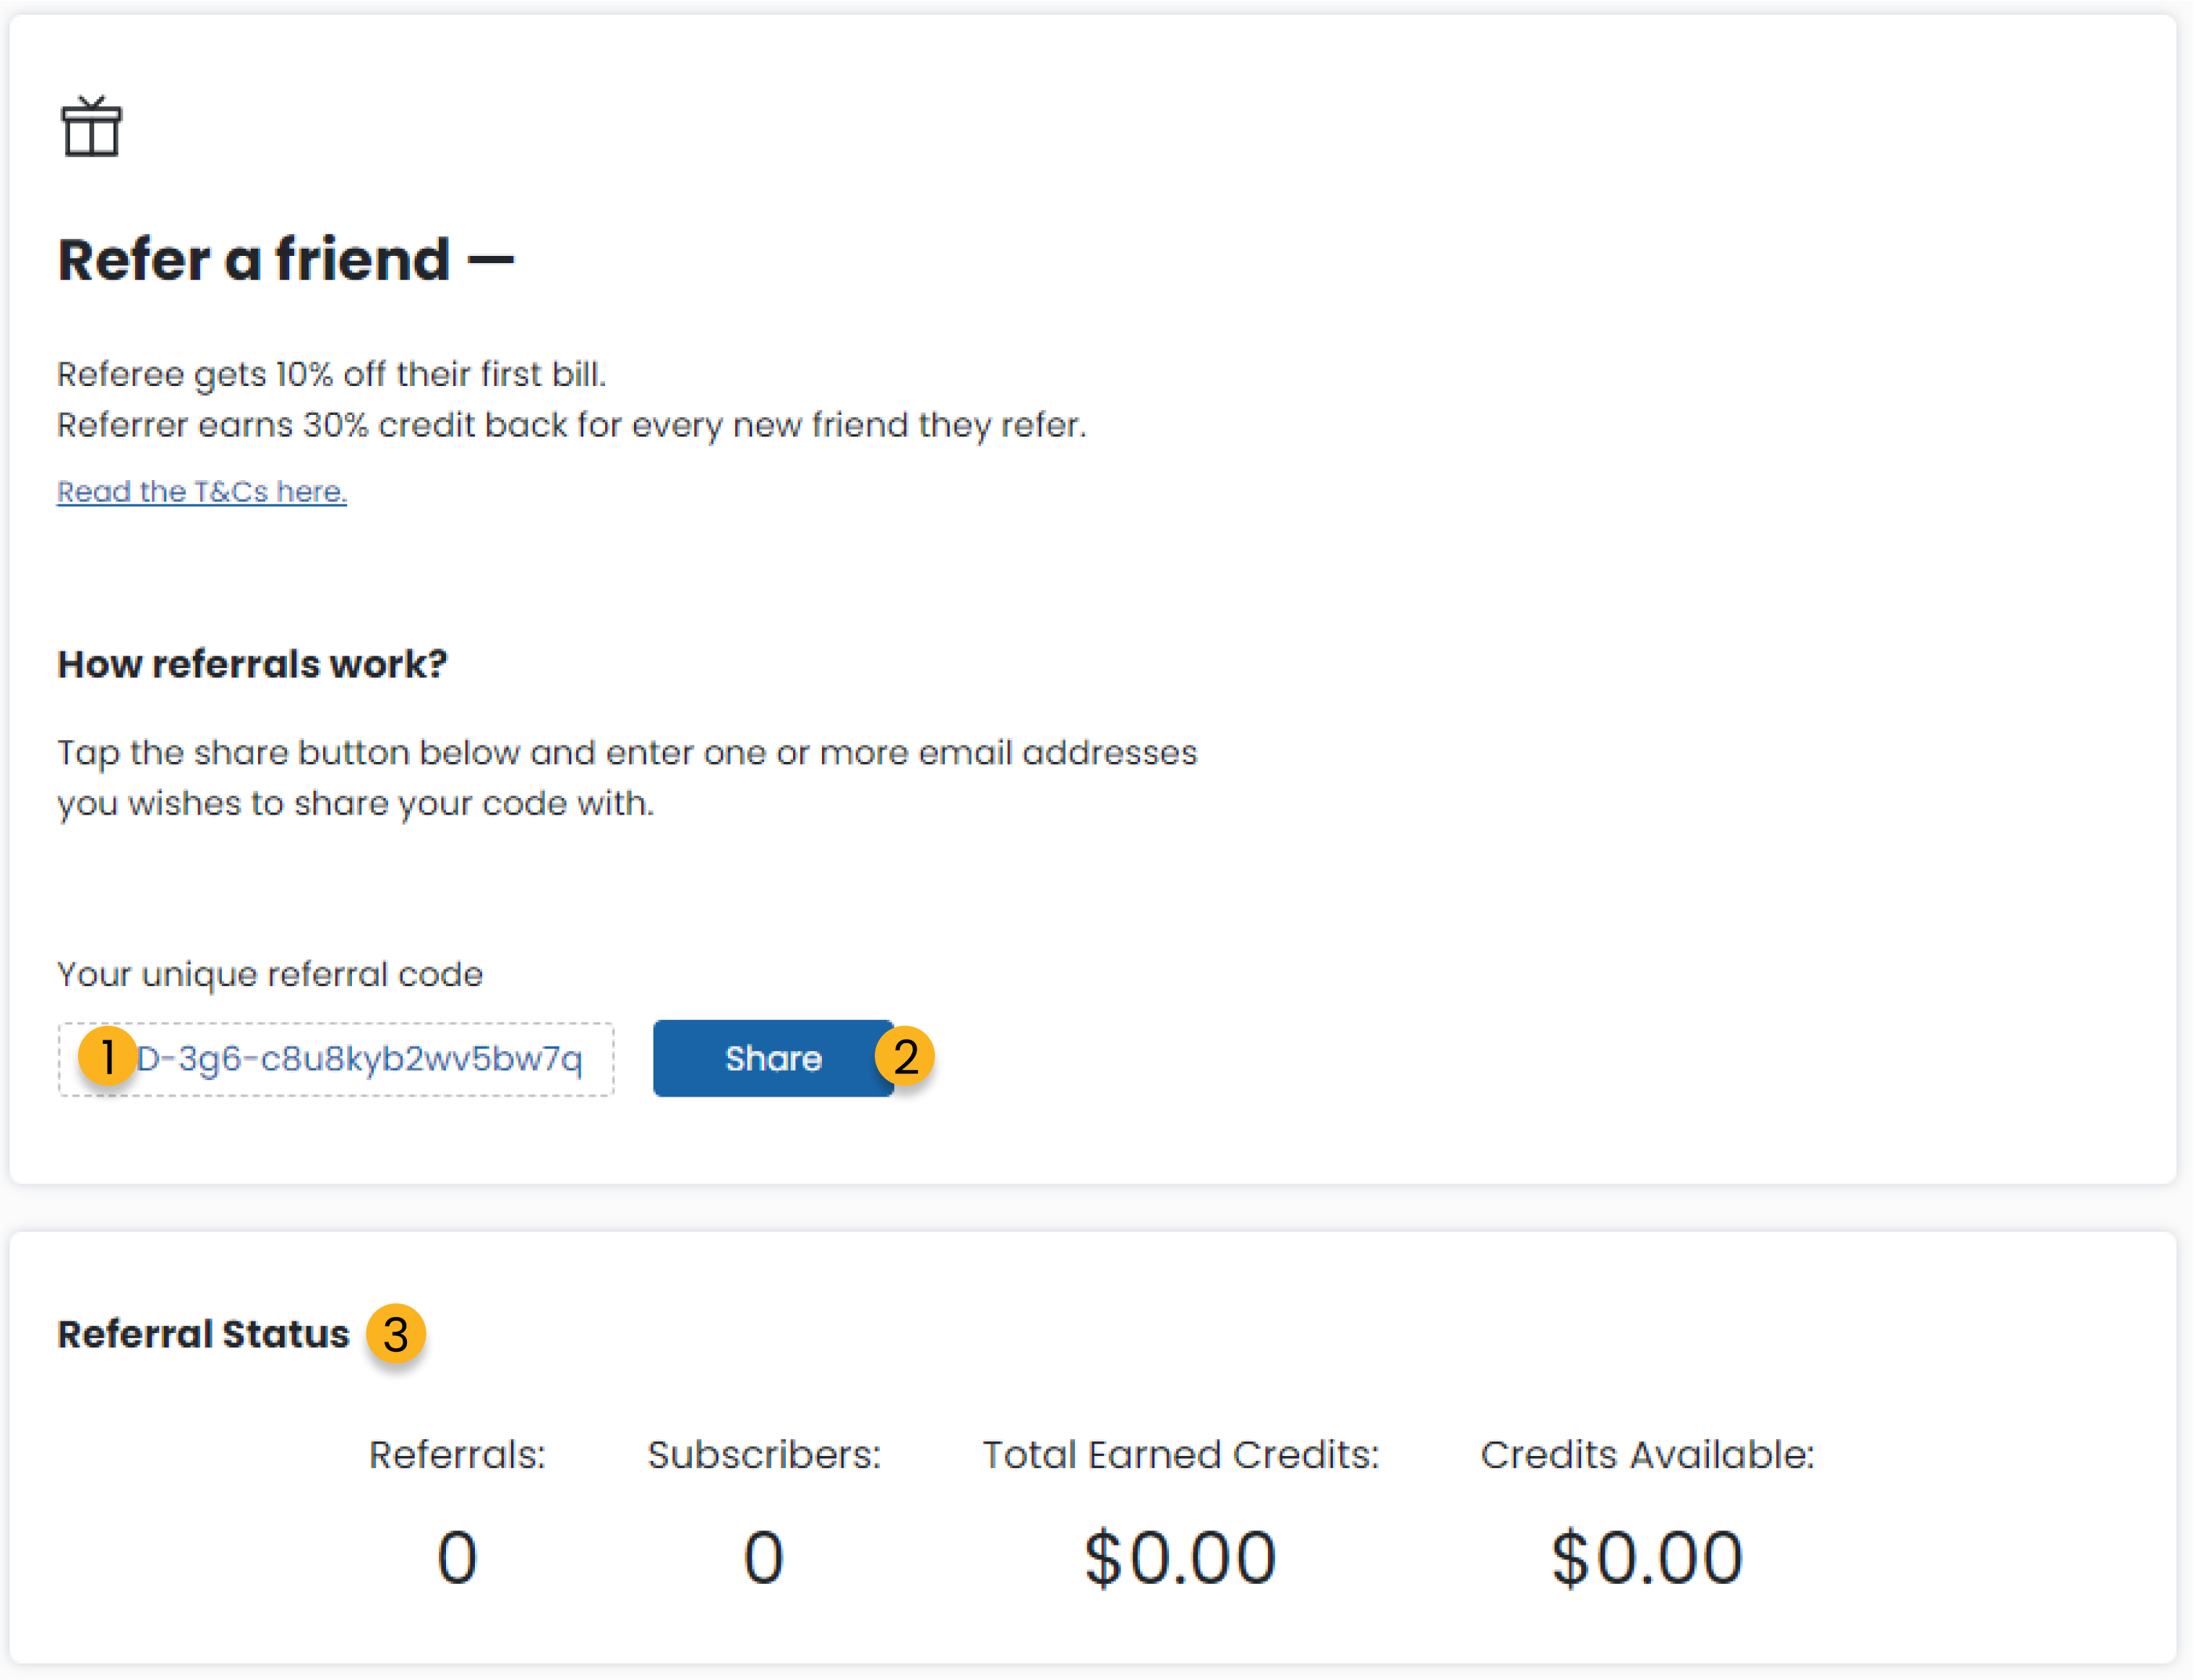
1. This is your unique code, you can copy this code and share it to a friend yourself for them to sing up with to score both of your some nice bonuses.
2. Rather than copying the code and sharing it manually you can hit the share button which will open up an email template for you to send the referral link to as many people as you like.
3. Your referral status are the statistics related to your current referrals. From the number of total referrals you have made to the earned credits that you can use toward your next Clarc bill.
Project List

From anywhere in Clarc, if you click the project function button this will take you directly to your project list.
Your project list helps you manage projects as a whole, maintain/update template details and create new projects.
Project Creation
What can you do from the project list?
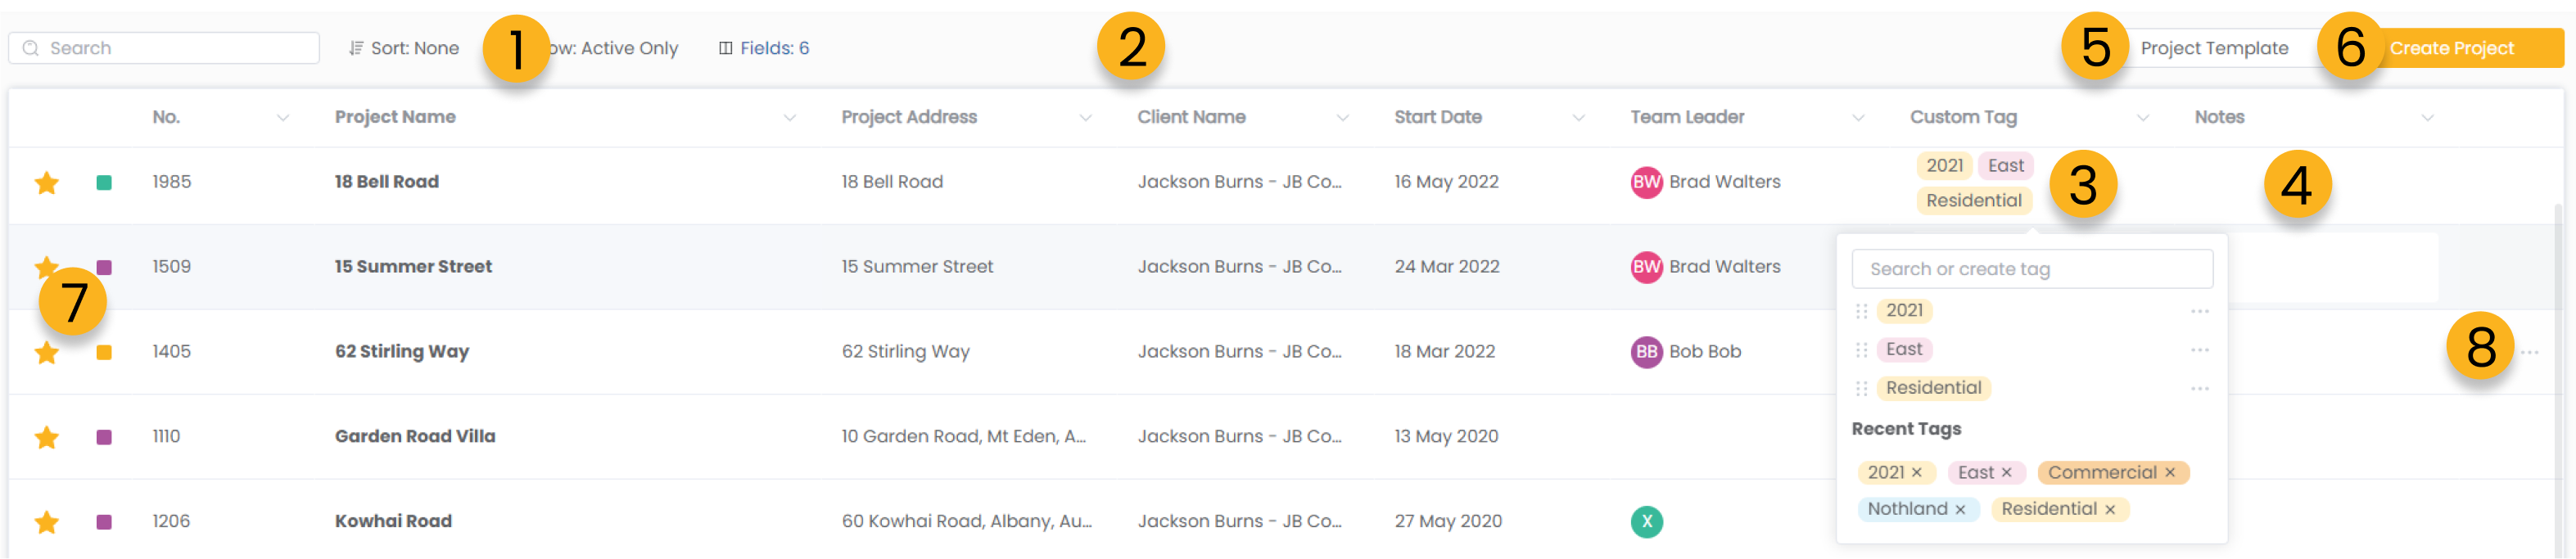
1. Filter your project list.
2. View basic project details for each of your projects in each row.
3. Add custom tags to projects to categorize and sort projects by certain tags.
4. Add custom notes to each project line for quick reference to project info or updates directly from your project list.
5. Click to open up the Project Template creation and edit window.
6. Click to create a new project.
7. Favouriting a project will allow it to appear at the top of your list and also in your personal list of favourited projects within your navigation bar.
8. The ... button will open up the project details edit window.
How to create a project?
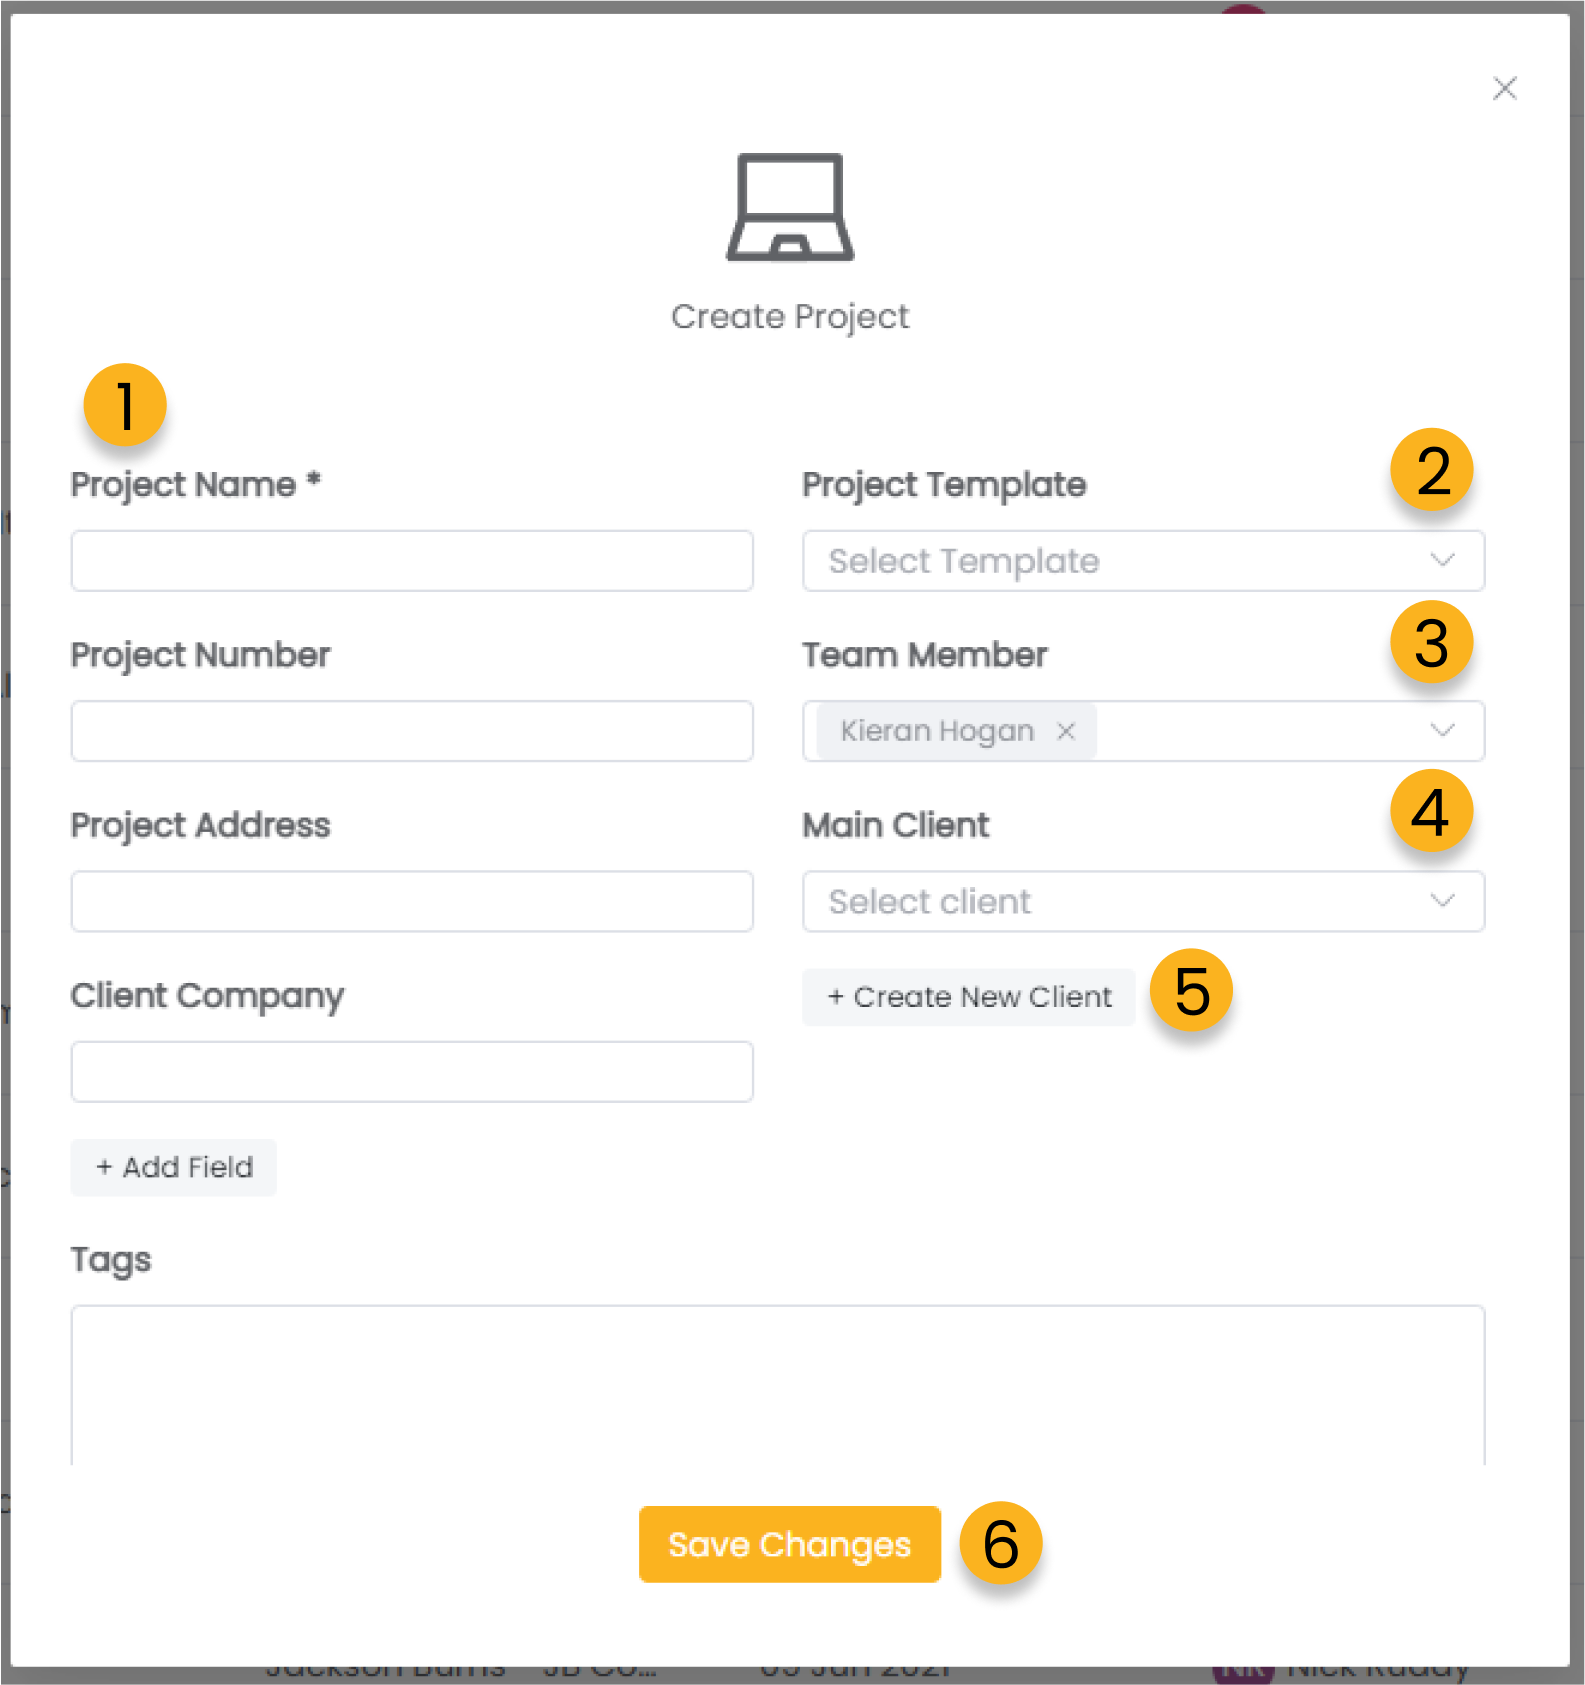
1. Fill in all of your basic project information details.
2. Select a Project Template from your own pre-created project templates.
3. Add team members to your project. These team members will be notified for updates and be able to collaborate with you on this project.
4. Add a client to the project. This can be chosen from your list of current contacts or you can create a new client contact from this window as well.
5. Click to create a new client contact and assign them to this project.
6. Once you have completed entering your project details, click to save and your new project will be created.
Project Templates
How to create a project template?
1. Click the Project Template button to open up the management window for your templates.
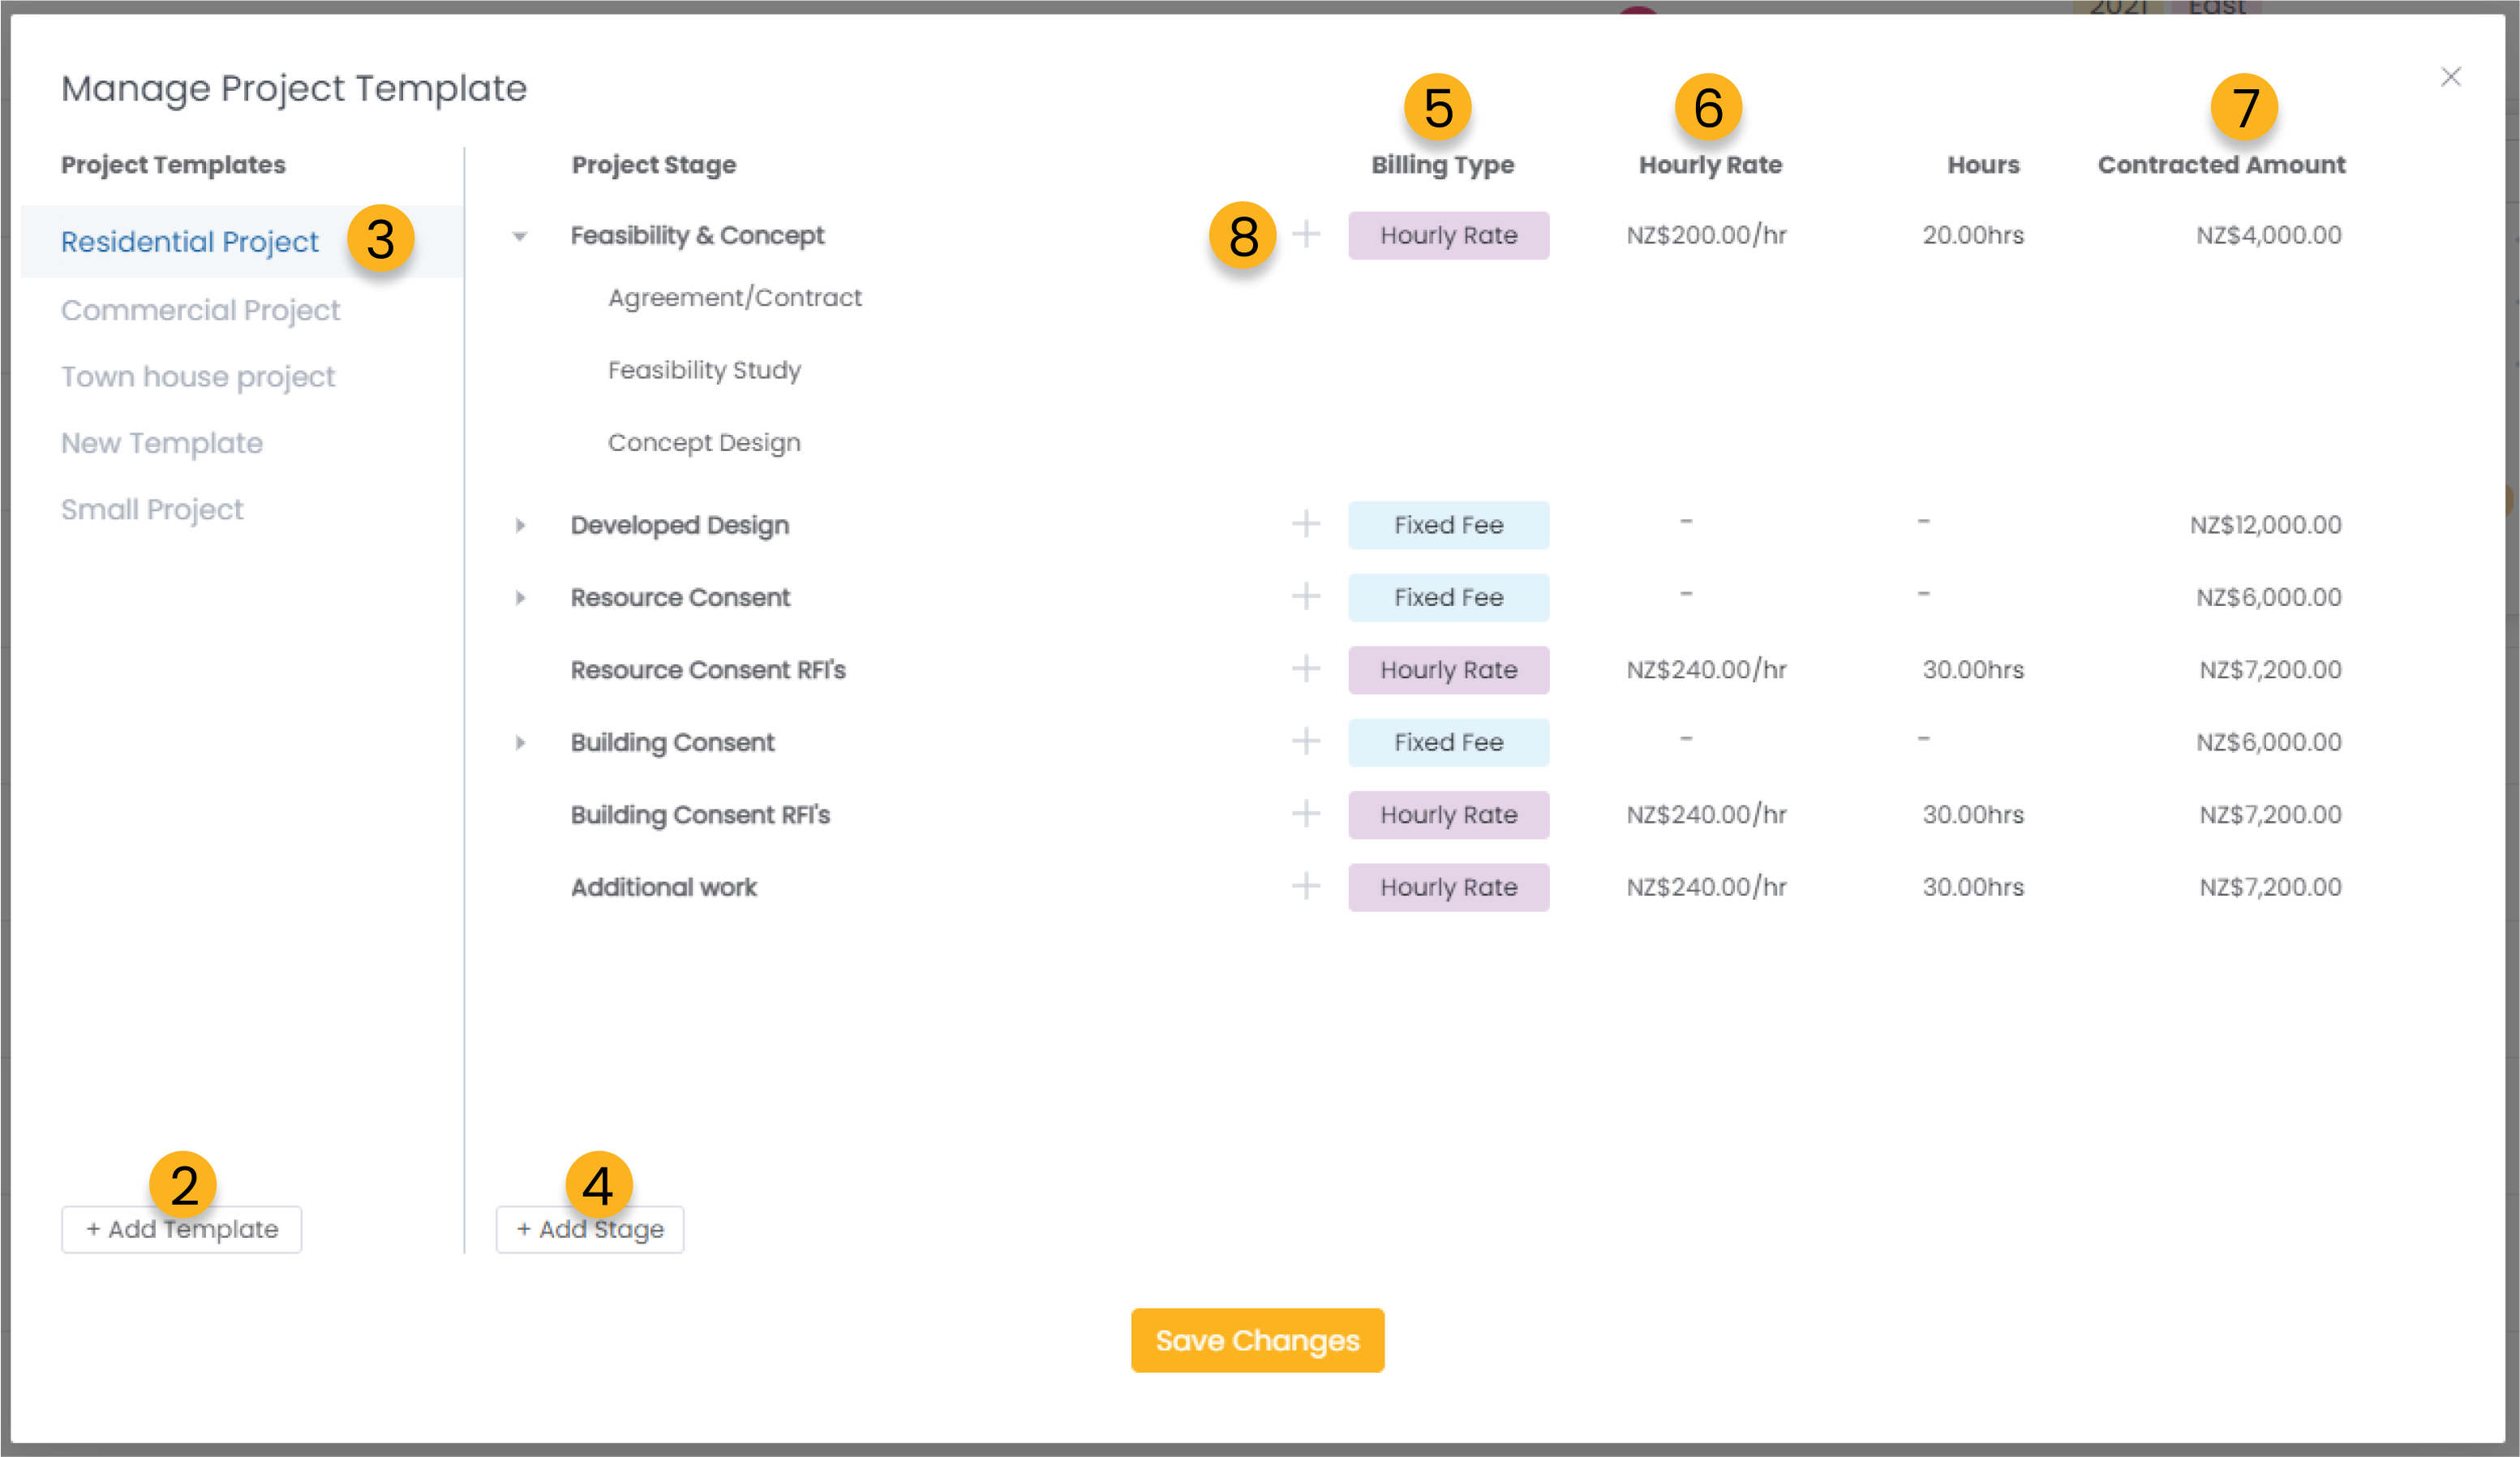
2. Click the + Add Template button
3. Name your new project template
4. Add stages to your project template. These are the larger portions of a project that will generally also be in your contract. You can have as many stages as you wish with any name that you decide.
5. Choose a billing type for each of your stages, either Hourly Rate or Fixed Fee.
6. For hourly rate stages you can set a base hourly charge out rate for the corresponding stage. (You can leave this blank if not needed)
7. For all stages you can decide on default contracted amounts. (You can leave this blank in not needed)
8. Add tasks to each of your stages. These are the smaller portions of a project that you will be able to assign to your team member from the Project Workspace. You can have as many tasks as you wish with any name that you decide.
Project Tags
How to create and add tags to projects?
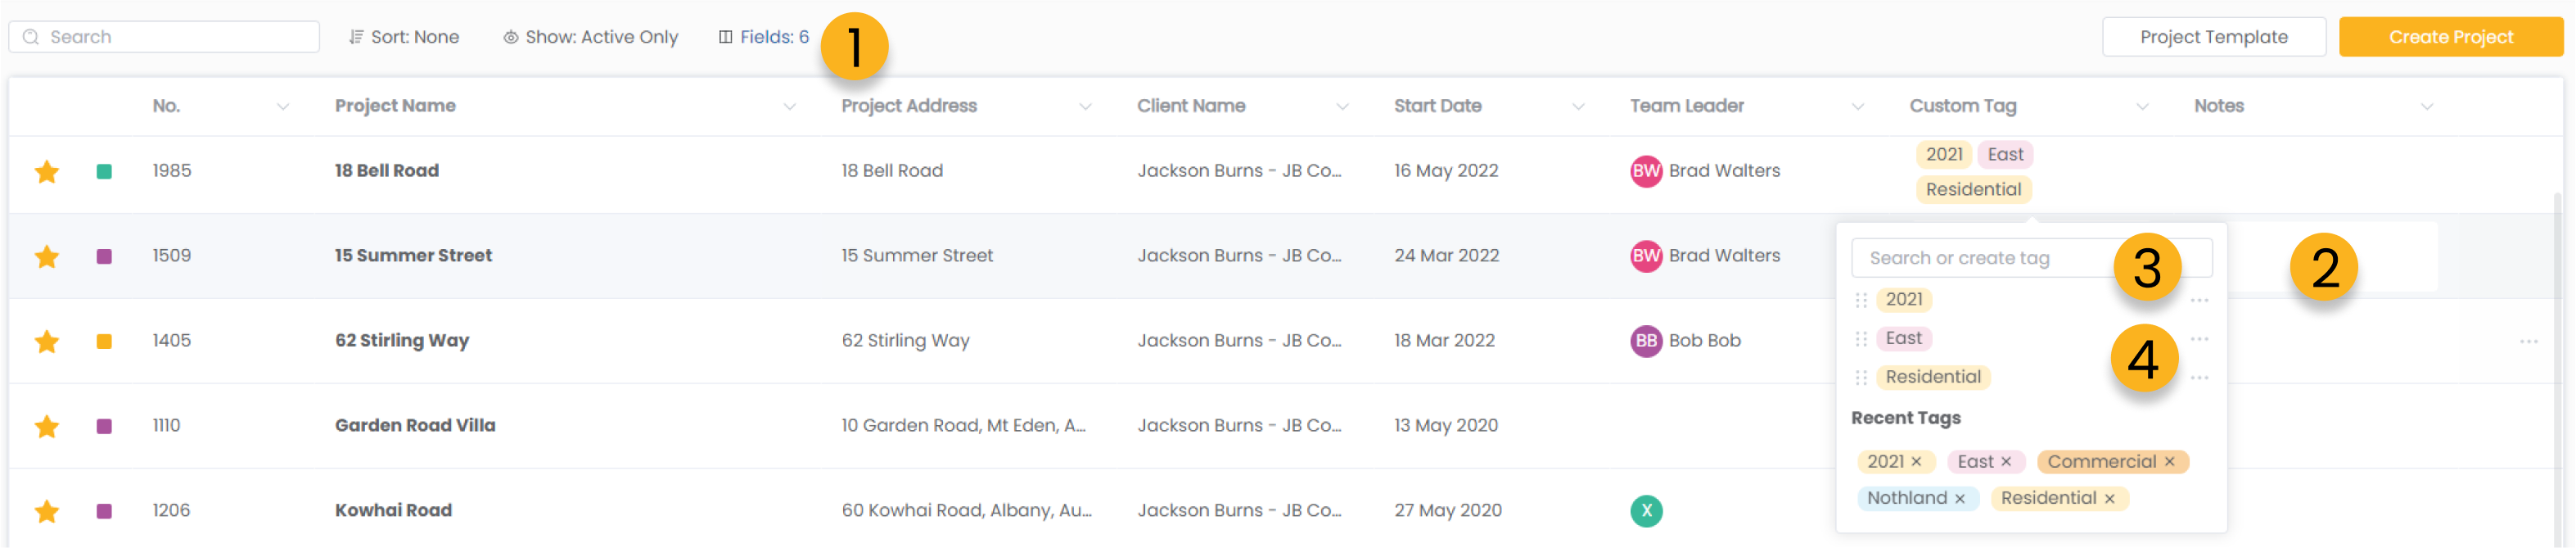
1. First, ensure that you have the Custom Tag field show by clicking the Fields button and checking the option for Custom Tag.
2. Under the Custom Tag heading, click the empty space for the project you wish to add tags to.
3. If this is your first time using tags, there will be no recent tags shown. Simply type the name of the tag you wish to create in the search bar and click the option that appears to create that tag. To add tags that are already created simply select them from recent tags or begin typing to search for your desired tag.
4. To remove tags or change the colour of certain tags, click the ... button to the right side of your selected tag.
Project Workspace
From anywhere in Clarc, if you click the project function button this will take you directly to your project list.
From there, if you select one of your projects this will take you to the project workspace for that project.
Creating Stages
How to create project stages?

1. Click the Manage Budget button to create, edit and manage the stages within your project.
2. Click to add a new stage and name your new stage or add a set of default stages.
3. Make sure to click the save changes button once you have completed setting up your stages.
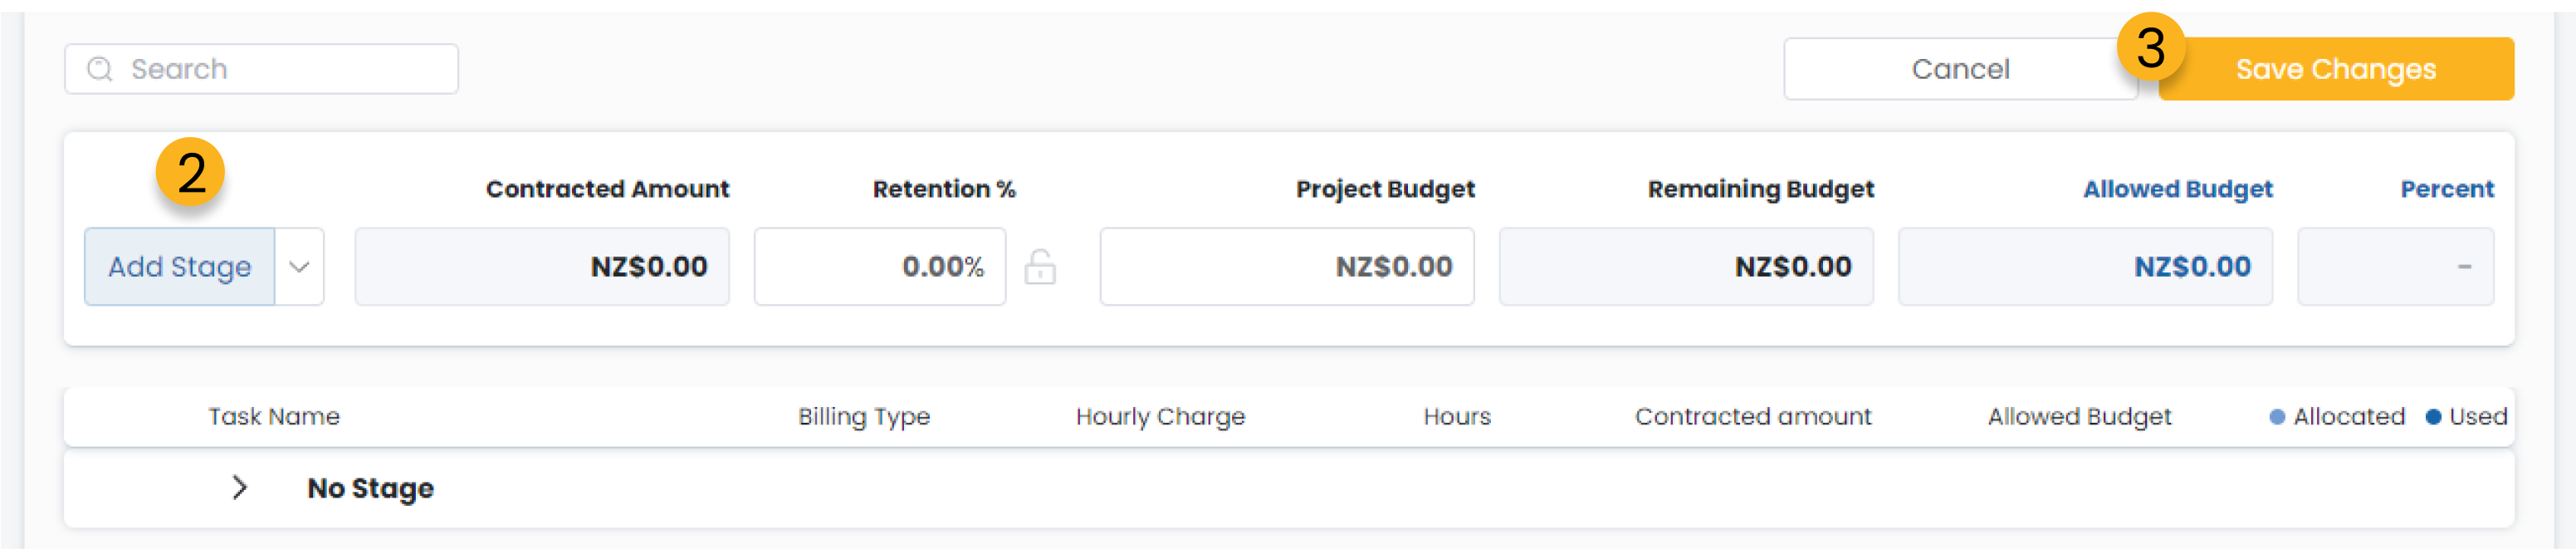
How to manage your stage budgets?

1. Click the Manage Budget button to create, edit and manage the stages within your project.
2. The contracted amount is the total contract value of this project. This number is automatically generated when your project is created from the Contract function.
3. Retention % is the amount of profit you wish to separate out from your contracted amount and your project cost budget. You can set your default retention % in your Admin Settings. You can also edit this retention % here.
4. The project budget is the contracted amount less the retention %. This is the total cost expenditure you are expecting to spend (mostly in terms of time) on this project.
5. Remaining budget is your project budget less your allocated budget and is automatically calculated.
6. Allocated budget is automatically calculated as the total amounts allocated across your project stages.
7. This percent column is to total amount of your project budget that has been assigned to your project stages. You can set a default allocated budget percentage in your Admin Settings. This allows for any unexpected overruns to use the remaining budget before eating into the profit retention.
8. Select a billing type for each of your stages.
9. You can select a base hourly charge out rate for all of your hourly rate stages.
10. The contracted amount is automatically generated when you create your project through the Contract function.
11. The stage budget is also automatically calculated, proportionately from your project budget when you project is created through the Contract function. If you did not create your project through Contract or if you want to edit/adjust your stage budgets you can also do that from here. Simply click into the box and change the number to your desired budget. the budget totals will automatically adjust to your new budget amount.
12. This is a preview of your budget usage and future allocation. This is automatically calculated through timesheets and hours allocated on the Resource Planner. When your team enters new time entries, you will see the budget track in real-time according to their cost rates (their time cost to your organisation). You can set those cost rates in your Admin Settings.
Creating Tasks
How to create project tasks

1. There are two ways to add new tasks, both are shown above. You can click the + icon shown on each of your project stages to create a task beneath that stage, or you can click the add task button to create a task in the ‘no stage’ section of your project workspace. You can move tasks around once they are created.
2. Name your task.
3. You can make your task public by clicking on the shared icon on the left. This will make your task visible to all partners and clients who have been invited to join the project.
4. Assign your task to one of your team members.
5. Set start/due dates.
6. Click the grey dot to complete your task.
For more steps on what you can do with each of your tasks, head over to the Collaborate on Tasks page.
Collaborate On Tasks
How to leave comments on tasks?
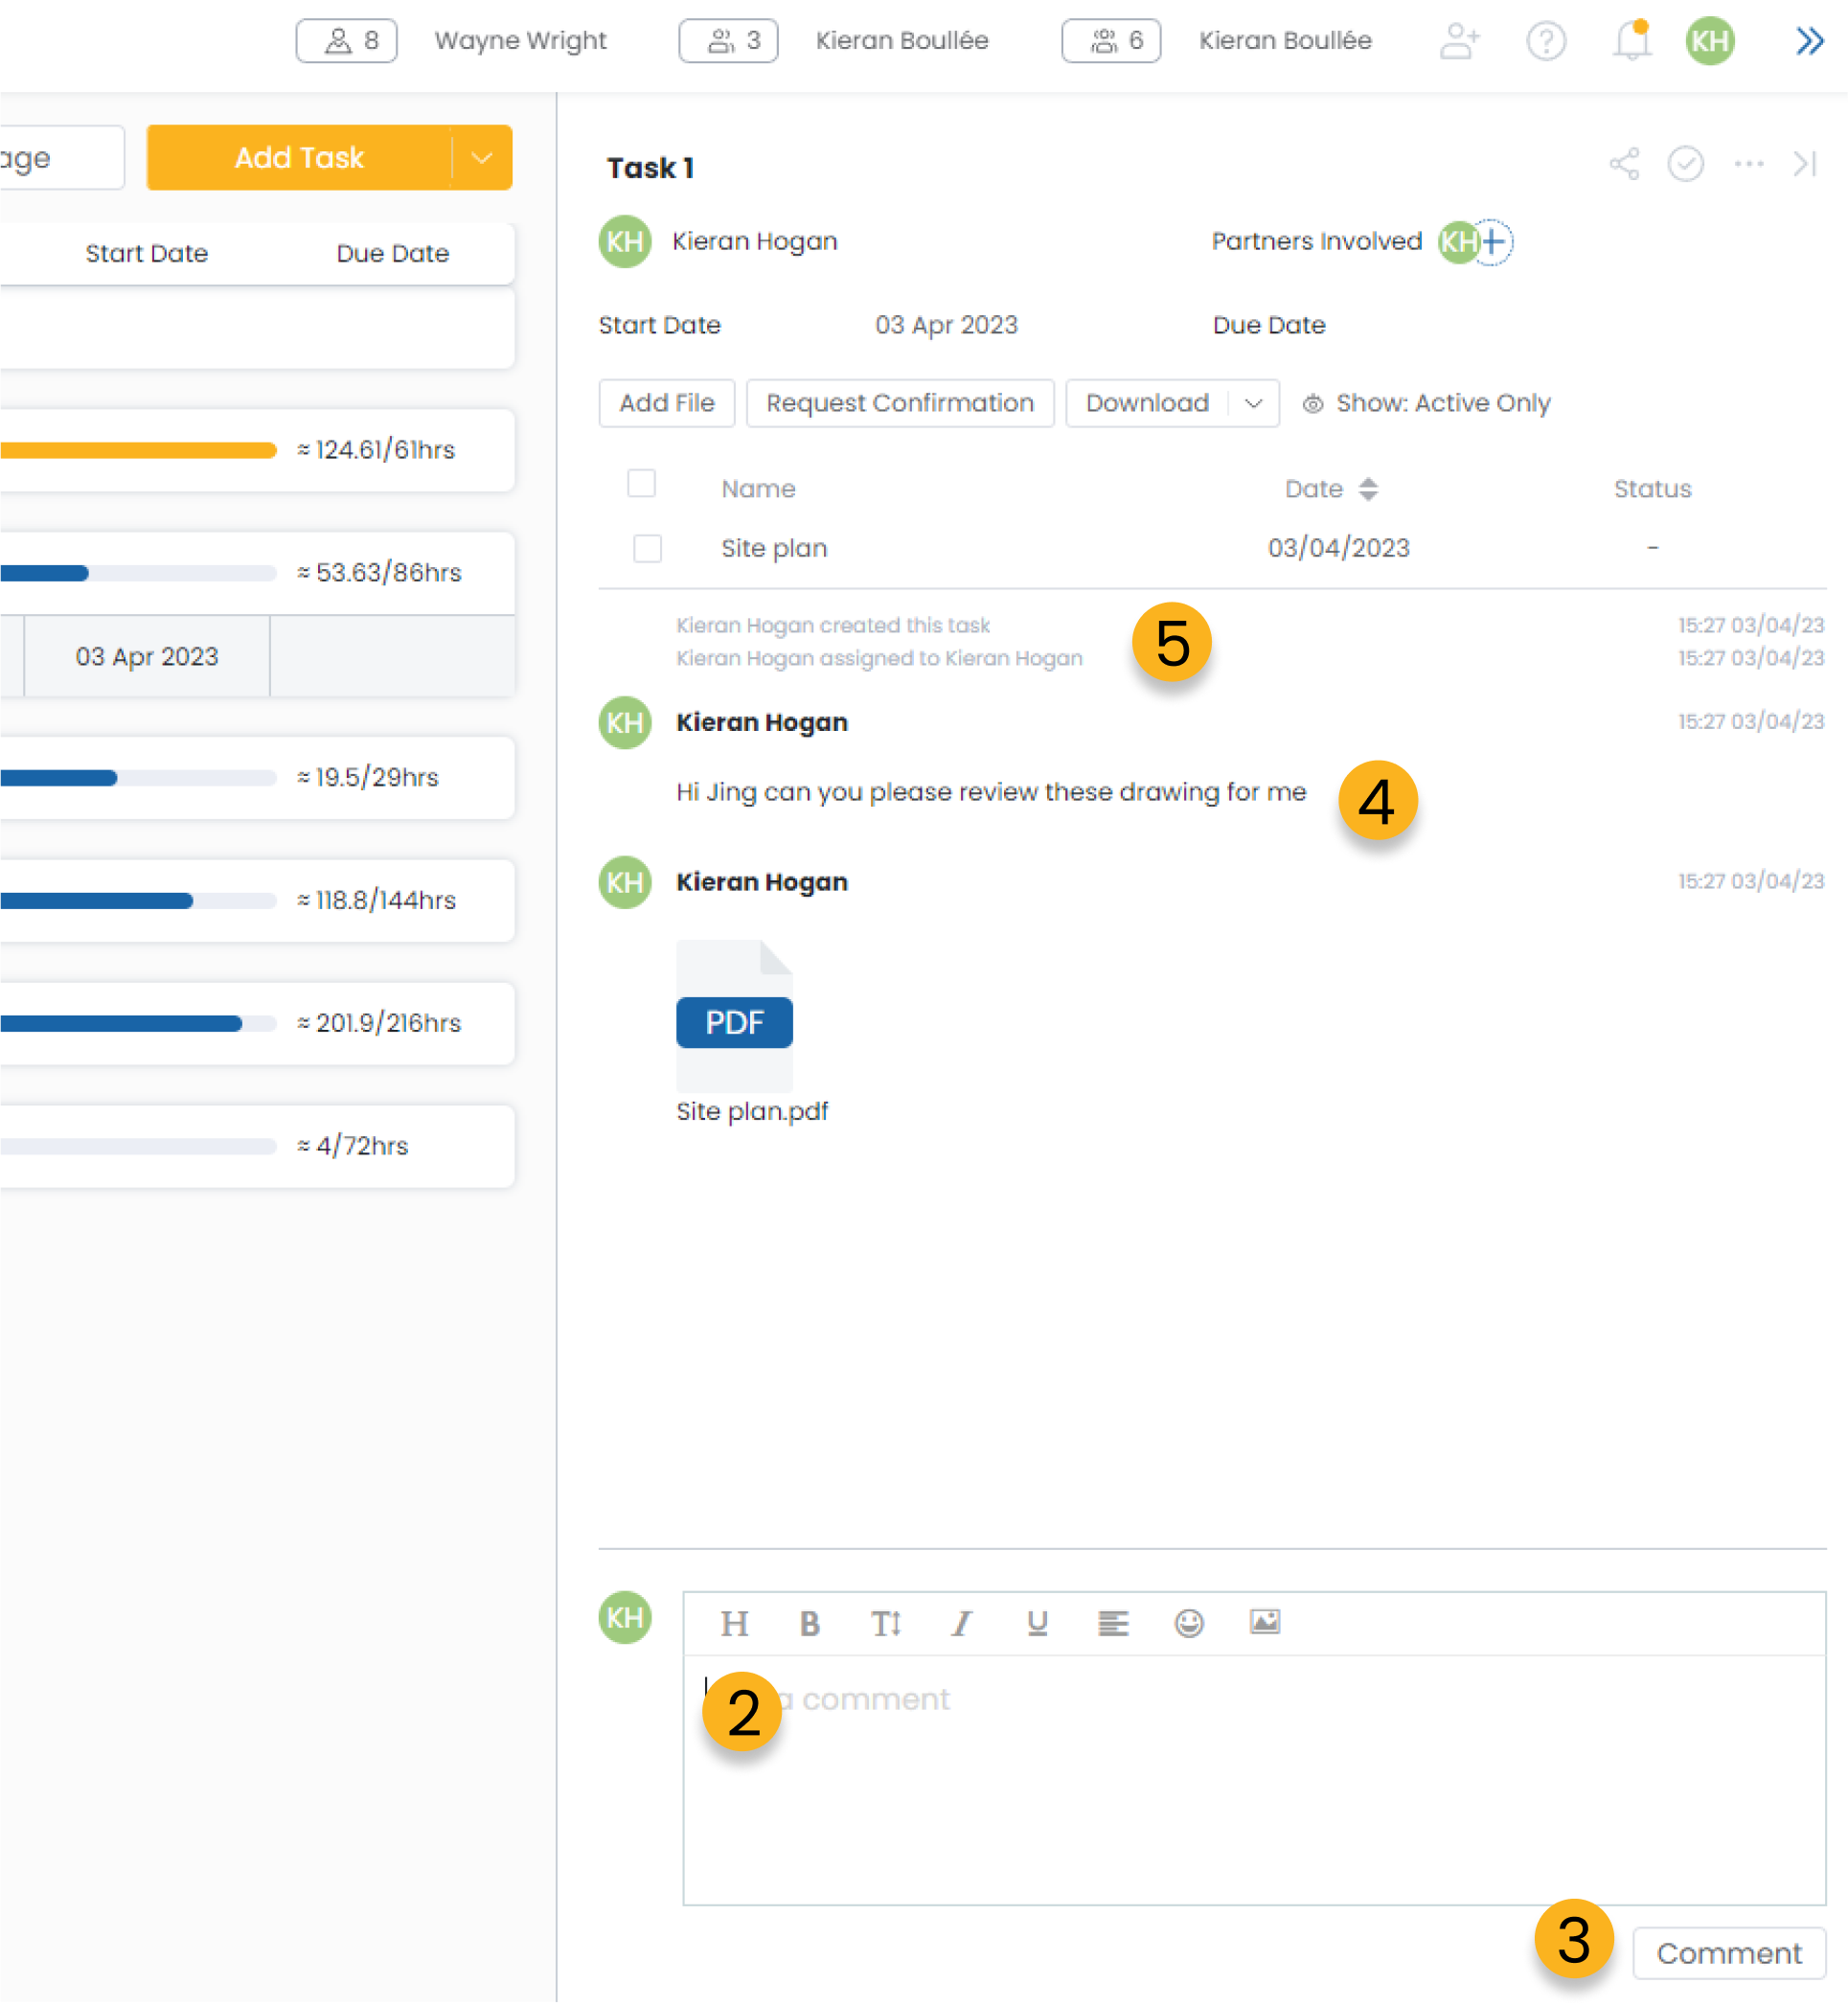
1. Clicking on one of your tasks will open up the side window that allows you to collaborate with others on this task.
2. To leave a comment, simple click into the box at the bottom of the window and begin typing.
3. Once you have completed writing your comment, click the comment button to send it.
4. New comments will appear in the chat box.
5. You will also see a log of all changes/updates that have occurred within this task and greyed out text within the dialogue of the task.
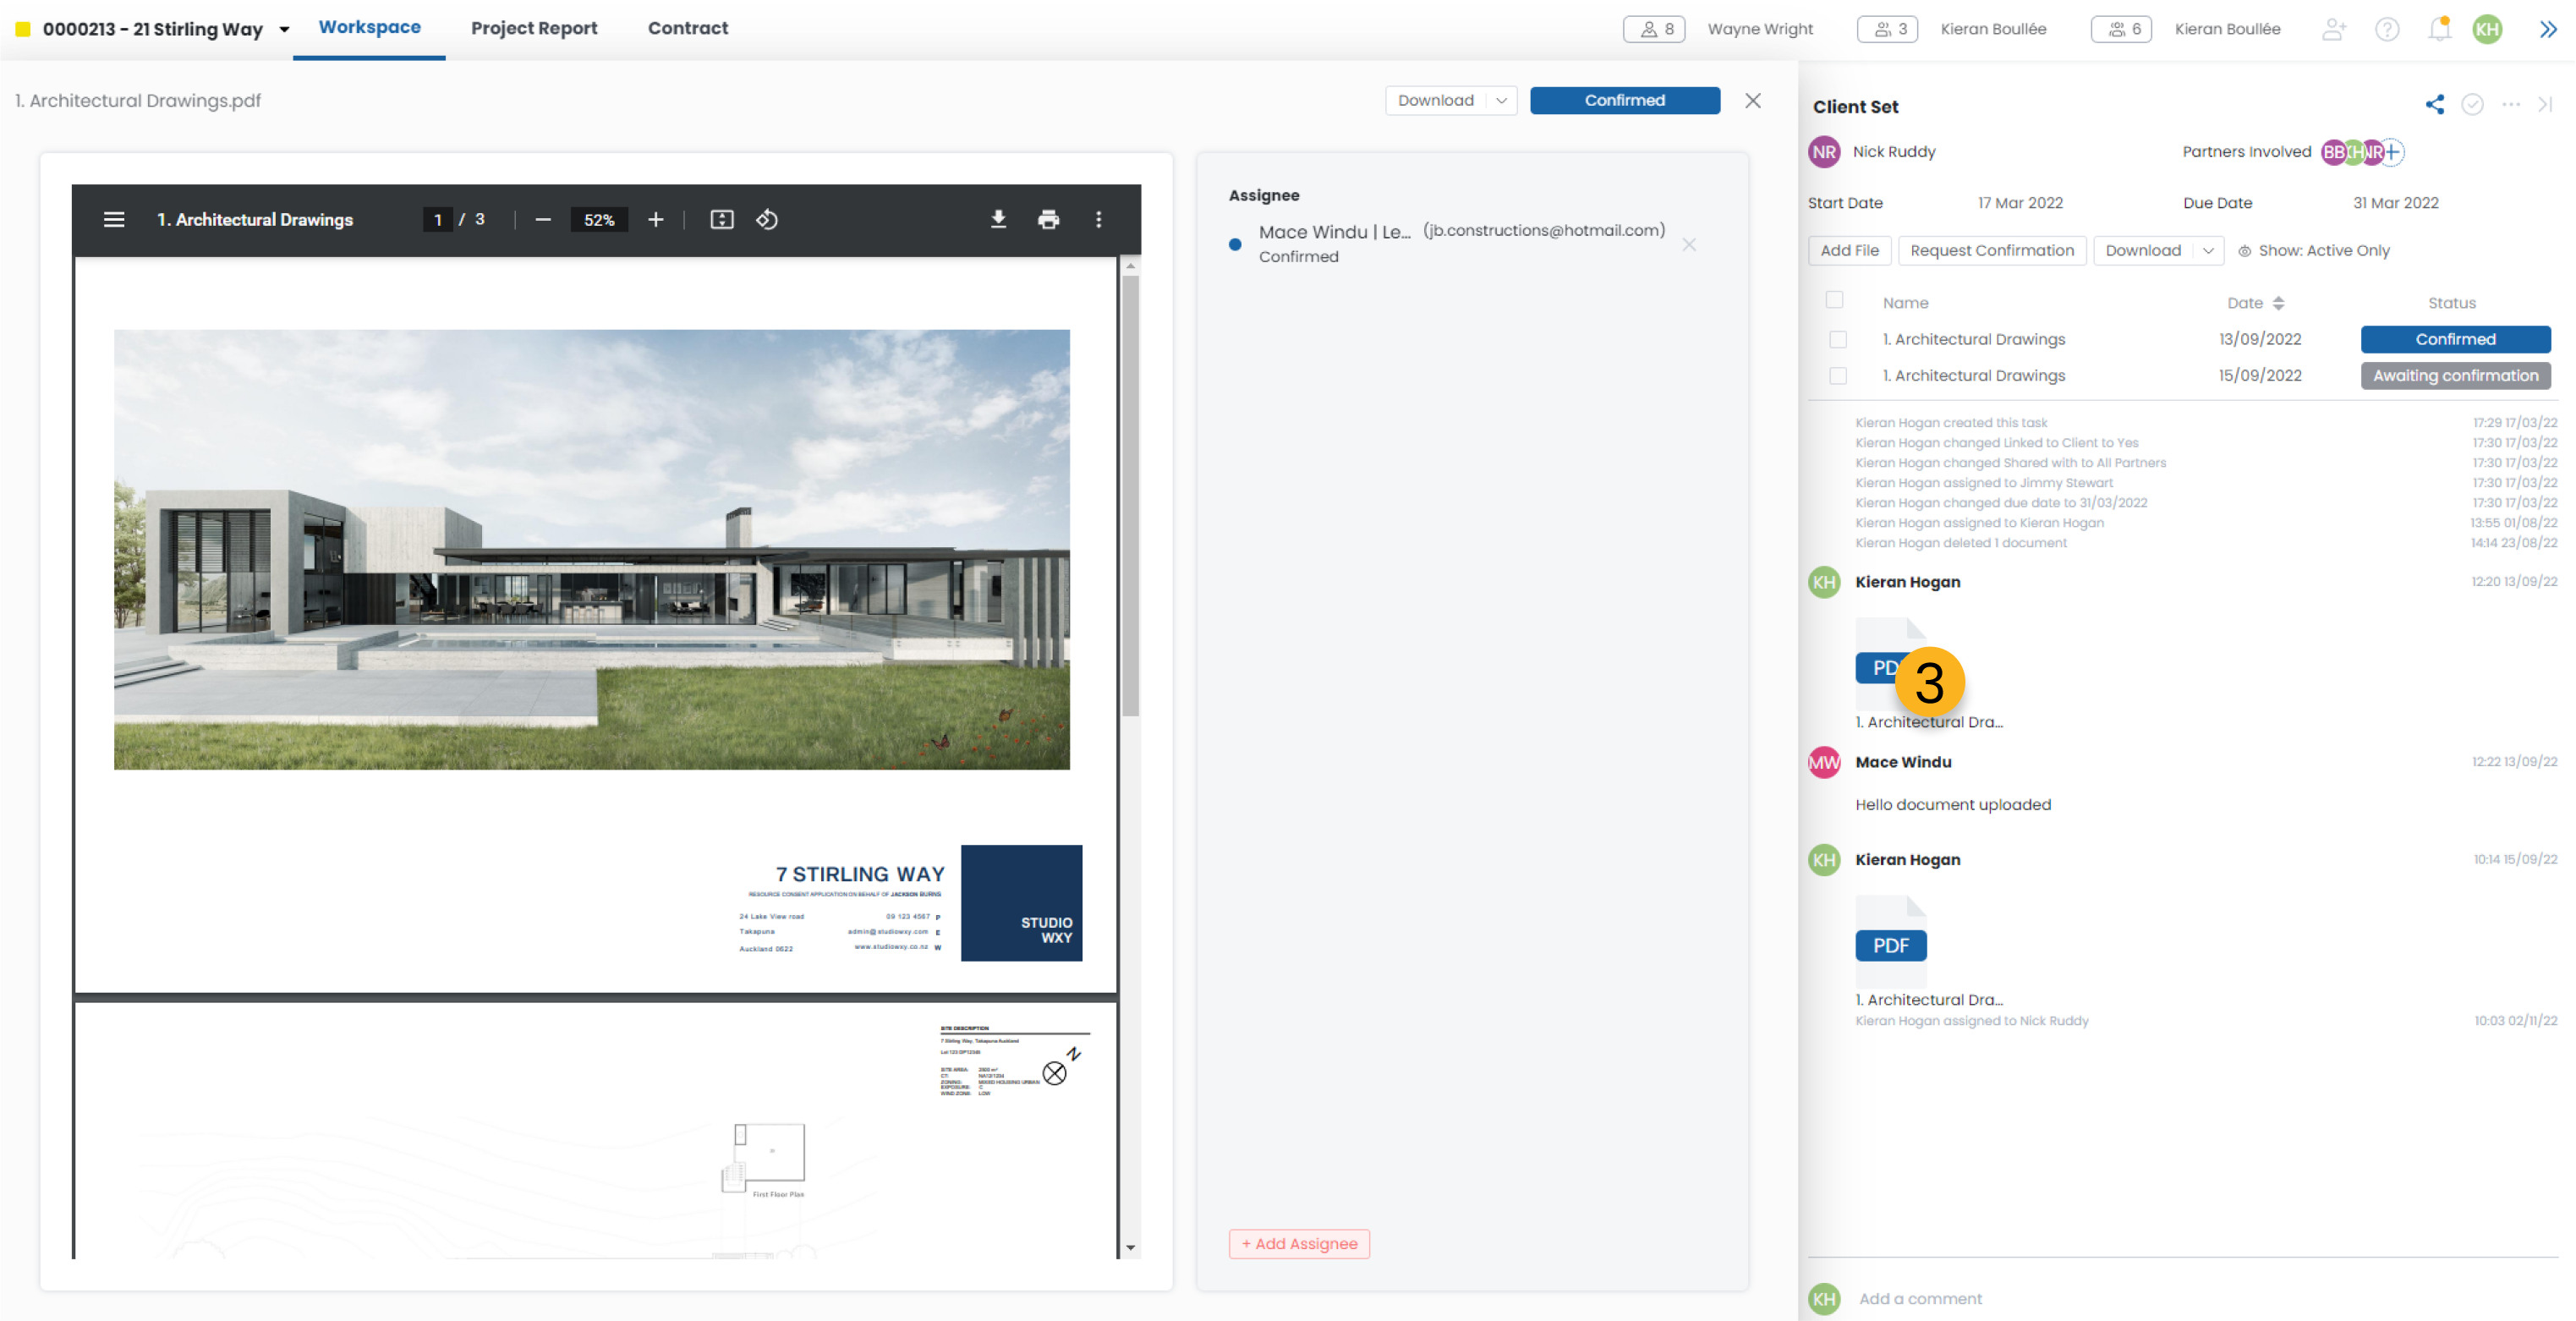
How to upload and view documents?
1. The easiest way to add files into your task is to click and drag them onto the task window. This will upload that document into your task.
2. The second way to upload documents is to click the Add File button, which will open up a separate window on your computer to browse your files and select the one you wish to upload.

3. Once you have your file shown within the comment stream, you can click that document to open it beside your task window to review the document.
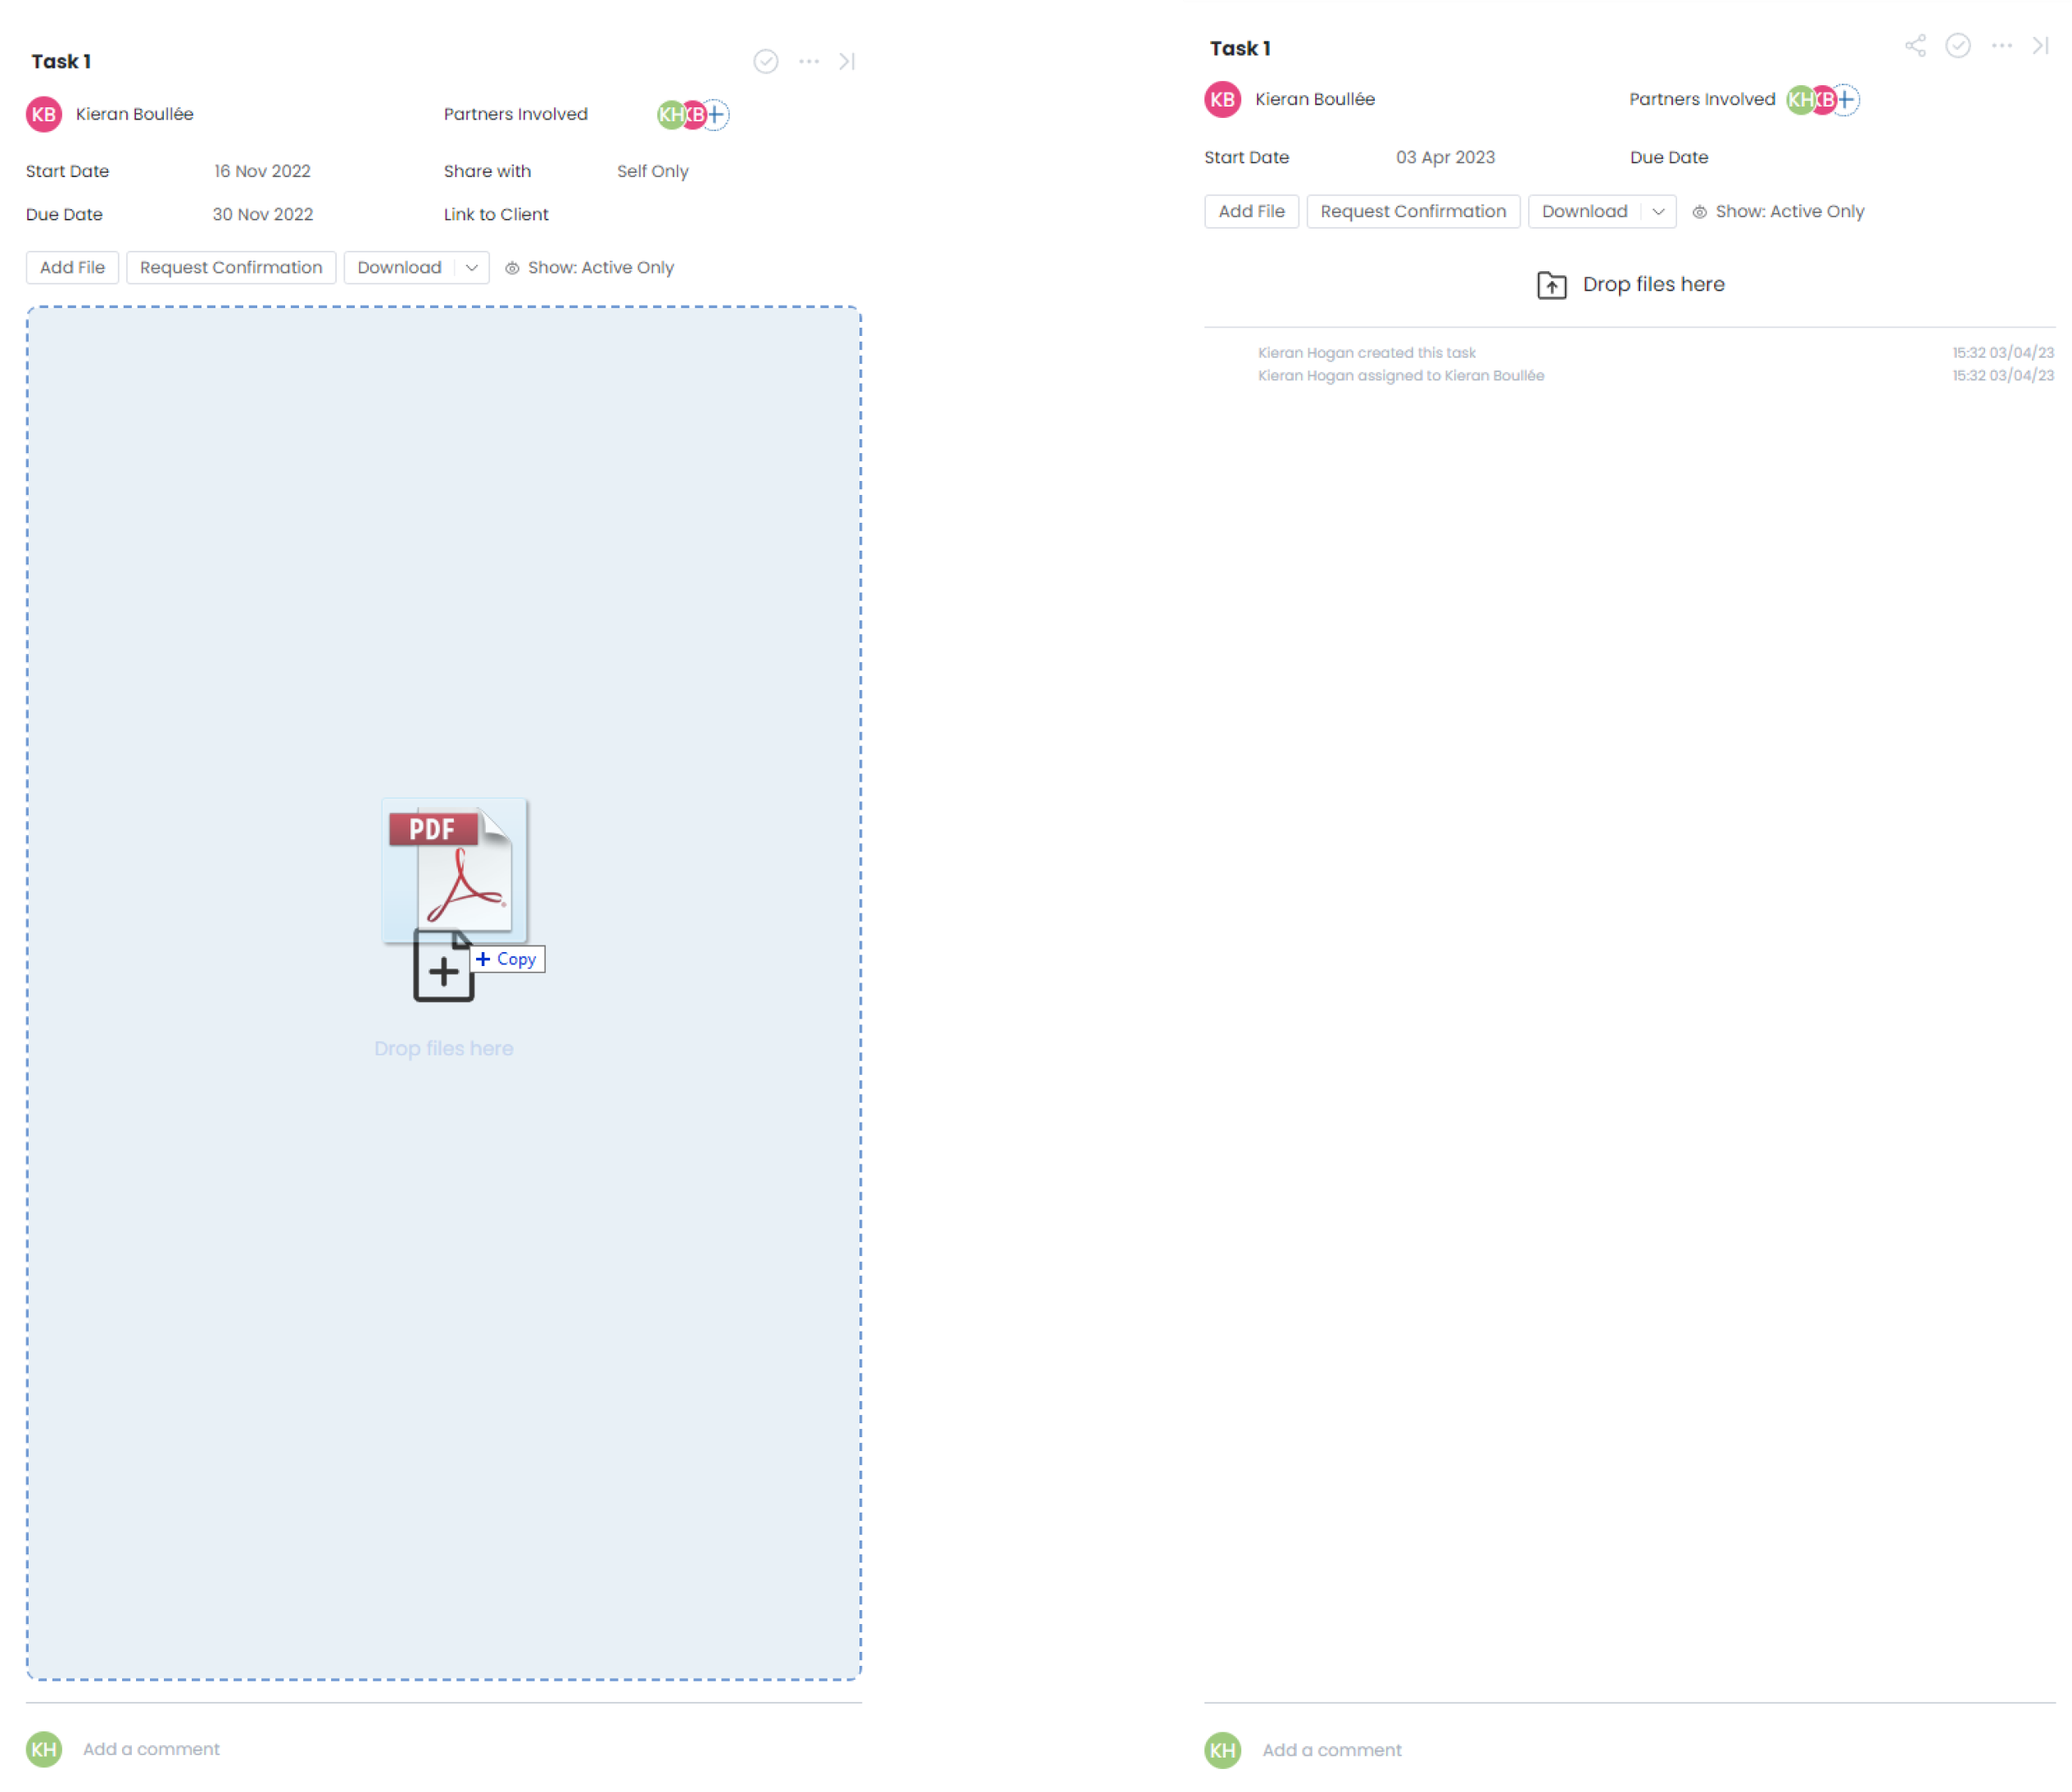
How to invite your partners?

1. To connect your partner to a task, simply click the cell under the Assignee column.
2. Click on the Partner tab to show your current partner contacts.
3. Select from your current list of partner contacts to assign them and connect them to this task, or
4. Invite partners via email for those who are not currently registered as contacts within your Clarc account. Your partner can then sign up as a free account which will allow access to this particular project that you have invited them into.

1. You can also invite your clients into the project by following similar steps. Click on the Client tap form your project Workspace.
2. Add your client from your existing contact list in Clarc or add a new email.
3. Make sure you click on the invite icon after this so that you send them the invitation email.
Request Document Confirmation
How to upload and view documents?
.png)
1. The easiest way to add files into your task is to click and drag them onto the task window. This will upload that document into your task.
2. The second way to upload documents is to click the Add File button, which will open up a separate window on your computer to browse your files and select the one you wish to upload.
3. Once you have your file shown within the comment stream, you can click that document to open it beside your task window to review the document.
How to request confirmation for a document?
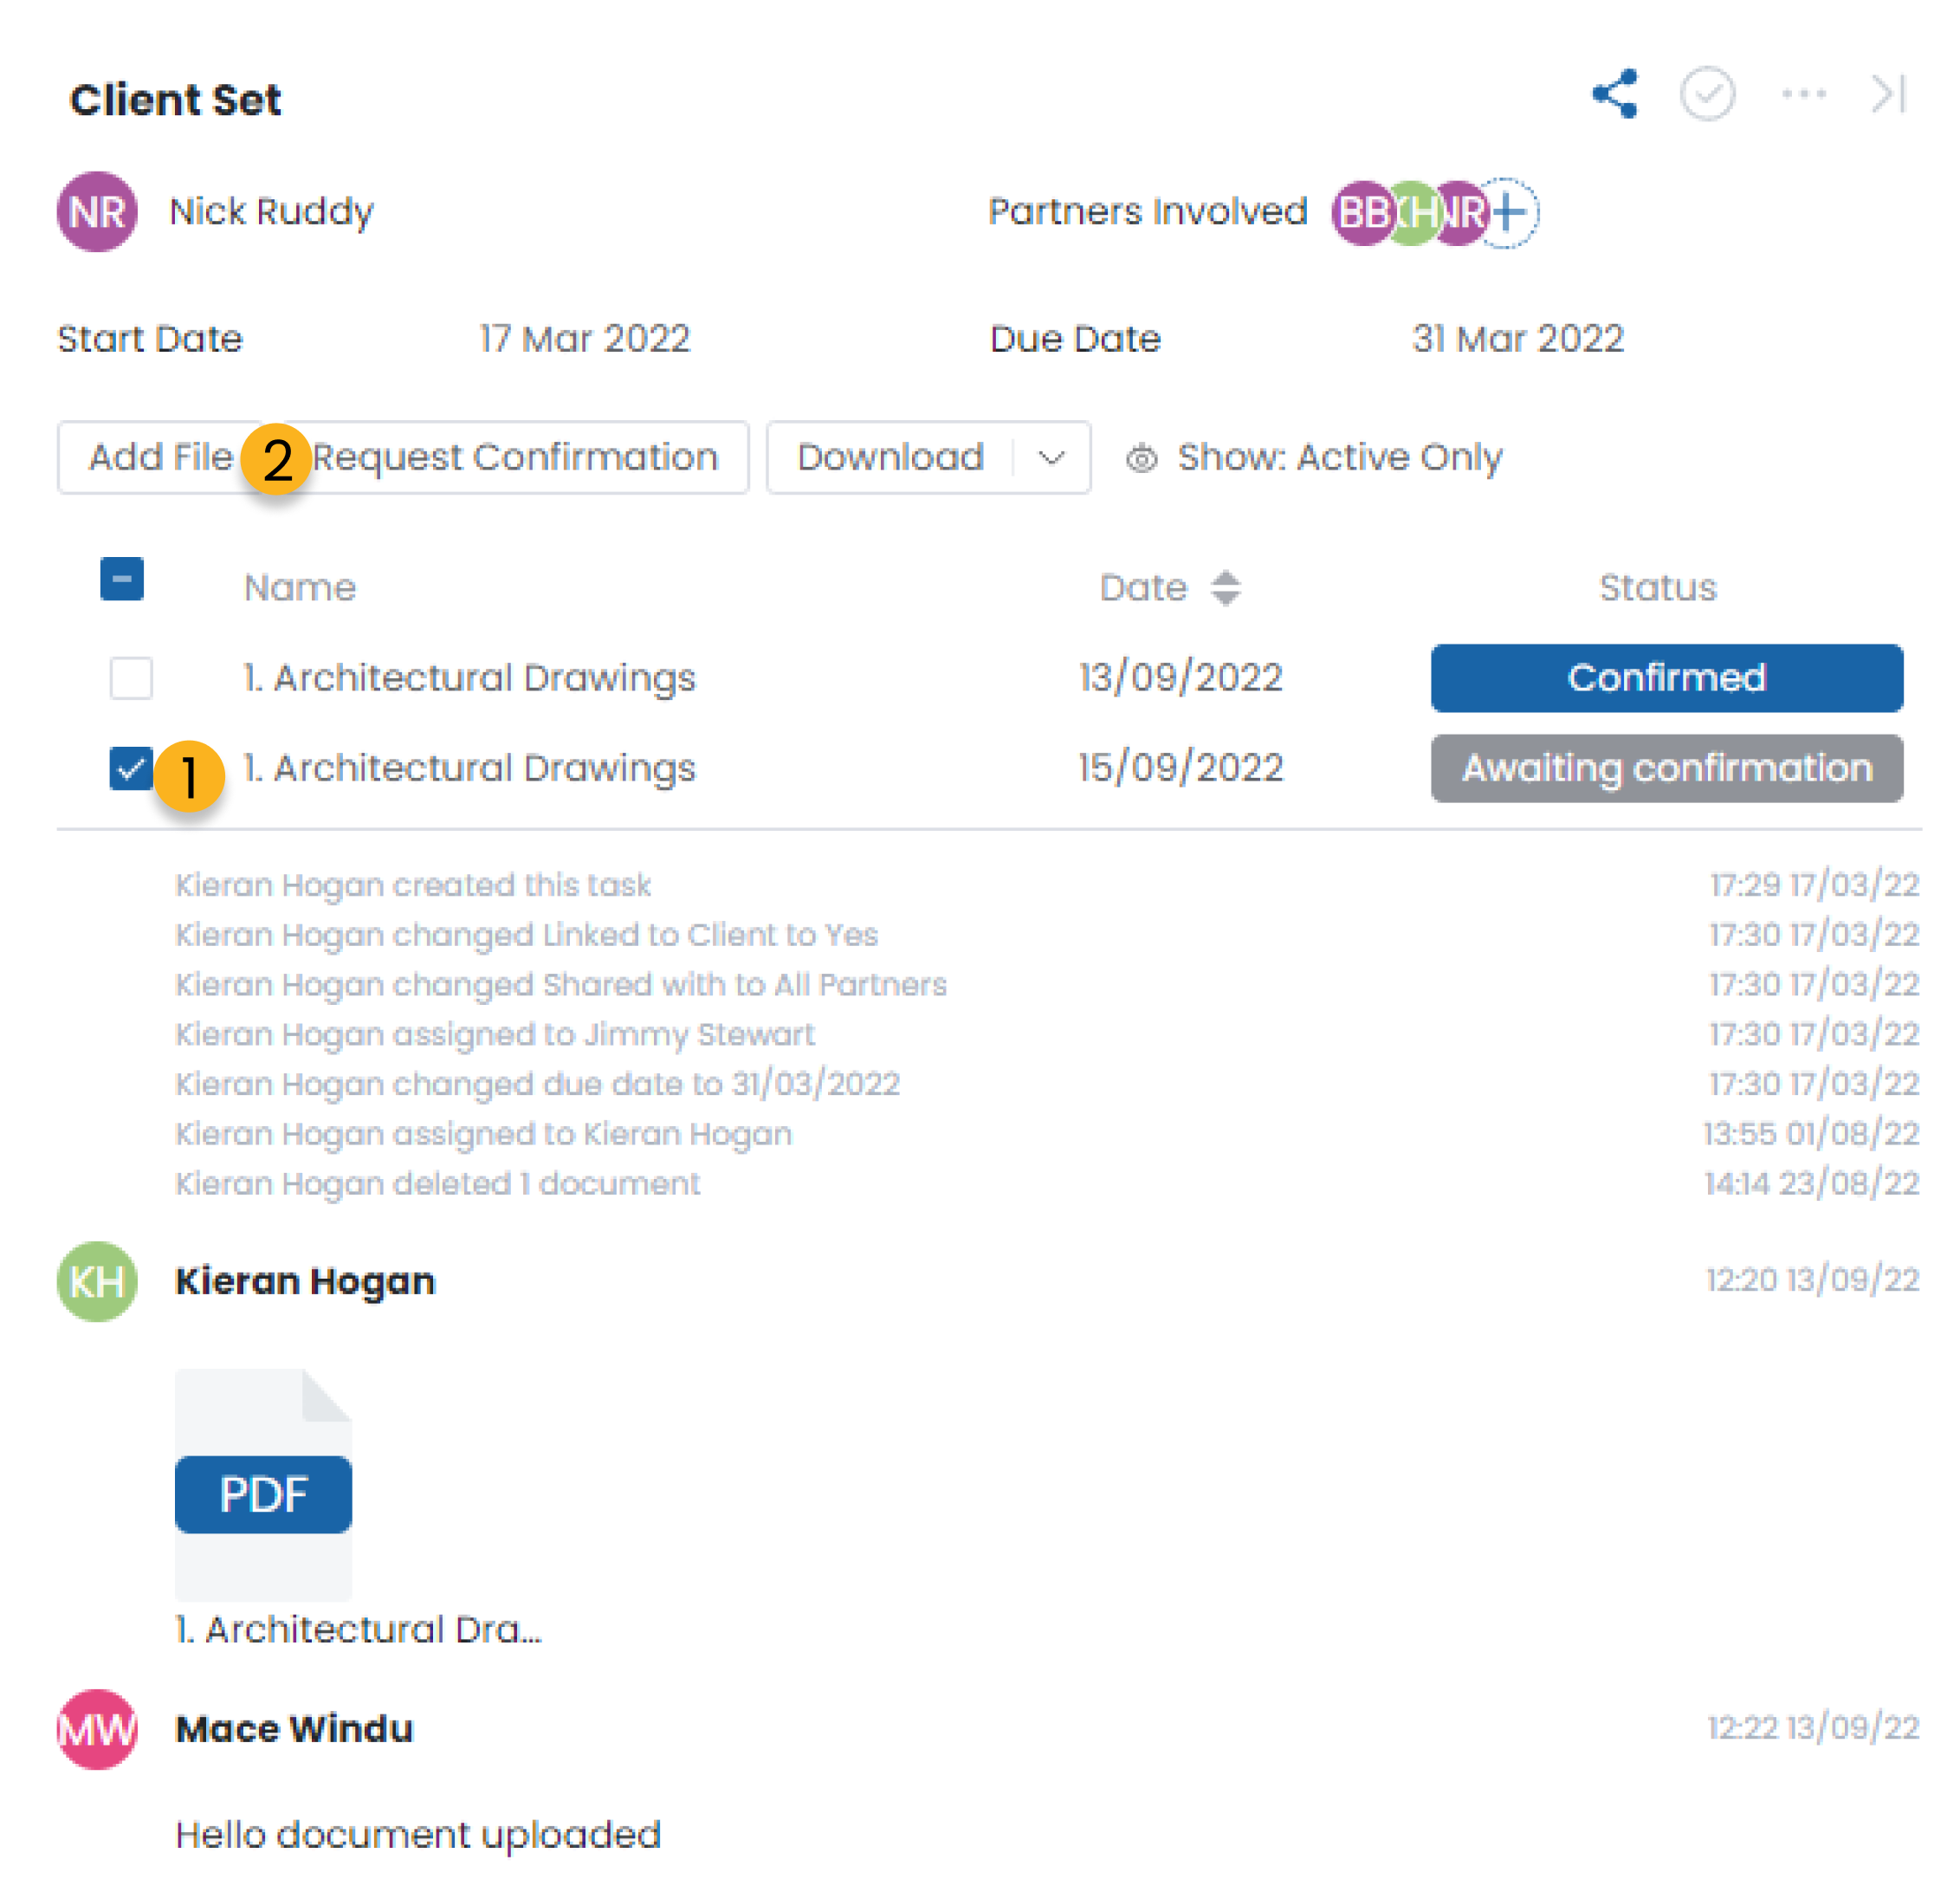
1. Check the box by the name of the document you wish to request a confirmation for.
2. Click the Request Confirmation button.
.png)
3. Select the person you want to send this document to from your contact list, or type their email here. You can also send this to multiple people at once.
4. Check this box if you require the recipient to sign a confirmation of this document.
5. Check this box to open up the email template to customize the message sent along with this document.
6. Once all steps are completed click the Send Requests button to send your document.
Project Resource

From anywhere in Clarc, if you click the team function button this will take you directly to your project list.
At the top left of the page, you can switch from your project list to resource menu
Team Member View
What can you get from Team Member View
The Member View feature displays a timeline of your team members' Allocated and Used hours, enabling you to anticipate capacity, monitor actual spending, and identify team members with higher or lower availability.
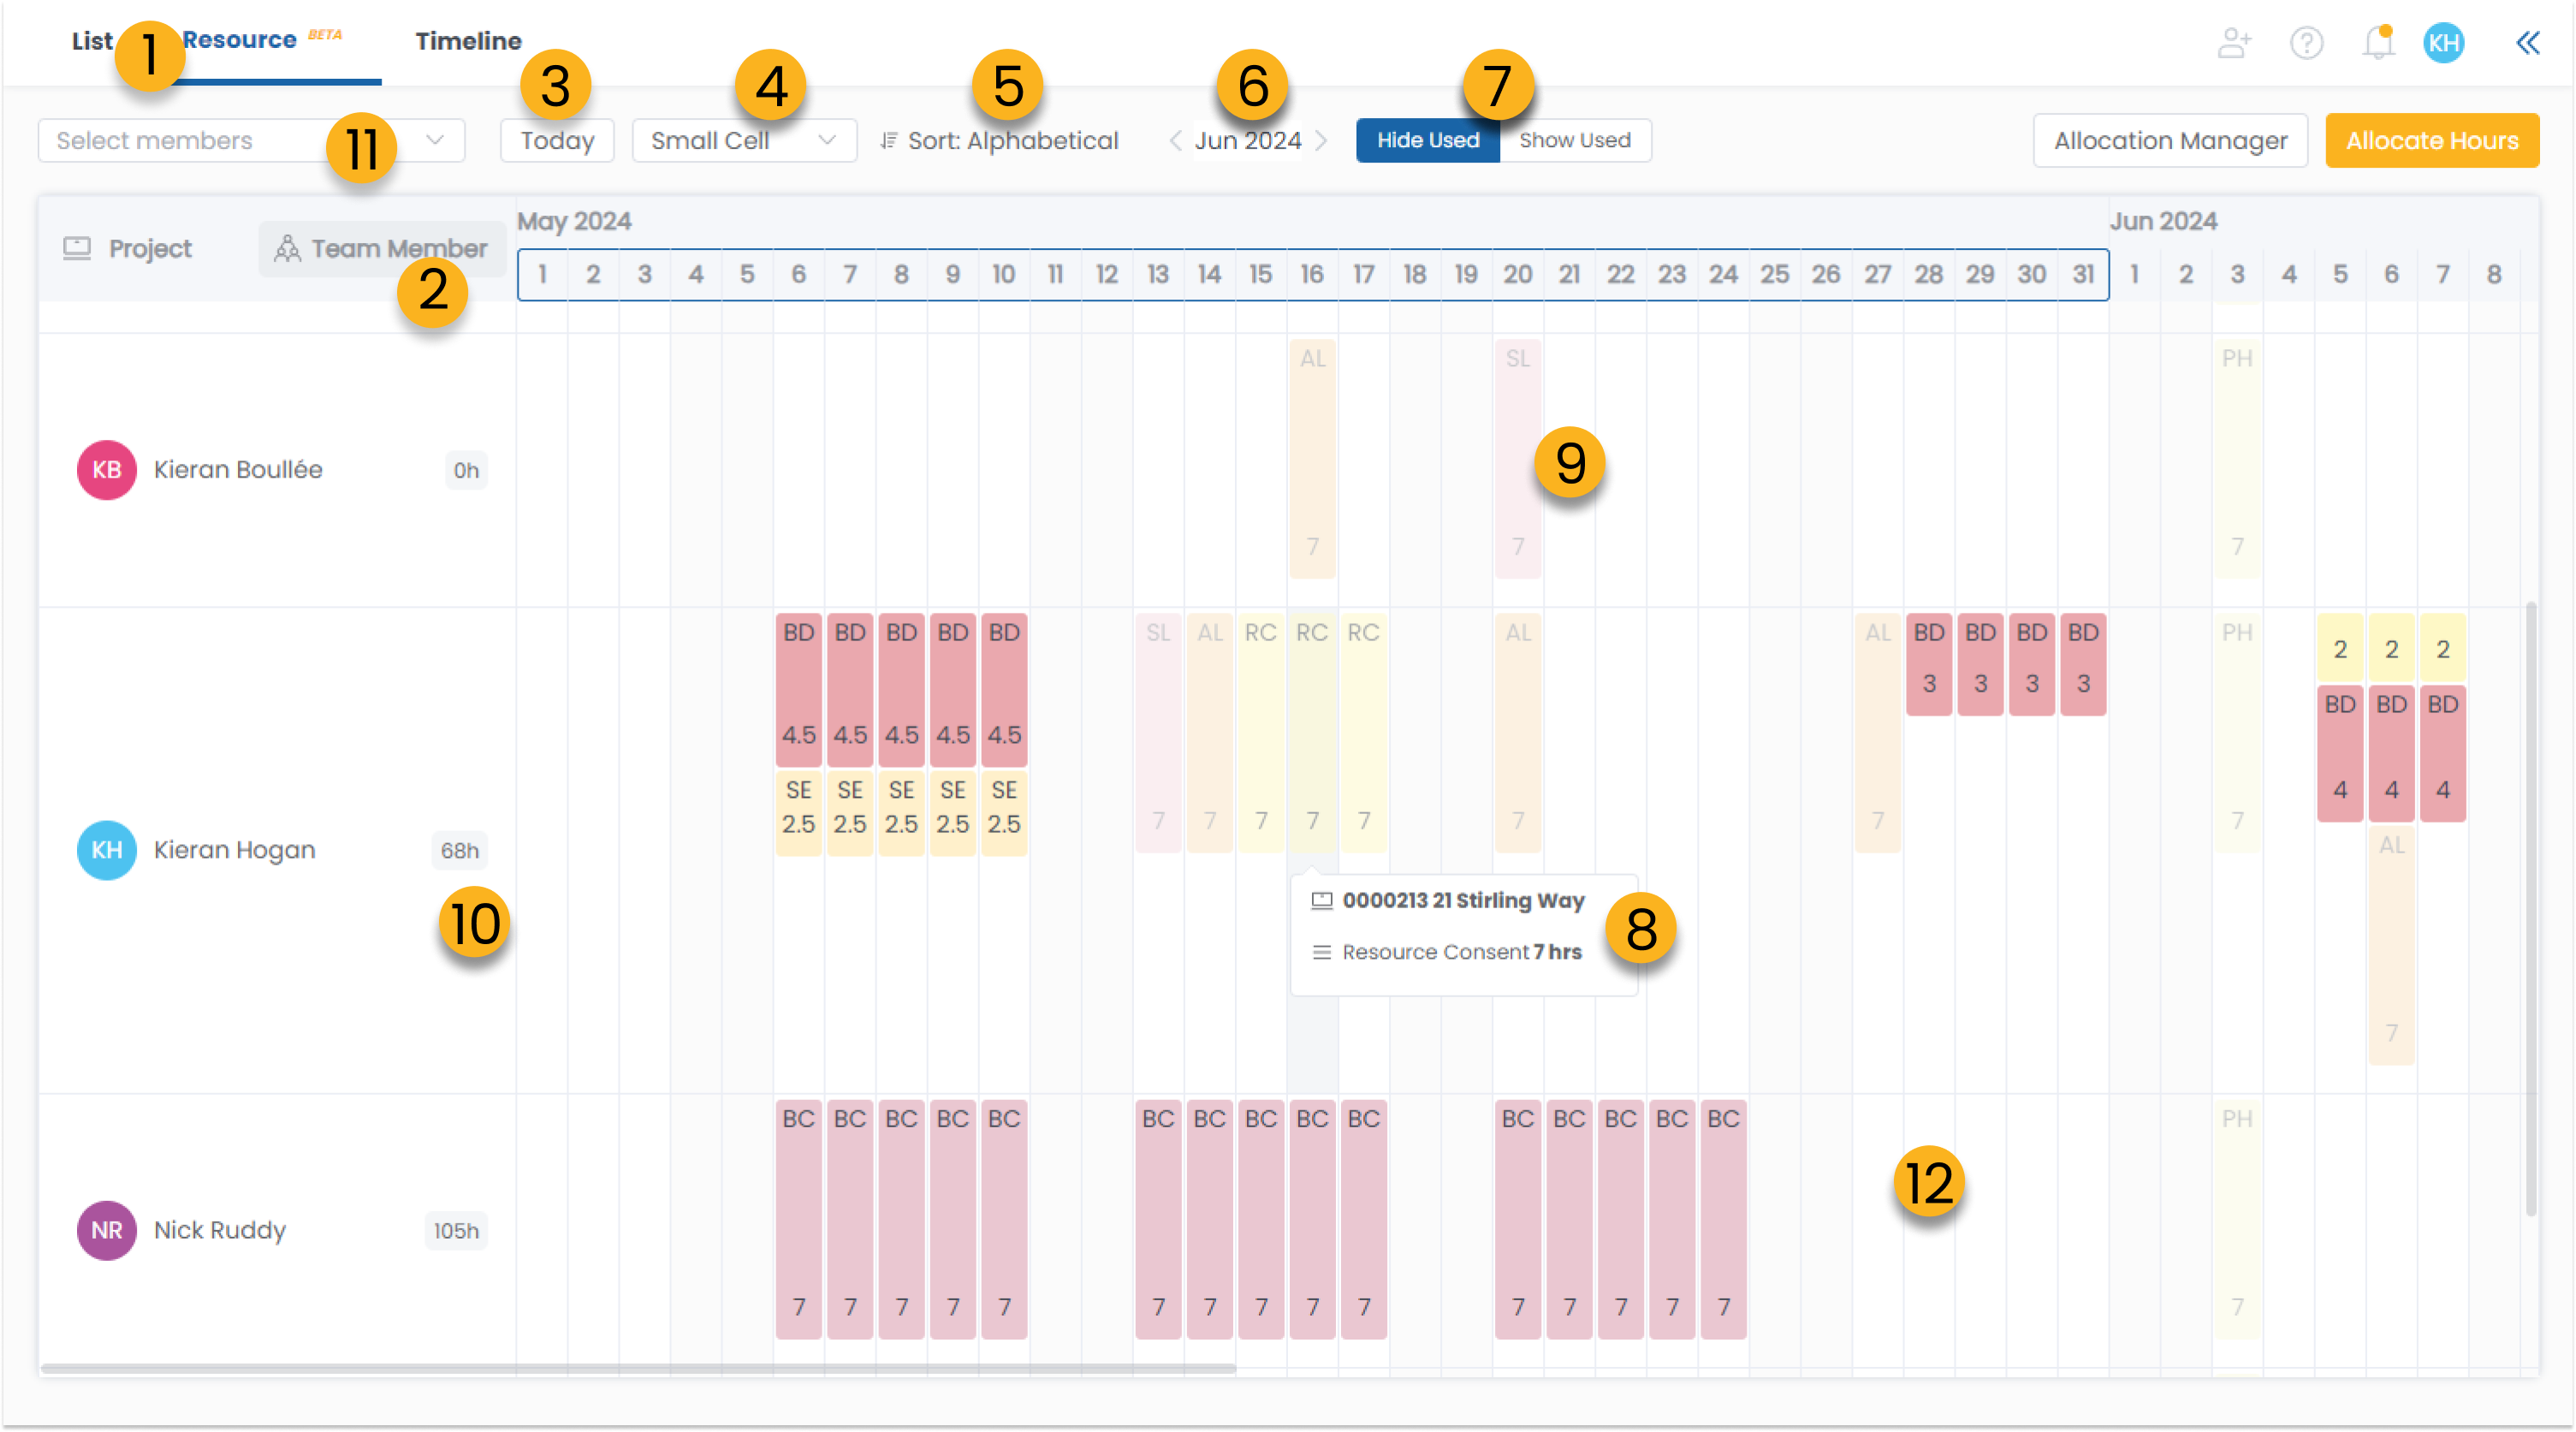
1. Navigate to Project and go to the Resource Planner.
2. Ensure Team Member Viewer is selected.
3. Click "Today" to navigate to today’s timeline.
4. Choose from Small Cell/Medium Cell/Large Cell to customize the size of your planner.
5. Sort the members list alphabetically or by member’s capacity.
6. Click on the month bar to navigate to a different period, or use the < and > arrows for previous and next months.
7. Use the Show Used function to preview the actual time logged against allocated time.
8. Hover over an allocation to view the details.
9. All leaves and holidays will be shown in the planner automatically for time allocation.
10. Total allocated hours within a selected period (blue box) will be shown in the front, excluding any leaves or holiday hours.
11. Use the filter function to filter the member list.
12. Click a cell to start allocating hours, refer to Resource Allocation section for detailed guide.
Project View
The Project View feature offers a breakdown of the planned budget and actual costs for each project stage, as well as an overview of overall progress. This allows for more efficient project management workflow and helps to forecast your capacity and spend.
1. Navigate to Project and go to the Resource Planner.
2. Ensure Project Viewer is selected.
3. Click "Today" to navigate to today’s timeline.
4. Choose from Small Cell/Medium Cell/Large Cell to customize the size of your planner.
5. Click on the month bar to navigate to a different period, or use the < and > arrows for previous and next months.
6. Use the Show Used function to preview the actual time logged against allocated time.
7. Hover over a summary to see the budget allocated or used.
8. Total allocated hours within a selected period (blue box) will be shown in the front, excluding any leaves or holiday hours.
9. Use the filter function to filter the member list.
10. Click on one project to preview the Stage and Task breakdown.
11. Click a cell to start allocating hours, refer to Resource Allocation section for detailed guide.
Resource Allocation
Allocate Project Hours
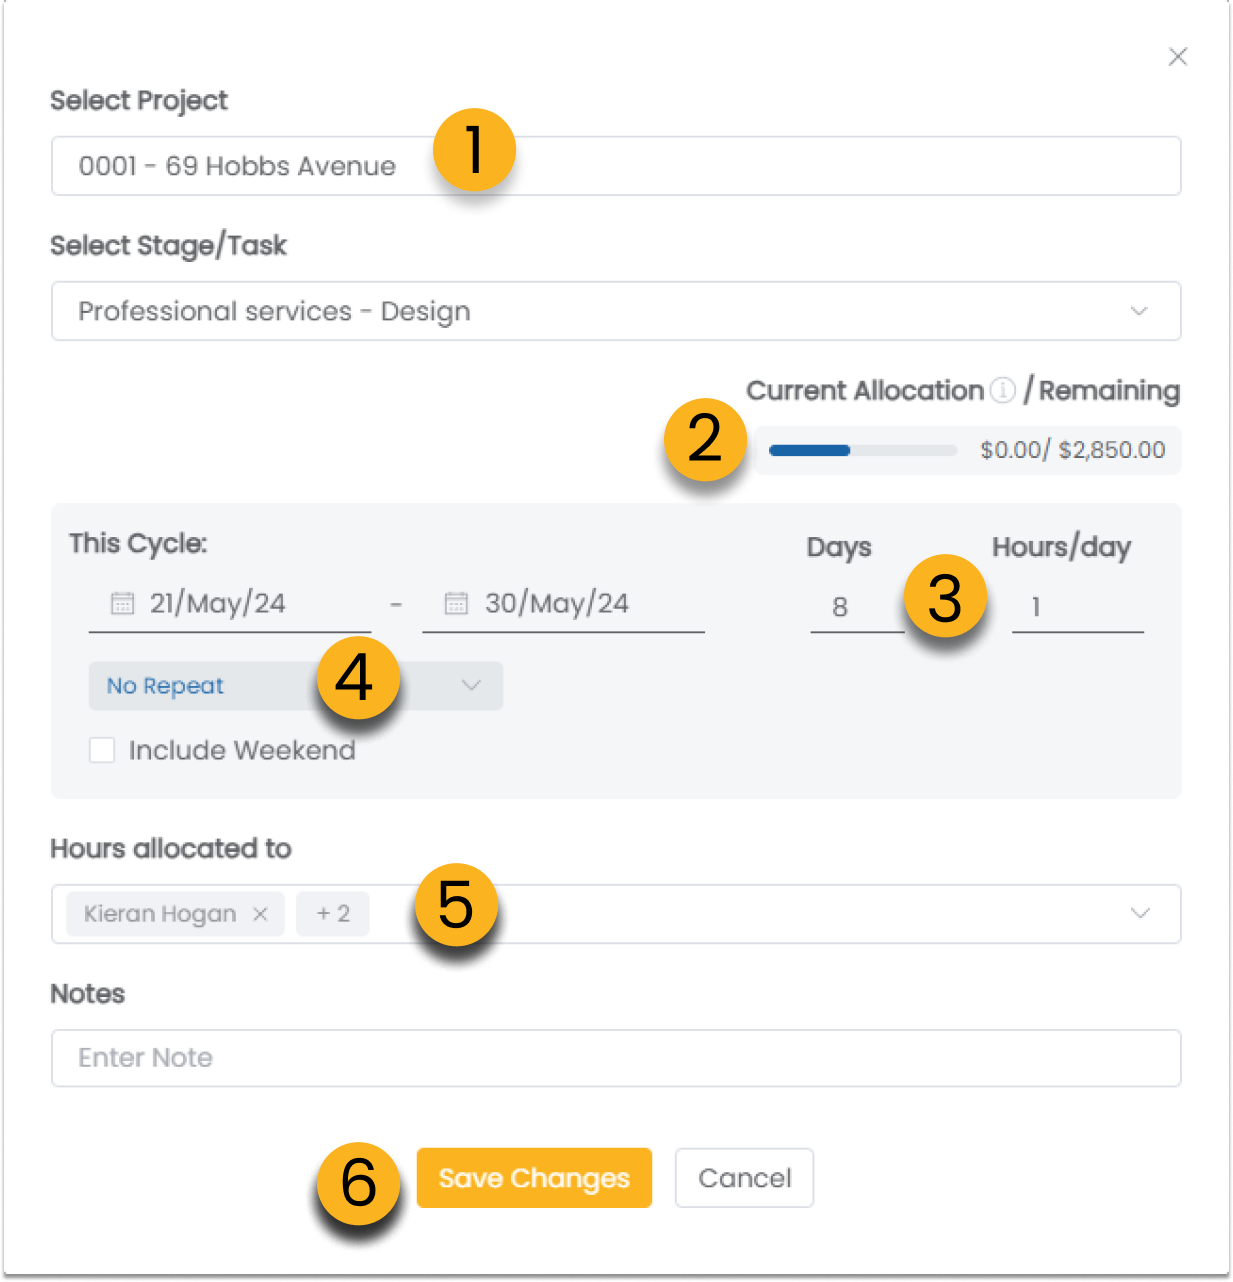
To allocate project hours, you can easily click on the cell to open the project allocation window.
1. Select the project you want to allocate.
2. Select the task. The percentage bar will display the percentage of used hours out of the total allowed budget. The remaining figure shows the remaining budget for the project.
3. Use the Cycle section to choose the hours to allocate for certain days.
4. Choose to repeat at certain intervals for recurring events like weekly or monthly meetings.
5. To allocate the same hours for multiple people, add more team members through the selection.
6. Save Changes to complete the hour allocation. The hours will be visible on the team member’s schedule as an optional setting. Team members will receive email notifications if they have turned on “Schedule & Leave Requests” in their email notification settings.
Allocation Manager

Alternatively, use the Allocation Manager to assign hours:
1. Open the Allocation Manager from the top right of the screen.
2. Select the project stages directly or use the filter on the top.
3. Drag the Stage or Task into the Resource cell to allocate hours.
Schedule & Timesheet Sync
By linking the Resource Planner directly to your personal schedule on Clarc, allocated hours will automatically appear in your schedule, and you can adjust and log them into your timesheet as needed.
1. Allocated time will show up in the personal schedule with a white background, indicating the hours have been allocated.
2. Click on an allocated item; a time entry window will pop up, then you can choose to Log the entry to the timesheet.
3. All allocated time logged into the timesheet will be shown with the project's background color.
.png)
From anywhere in Clarc, if you click the team function button this will take you directly to your contact list.
Creating Contacts
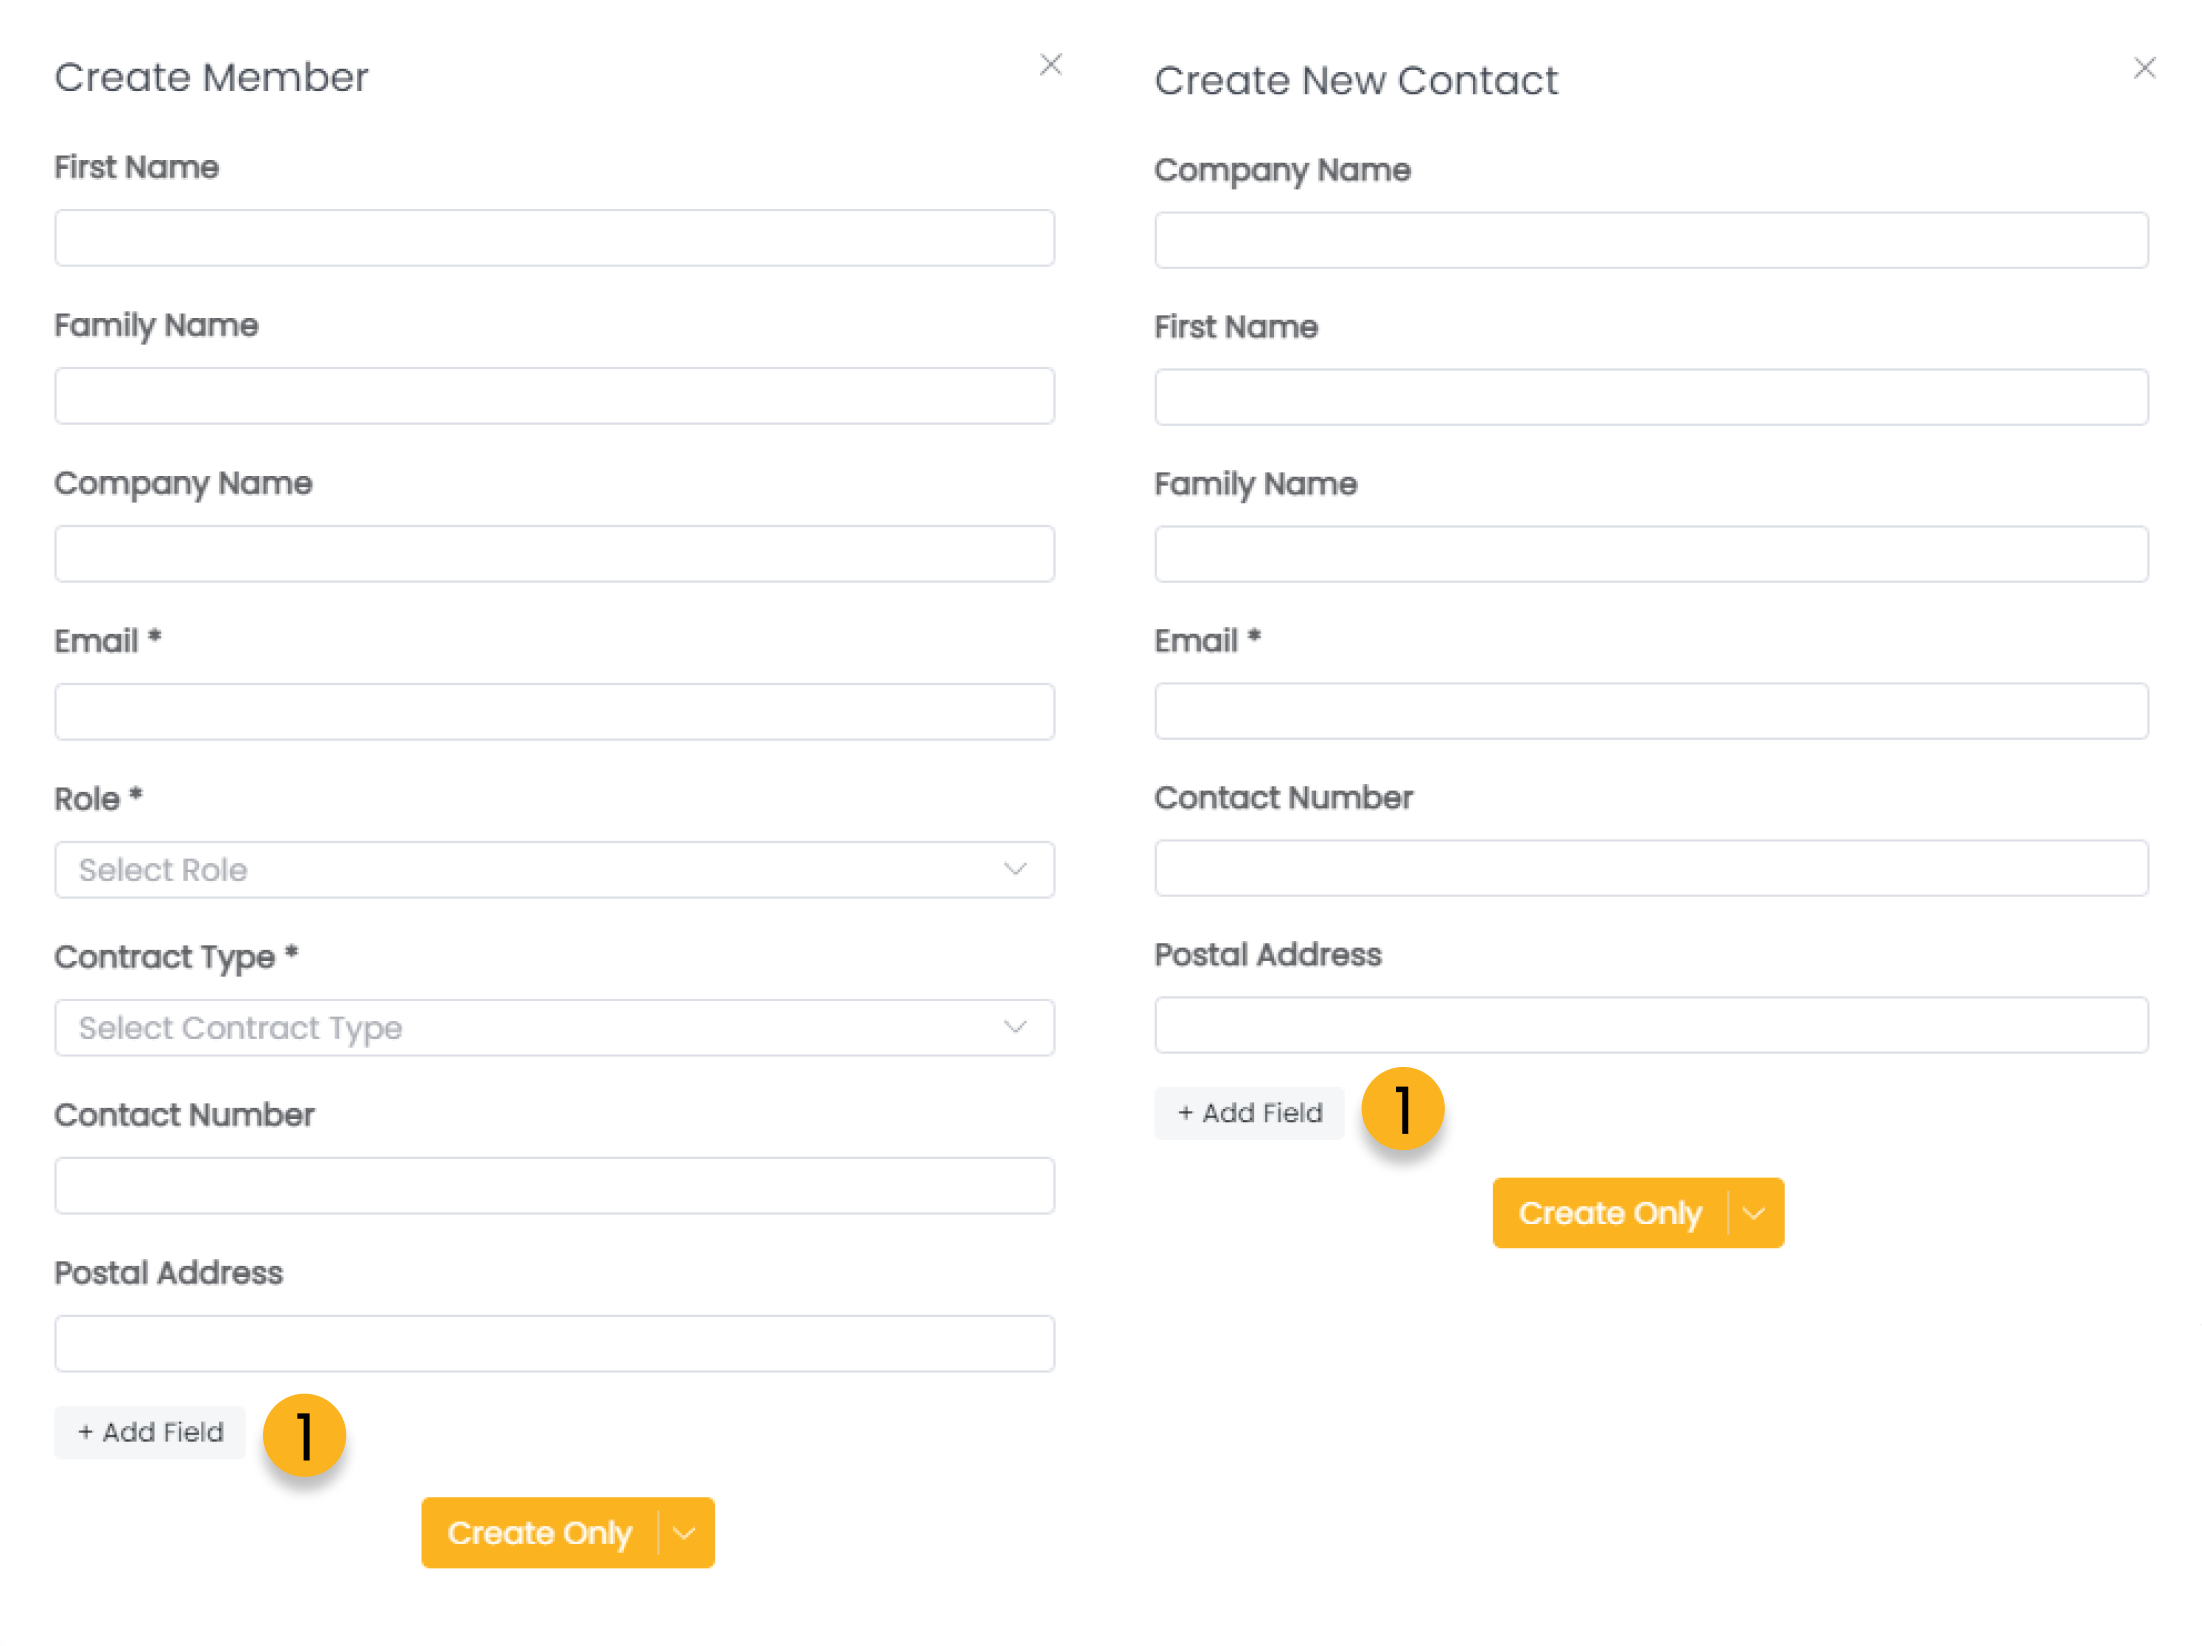
How to create a new contact?
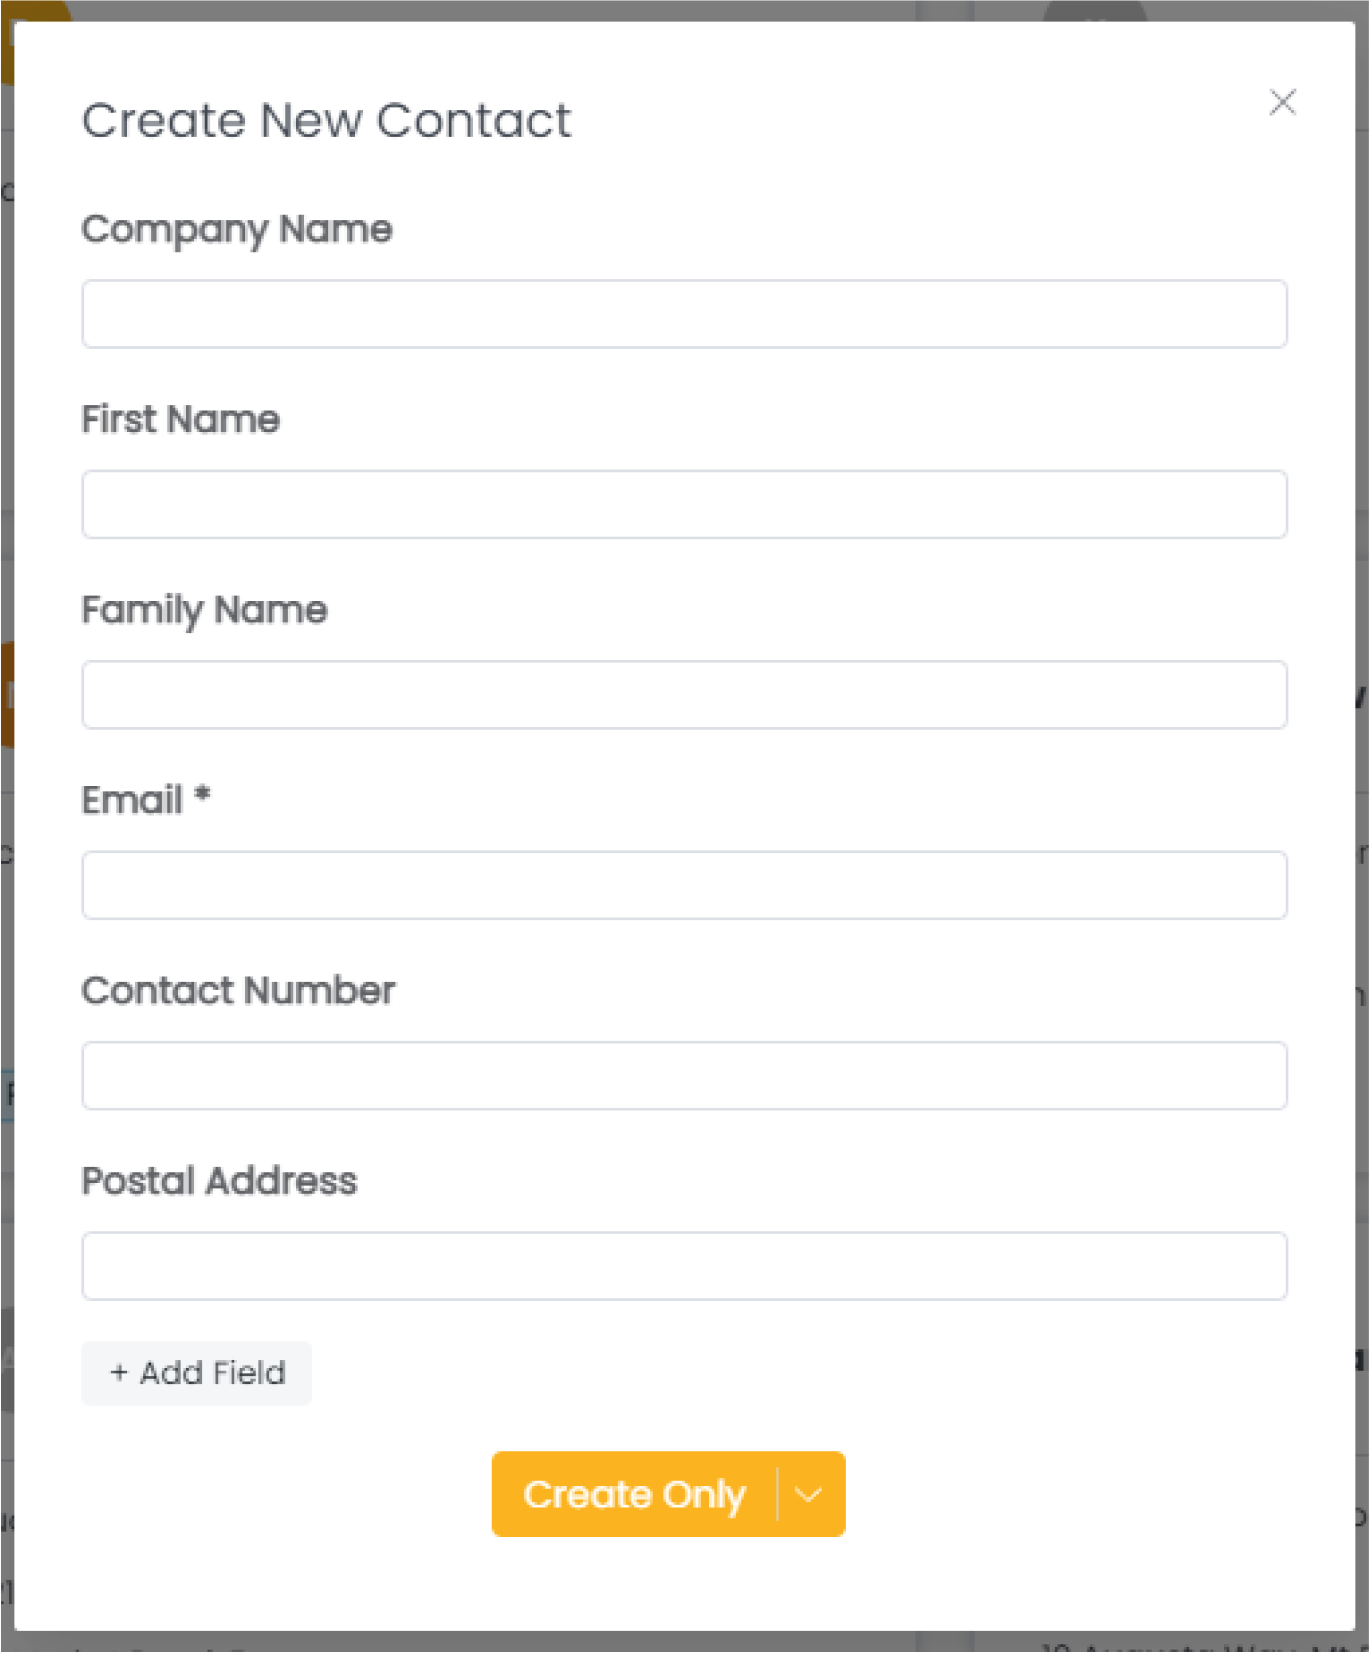
1. Click the Create Contact button.
2. Fill in your contacts details and create the contact within your account, make sure to enter the email as the compulsory field.
What can you do with your new contact?
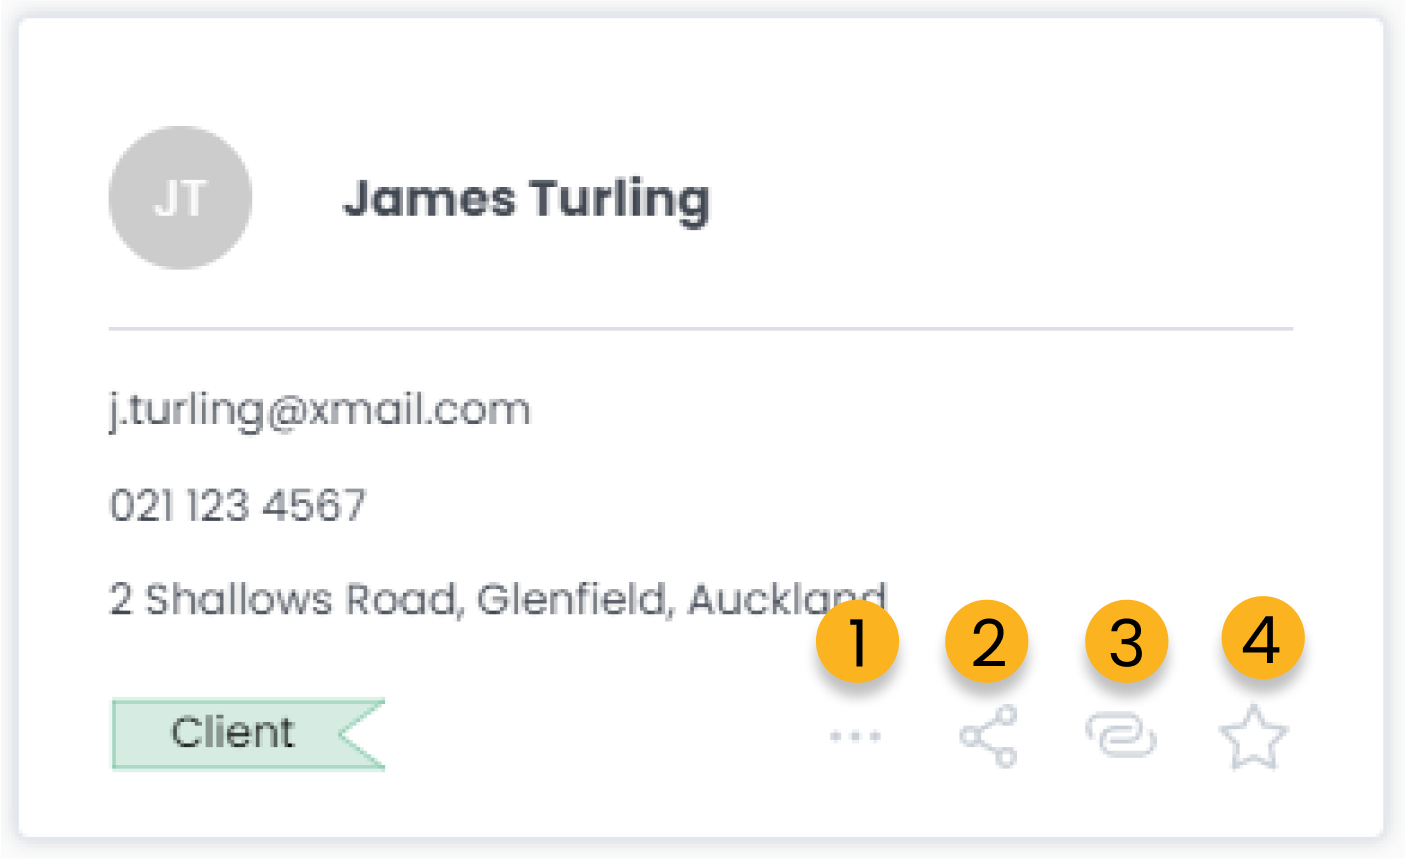
1. Edit the details of your contact.
2. Share contact details with others.
3. Send an activation link for your contact to create their own Clarc account. When coloured this indicates that they have created and account and connected with you.
4. Favourite this contact to appear at the top of your contact list.
Creating & Activating Team Members
How to create a new team member?
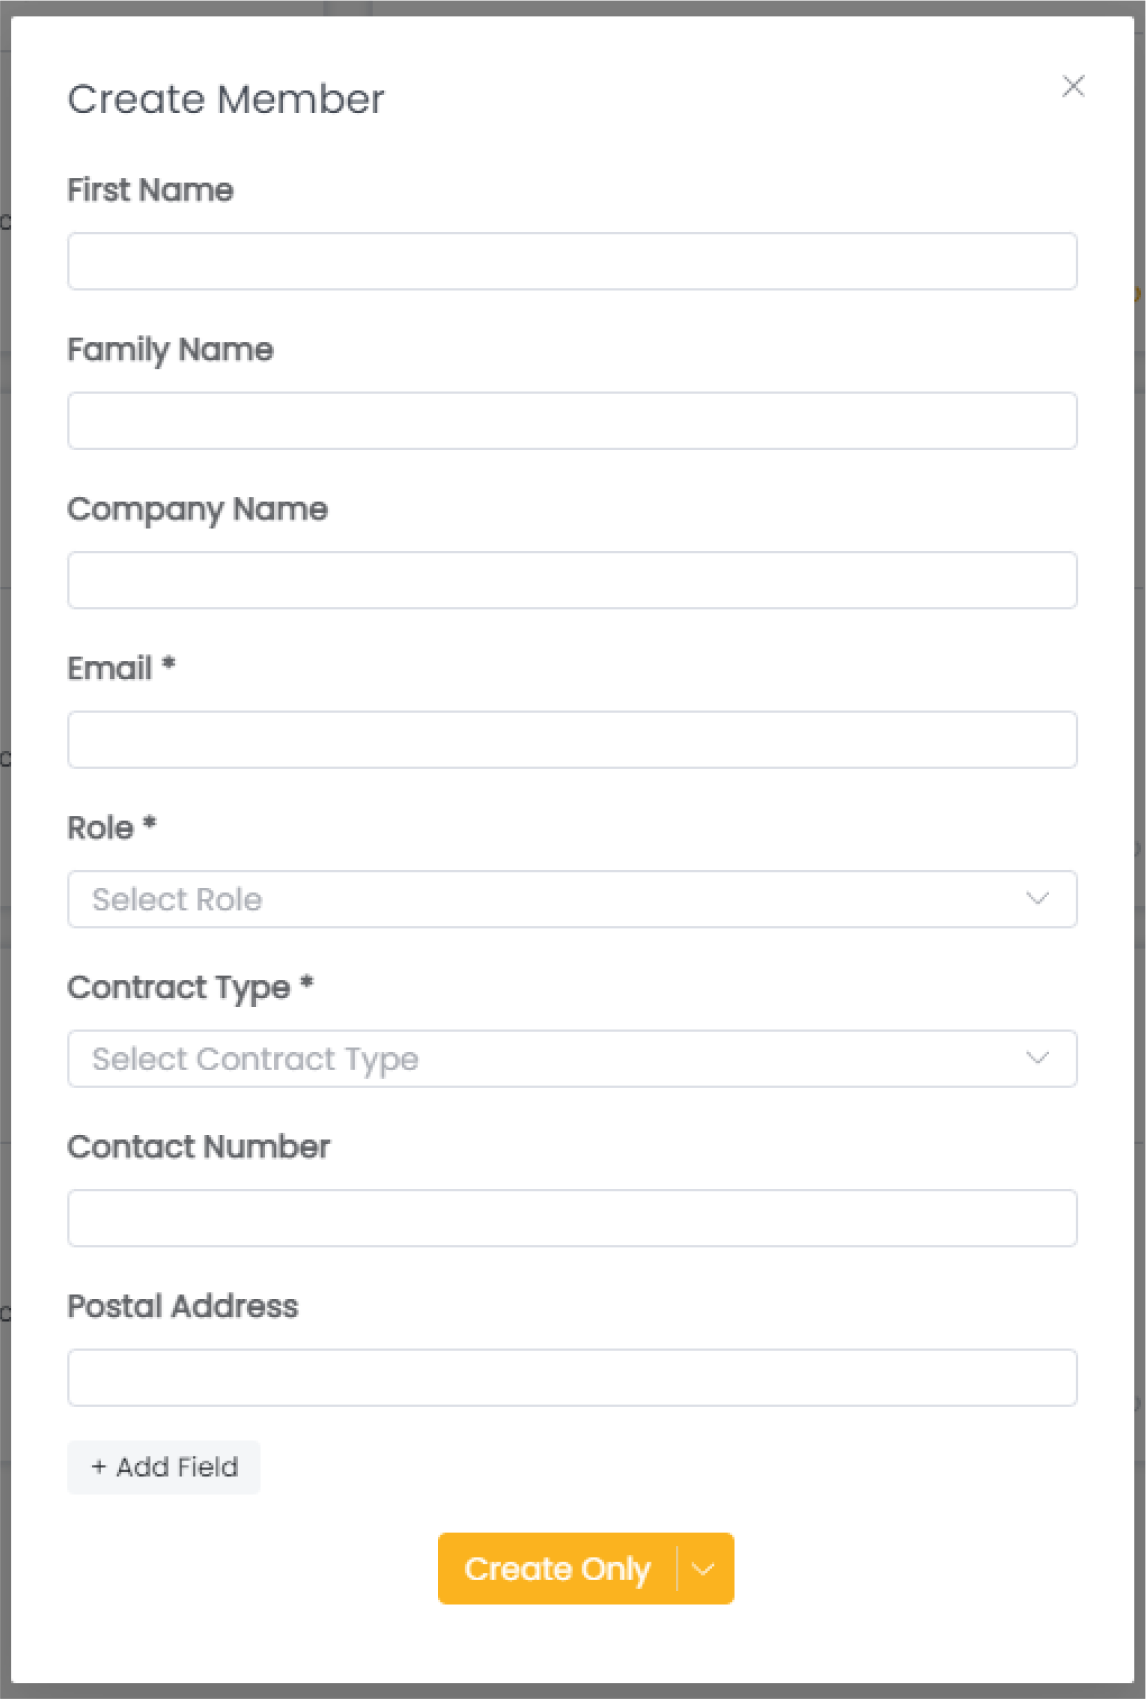
1. Click the Create Member button.
2. Fill in your team members details and create the team member within your account, make sure to enter the email and role as the compulsory fields.
3. You can click the create only button to create the team member contact and activate their account later, or if you click the dropdown box you will be able to create and activate which will send them an activation link upon creation.
What can you do with your new team member?

1. Edit the details of your team member.
2. Share your team members contact details.
3. Activate your team members Clarc account. When coloured this icon indicates that their account has been activated.
Contact Tags
How to create and add tags to contact
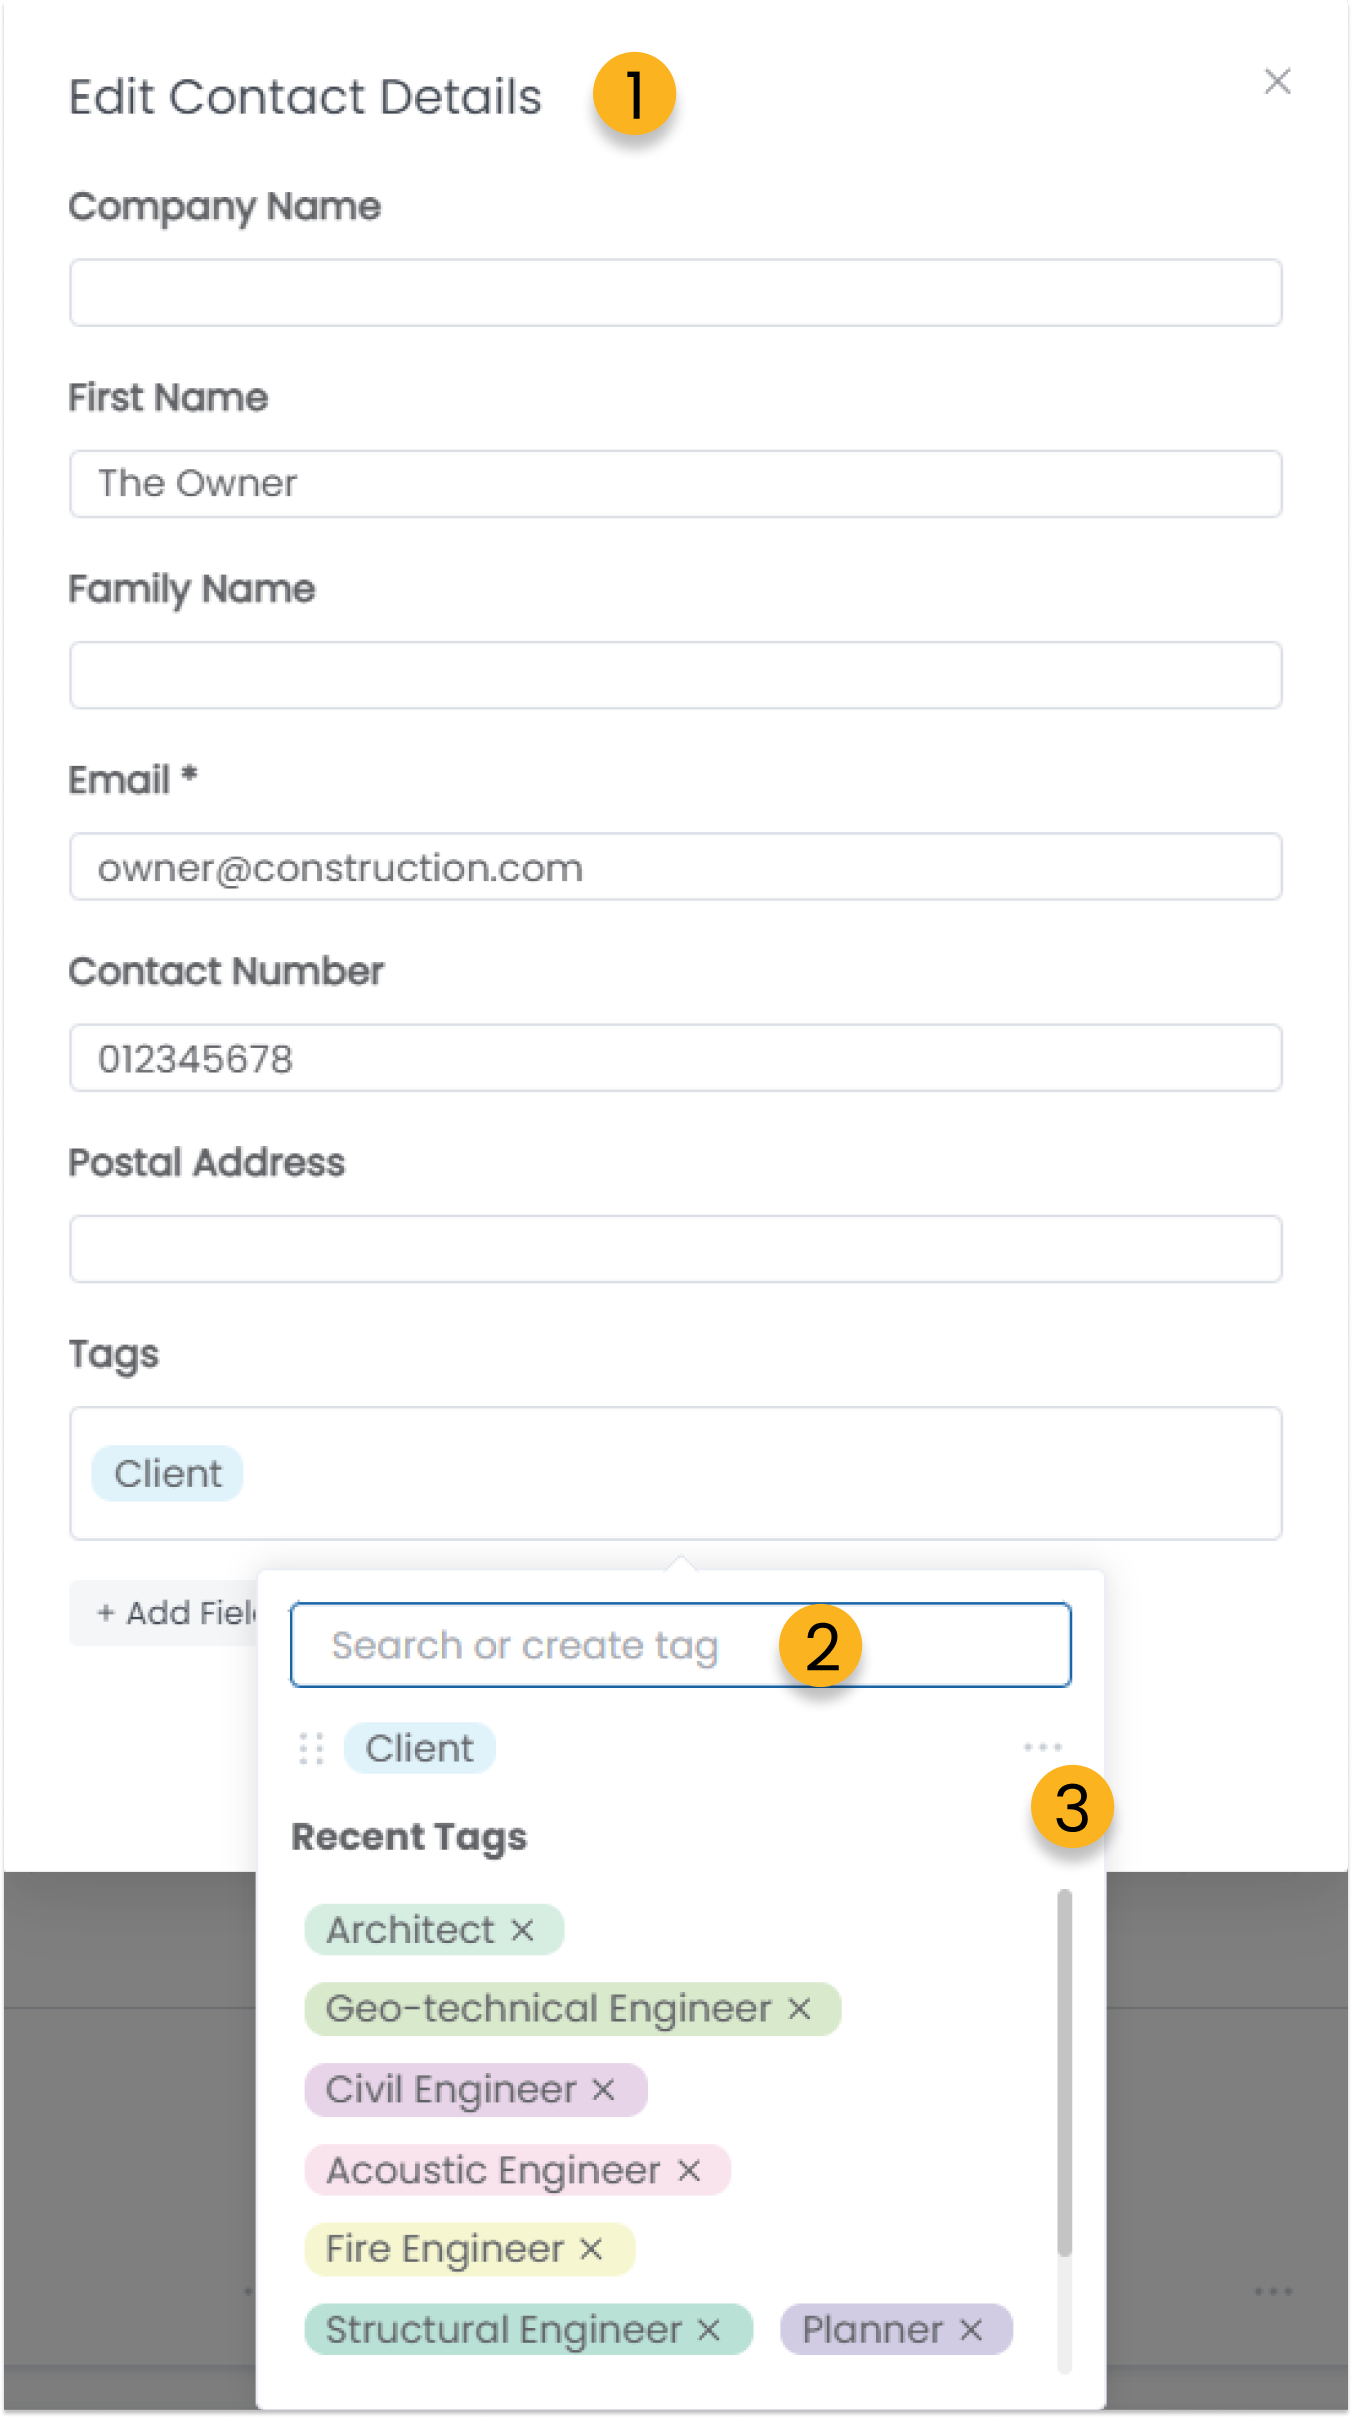
1. First, go to the Contact page, and click the ... under the contract to access Edit Contact Details window.
2. If this is your first time using tags, there will be no recent tags shown. Simply type the name of the tag you wish to create in the search bar and click the option that appears to create that tag. To add tags that are already created simply select them from recent tags or begin typing to search for your desired tag.
3. To remove tags or change the colour of certain tags, click the ... button to the right side of your selected tag.
Timesheet
.png)
From anywhere in Clarc, if you click the Timesheet function button this will take you directly to your time entry page.
From there, you will see four separate tabs. Time entries (for entering your time), schedule (for calendar entries), Project stage (for setting up stages on projects) and Attendance (for managing your teams attendance and leave requests)
Time Entries
Navigating the time entry page
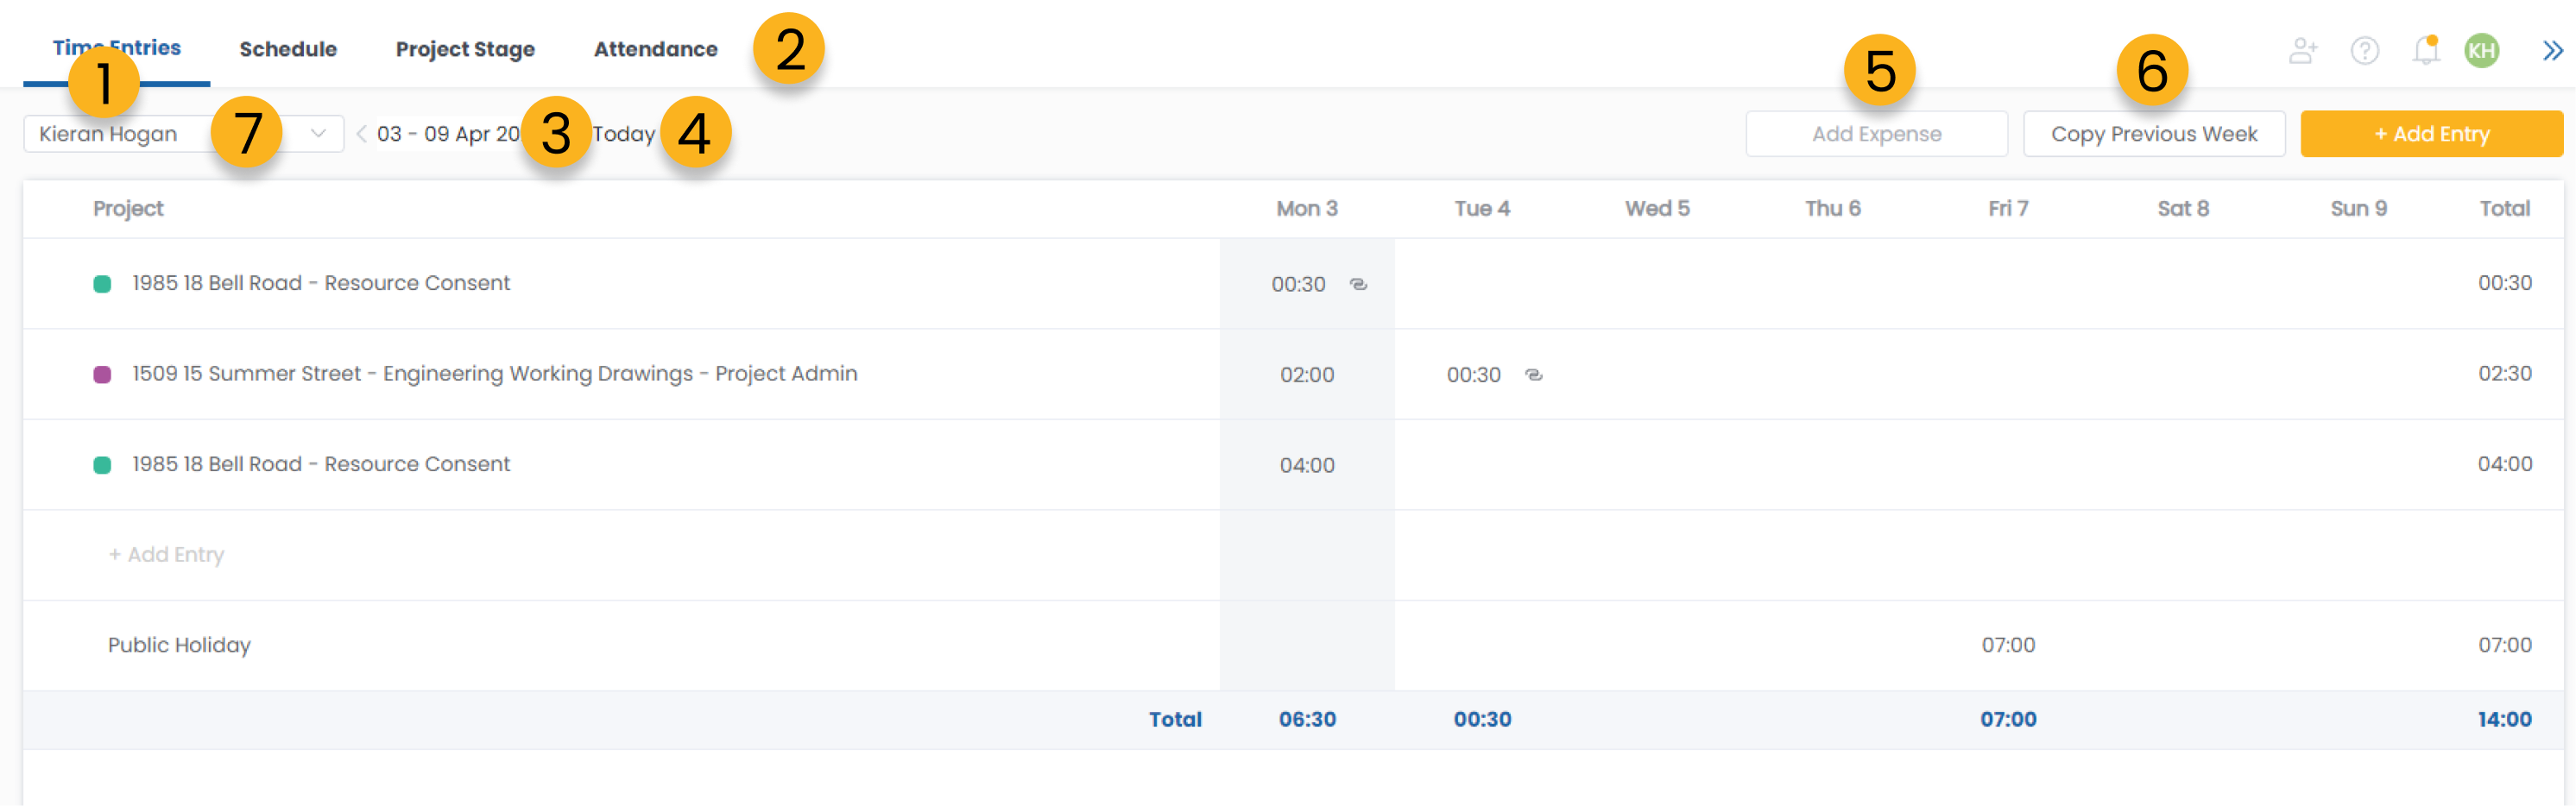
1. Your current tab will be highlihted, currently on the time entries tab.
2. Click to navigate to the other timesheet pages.
3. Navigate forwards or backwards between weeks of time entries.
4. Click the today button to jump directly to the week that contains todays date.
5. Select a cell and add an expense to that cel as opposed to a time entry.
6. Copy the project titles from your previous weeks time entries rather than having to select them again as you enter new time.
7. As an admin, click the dropdown to select another team members time entry to view and edit.
How to create a new time entry?
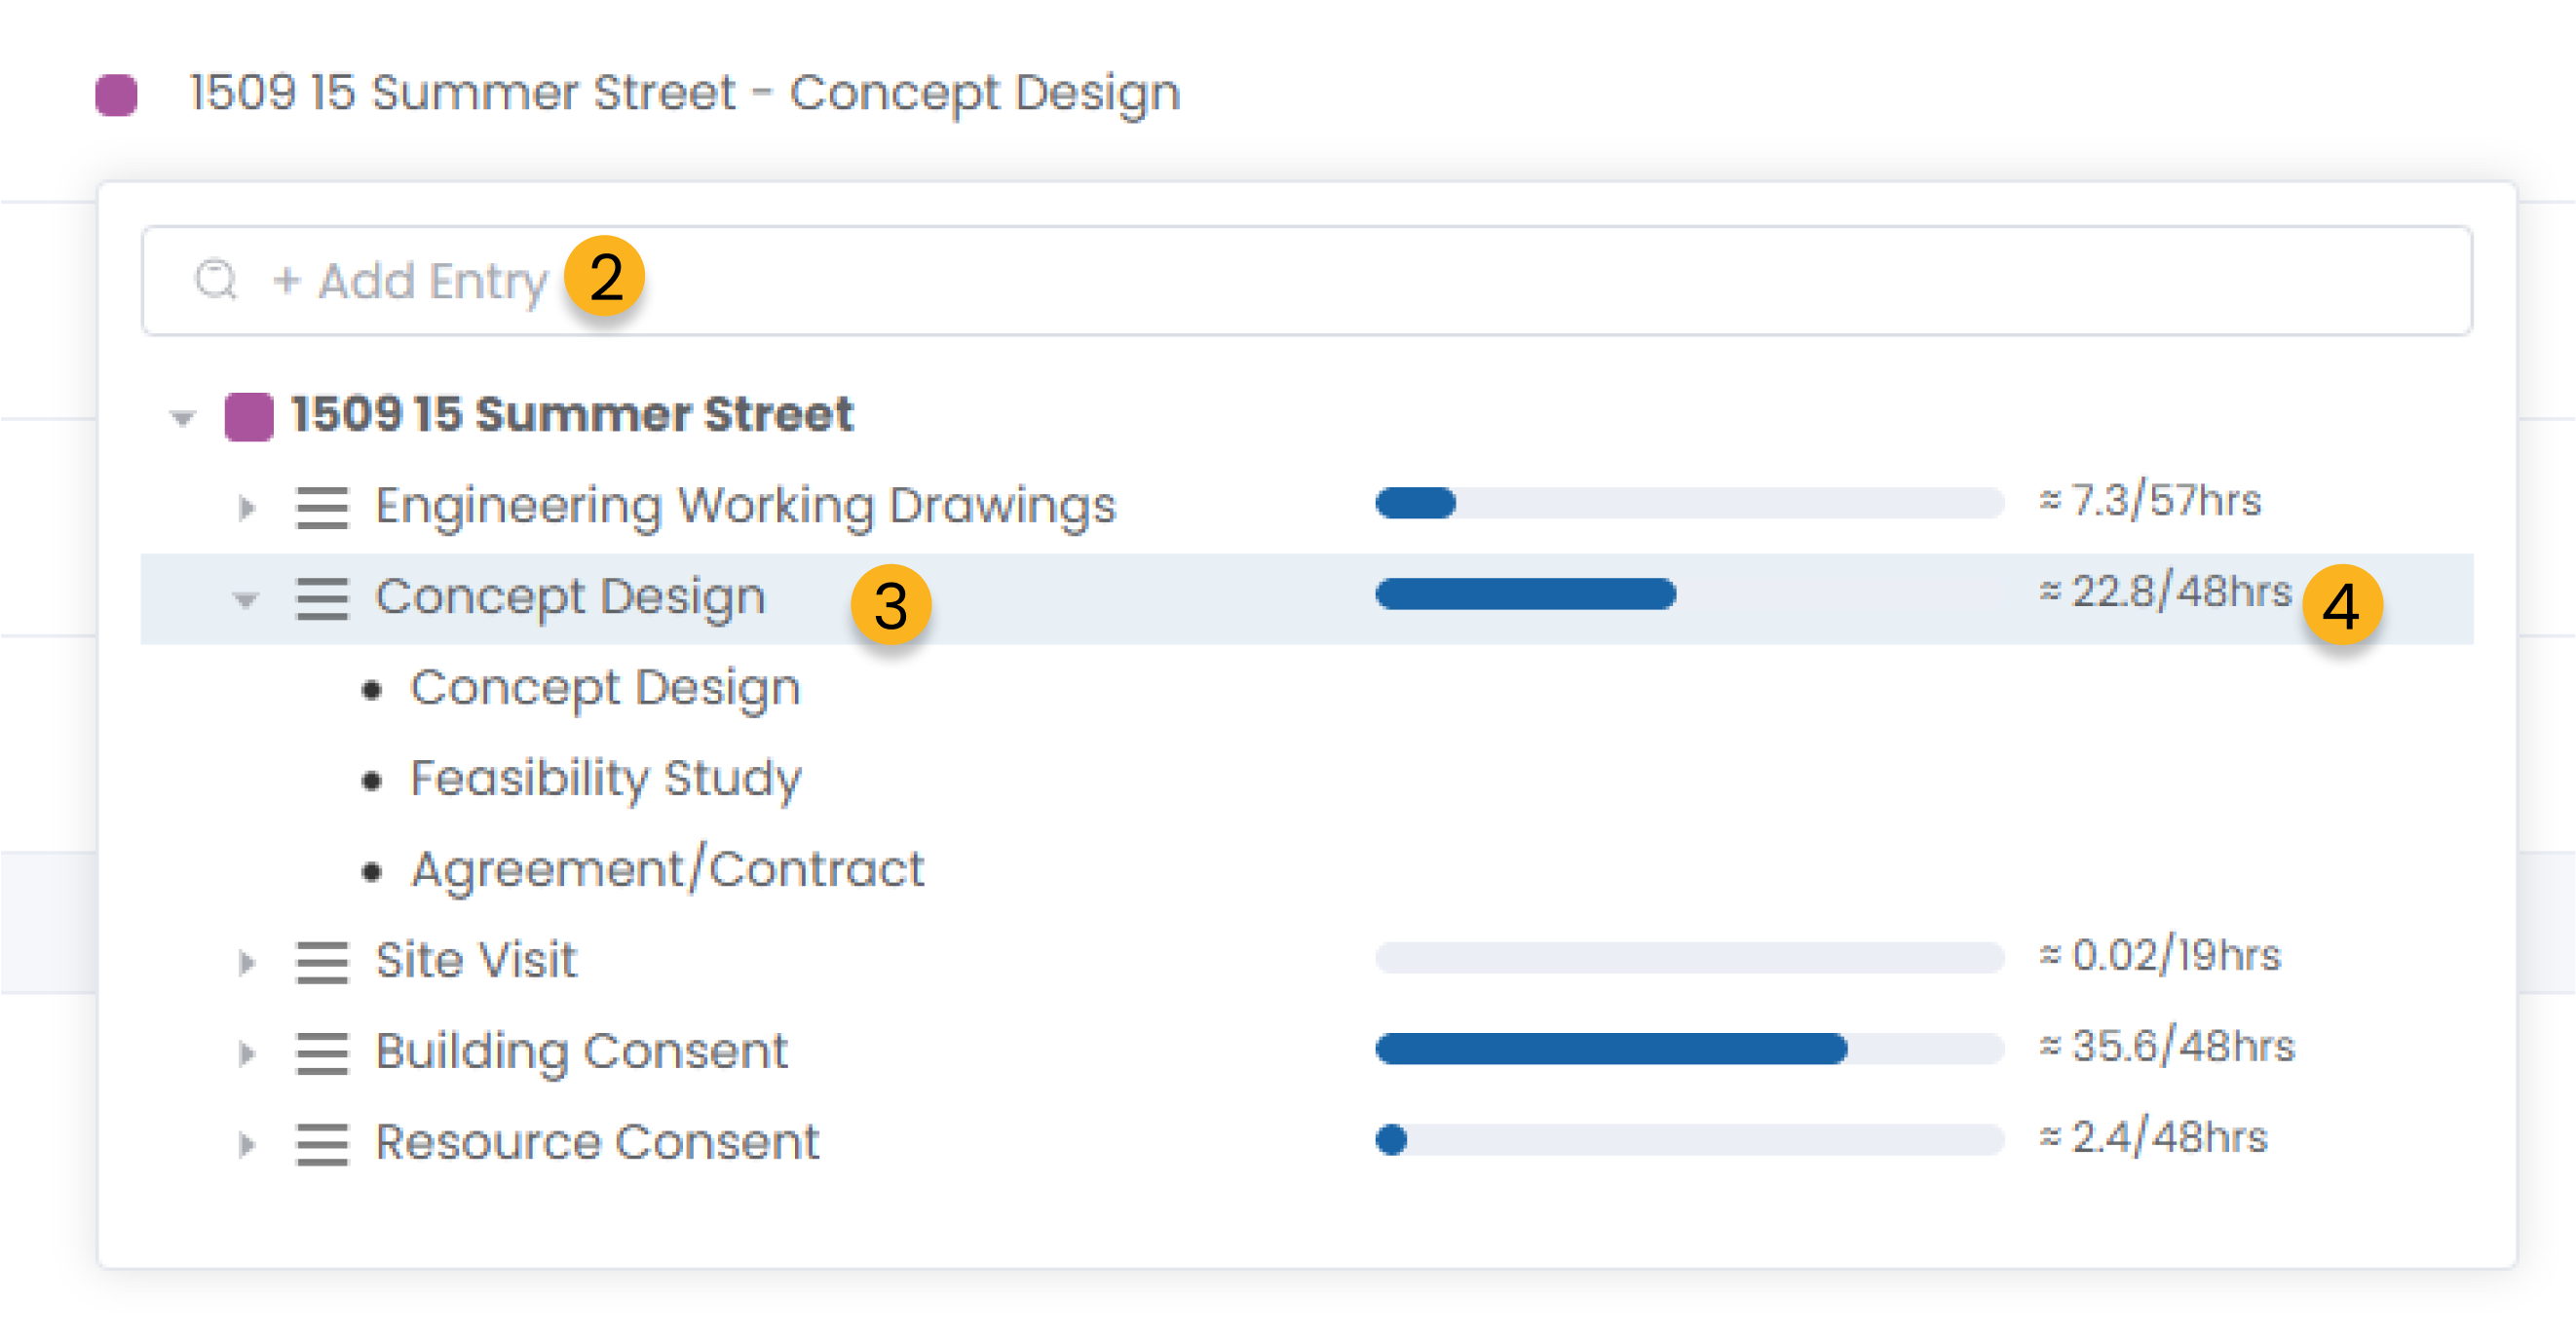
1. Click to add a new entry.
2. Search the project you wish to enter time against.
3. Select the stage or task to enter time against.
4. You can see a preview of the budget usage here.
5. Select the cell and enter a denotion of time you wish to record. You can type this is decimal or time based format.
6. Enter the notes related to your new time entry at the bottom of the time entry page.
How to record time live?

1. Click to add a new entry.
2. Search the project you wish to enter time against.
3. Select the stage or task to enter time against.
4. You can see a preview of the budget usage here.
5. Select the cell you wish to start recording live within.
6. Click the ‘Clock In’ button near the bottom right of the page.
7. This will begin recording time live in the background while you work. You can leave this page and come back to Clarc any time and stop the timer from your navigation bar or from the time entry page. Hitting the stop button will take you directly to your time entry page with the amount prefilled for what was recorded ready for you to enter you time entry notes.
How to add an expense?
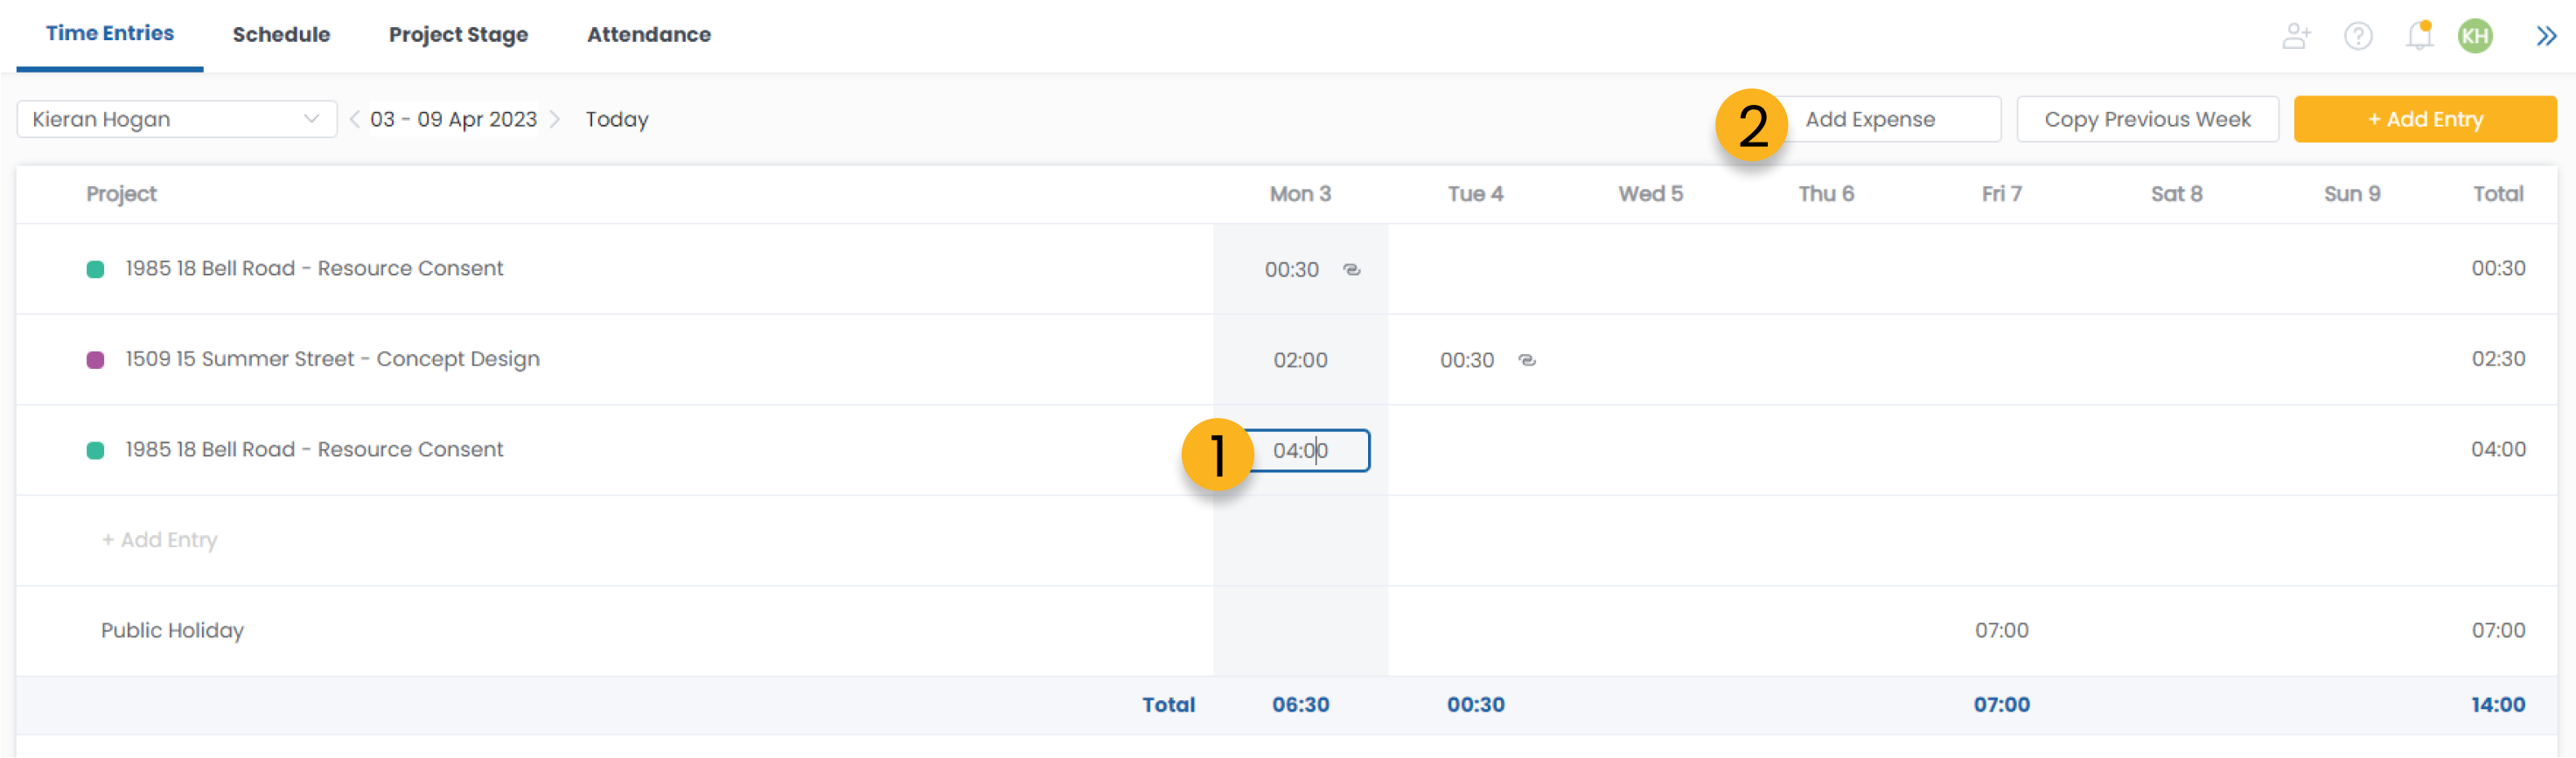
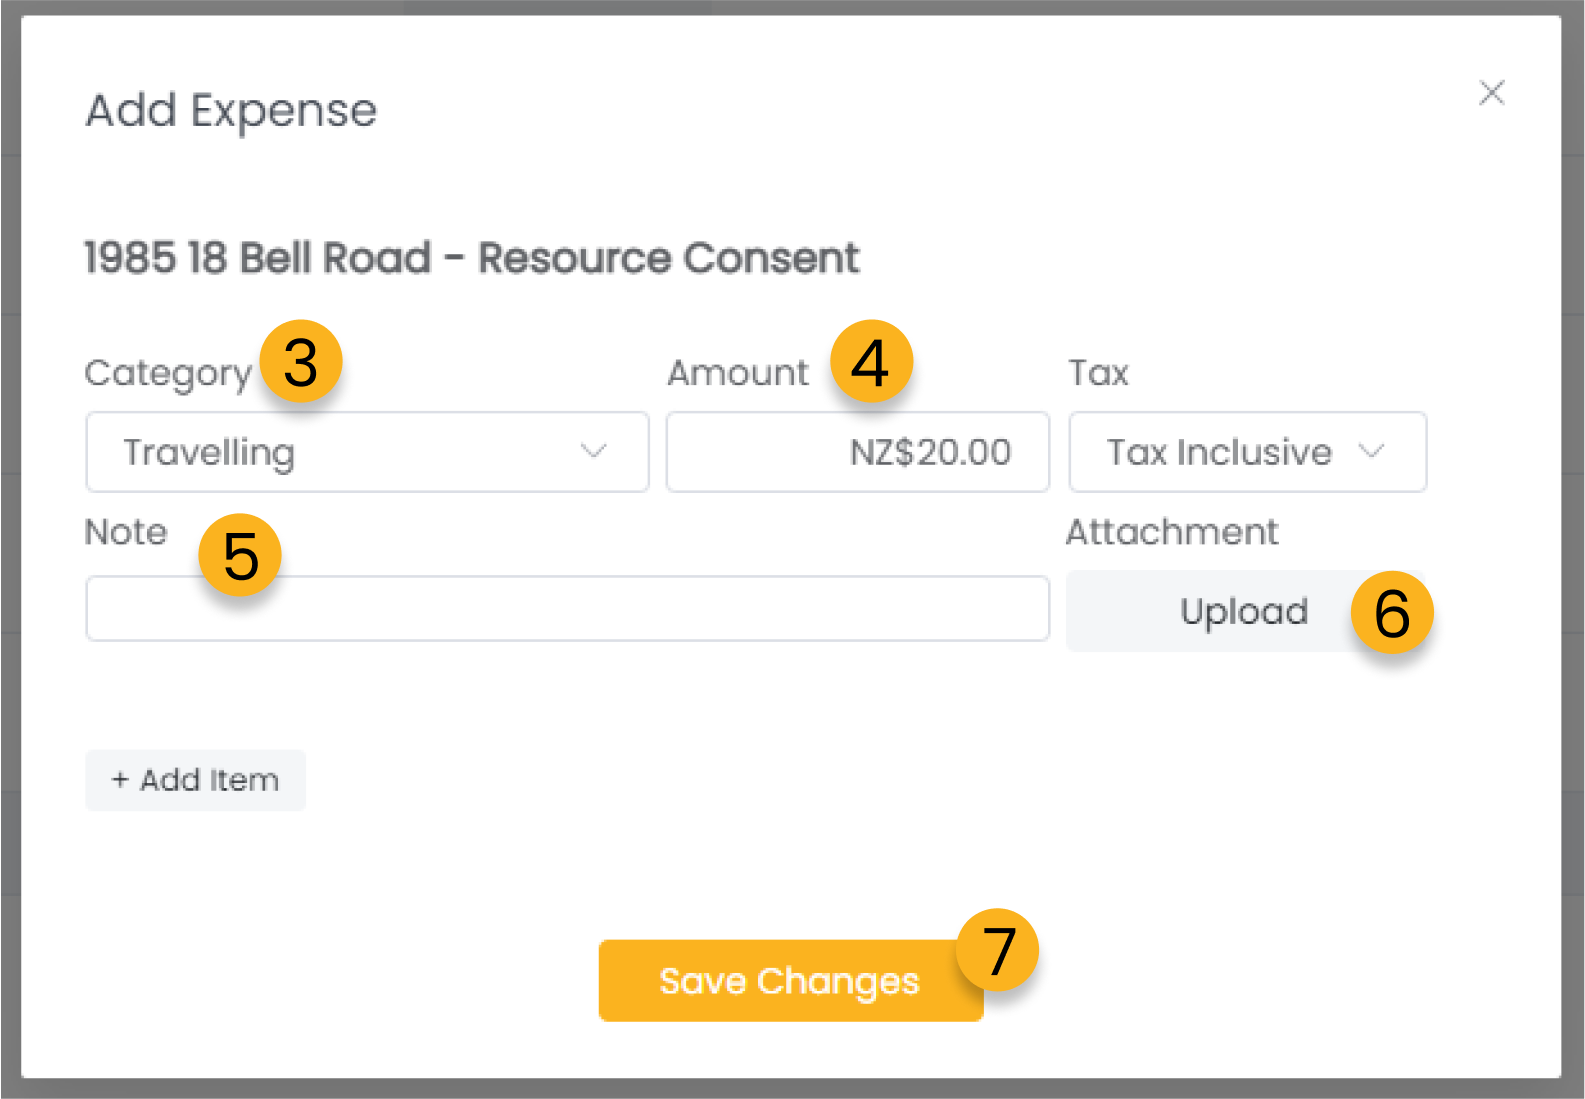
1. Select the cell you wish to enter an expense within.
2. Click the add expense button.
3. Select the category of expense type.
4. Enter the amount you are recording for this expense.
5. Add additional notes for this expense.
6. Upload an attachment such as a receipt for evidence of this expense.
7. Save your changes and add the expense to your time entry.
Schedule
Navigating the schedule page
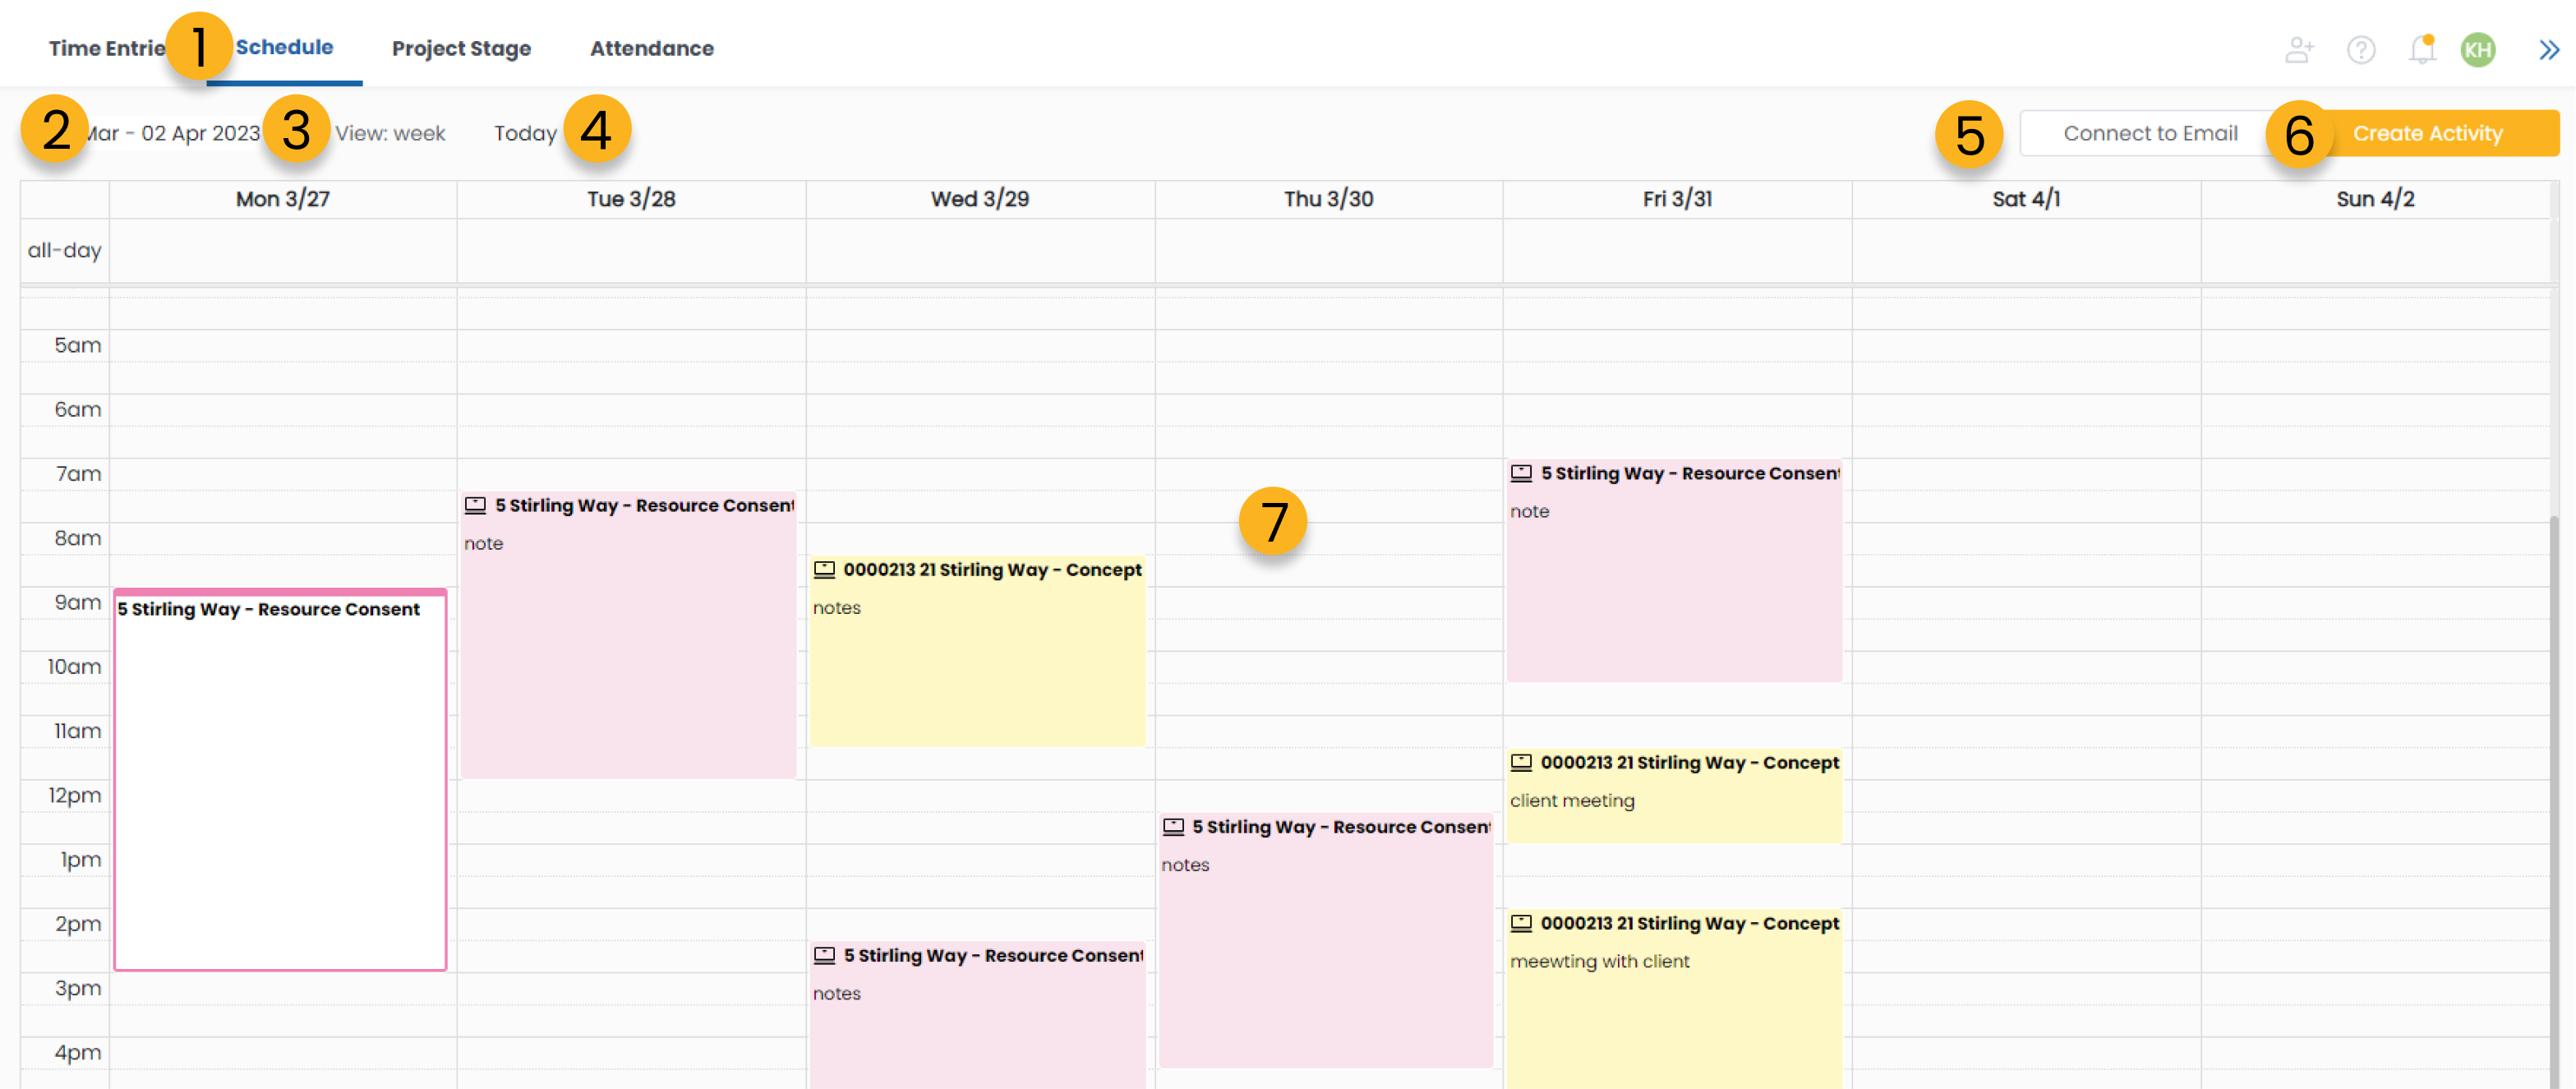
1. Your current tab will be highlihted, currently on the Schedule tab.
2. Click to navigate to the previous week/monthly schedules.
3. Change the view between weekly and monthly.
4. Click the today button to jump directly to the week/month that contains todays date.
5. Connect to a third party calendar integration to show both your calendar entries in your Clarc calendar.
6. Create a new activity in your calendar.
7. The current day will be highlighted within your calendar view. Events you create will appear here on the corresponding days.
How to create a new activity?
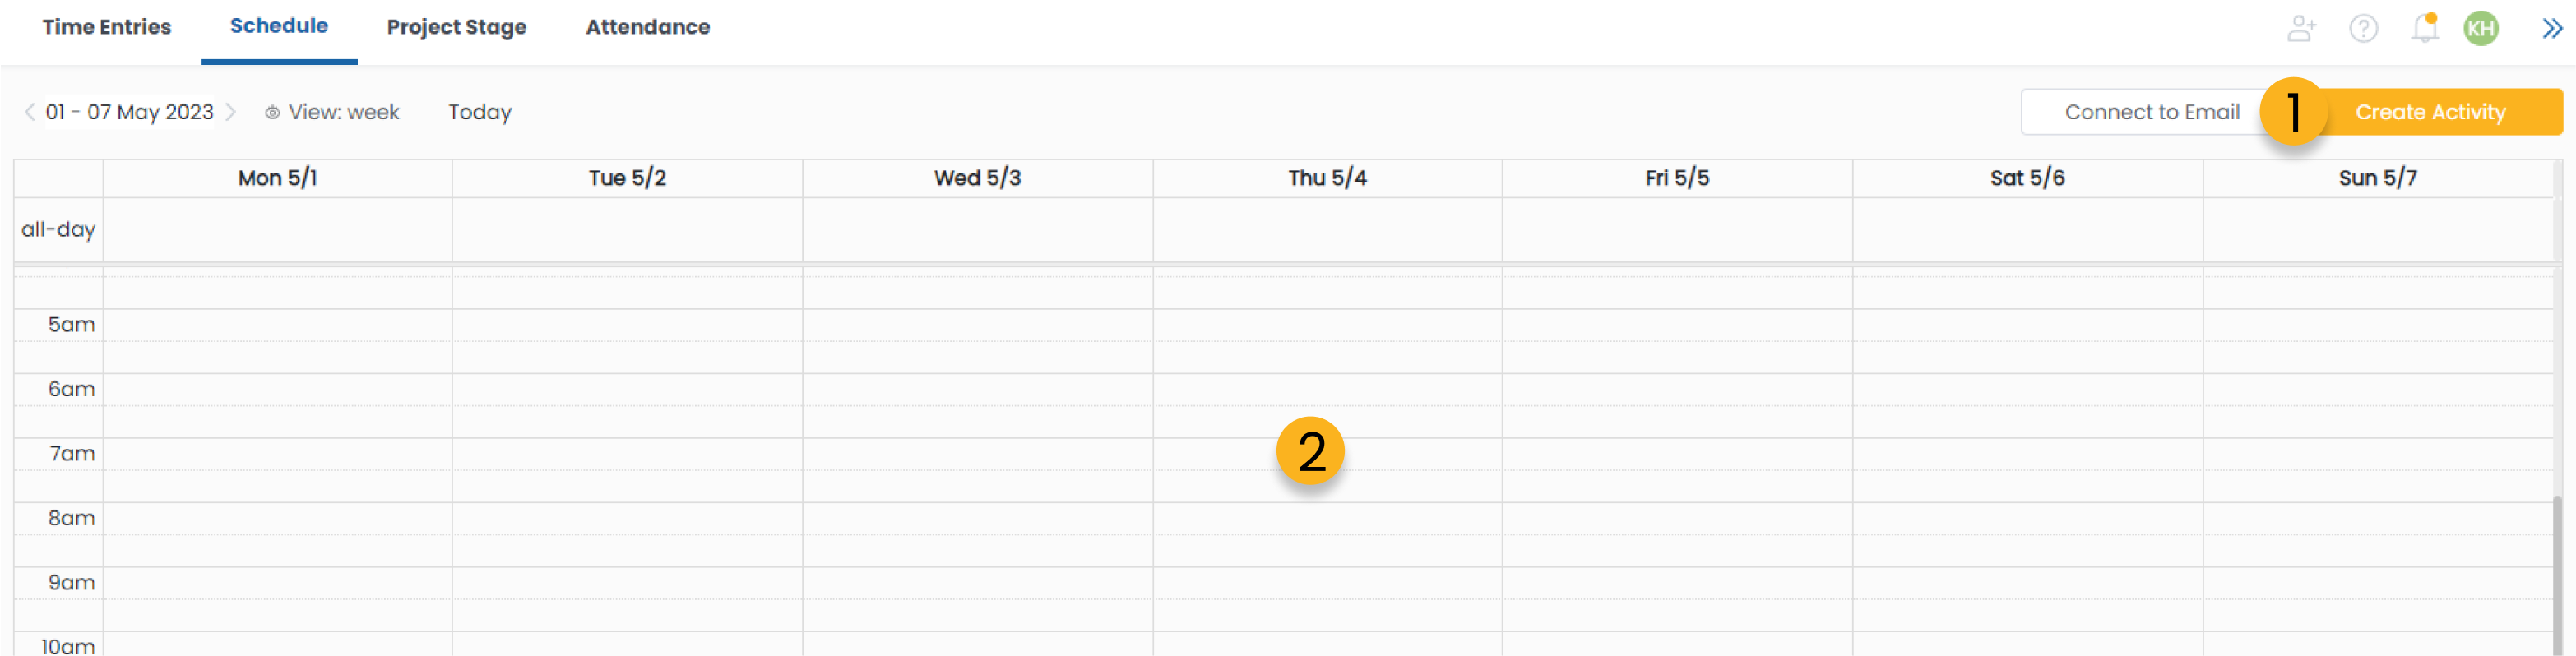
1. Primarily, the way you will create a new activity in your schedule is by clicking and draggin to highlight a section of your schedule which will open the create activity popup for the selected time slot.
2. The second way you can create an activity is to click the Create Activity button. However, you will need to select the time period for the activity manually if you opt for this direciton.

3. Give you activity a title.
4. Refine the date for your new activity.
5. Select/type a location for your activity.
6. Invite your team members through Clarc or others via email if you have integrated with a third party calendar.
7. Add additional notes to describe your activity.
8. Finalise and create your new activity.
How to link an activity to your Timesheet
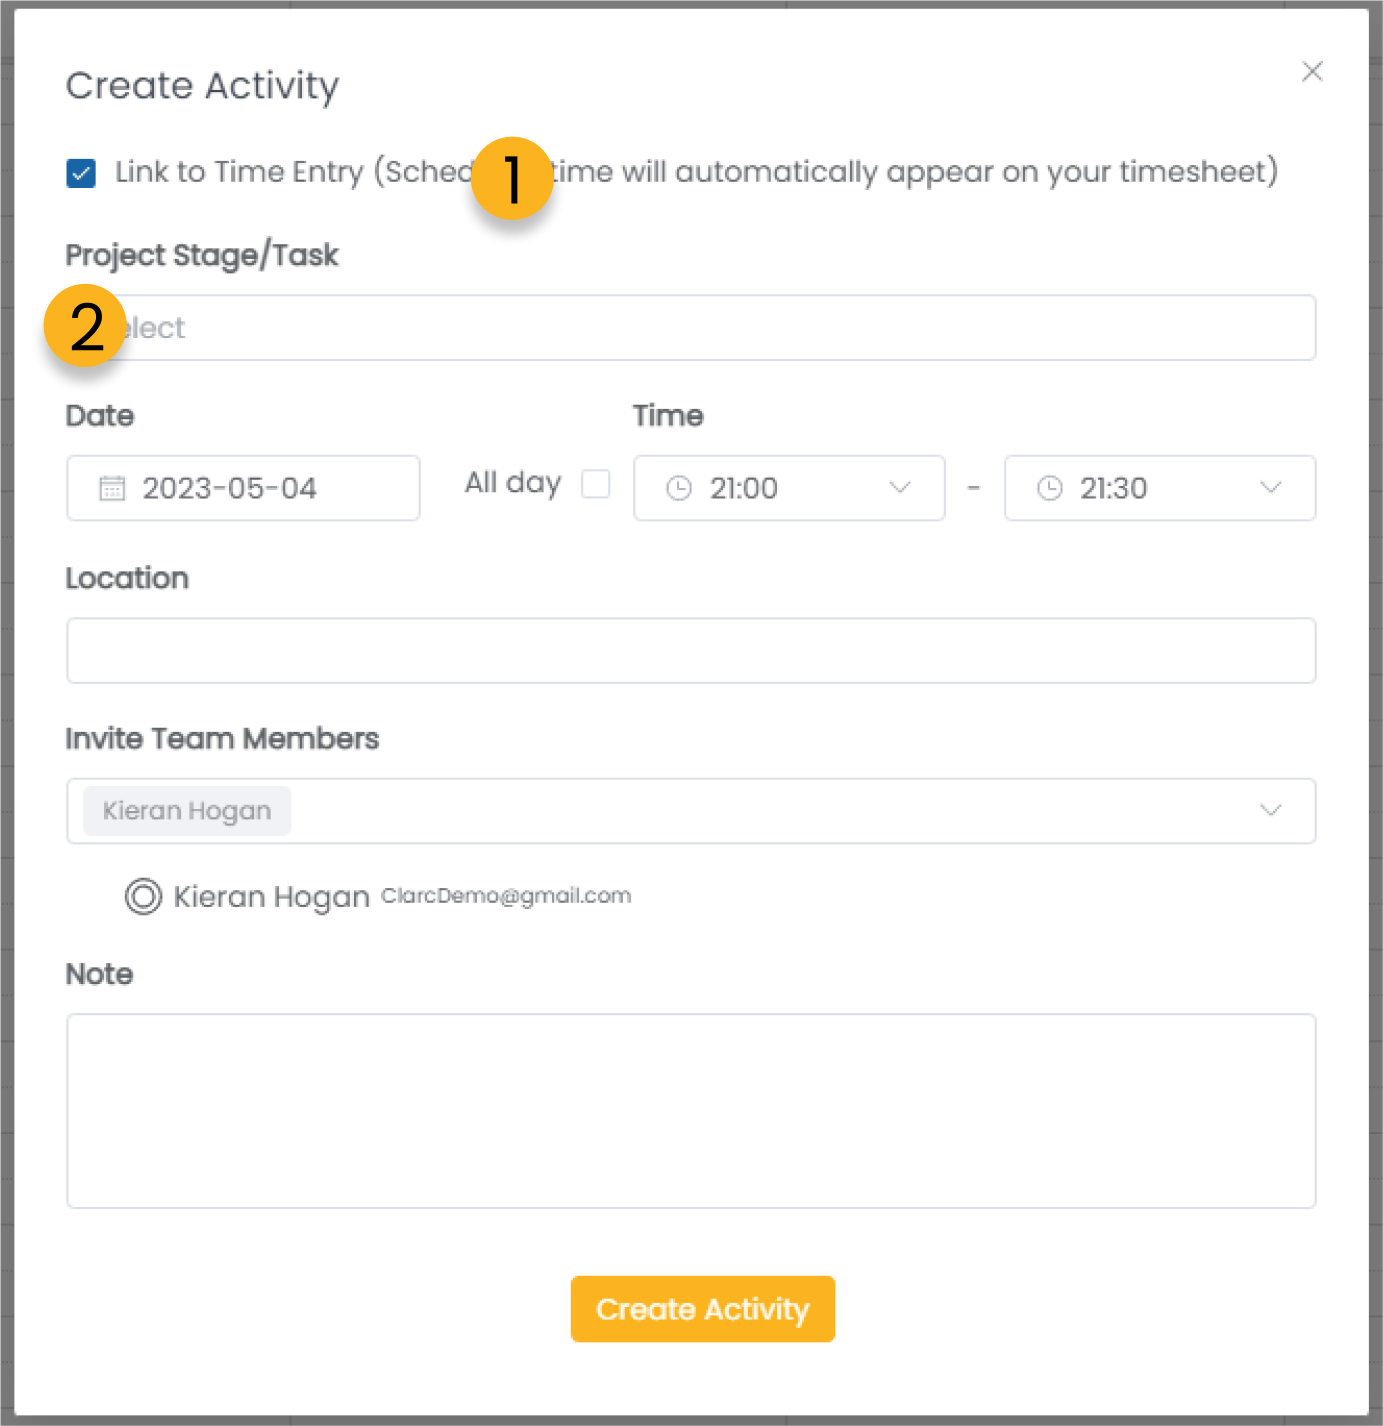
1. Click the checkbox to link this activity directly to your timesheets. This will allow your timesheet to be prefilled with this activity, reducing the need to enter the same information again.
2. You must select a project stage/task for the time to be recorded against within your timesheet.
How to connect to a third party calendar integration?
1. Click the Connect to Email button from your calendar.
2. You will be taken to your admin settings where you will be able to select your preferred email provider to integrate with your Clarc calendar.
Attendance
Navigating the attendance page
.png)
1. Your current tab will be highlihted, currently on the Attendance tab.
2. Your own personal upcoming leave days, including public holidays.
3. Your personal remaining leave.
4. Your personal leave usage.
5. As an admin you can edit the settings of your team members leave.
6. As an admin you will be able to assign leave to yourself and others. As a team member without admin privelages you will see an Apply for Leave button to make your leave requests.
7. This is your teams leave calendar. See what days people have of and when they are coming up.
8. Filter your leave calendar by team members and date.
How to apply/assign for leave
1. From the attendance tab you can click the button to Apply for Leave at the top right.
2. You can view and manage all of your past leave requests from the View request tab.
.png)
3. Select the type of leave you are applying for.
4. Select the date and time range for your leave application.
5. Add additional notes for your leave application. The person reviewing your application will see these notes.
6. Click apply to finalise your leave application. (You will see this button as Approve if you’re the admin of the account)
How to review and approve/reject leave requests?
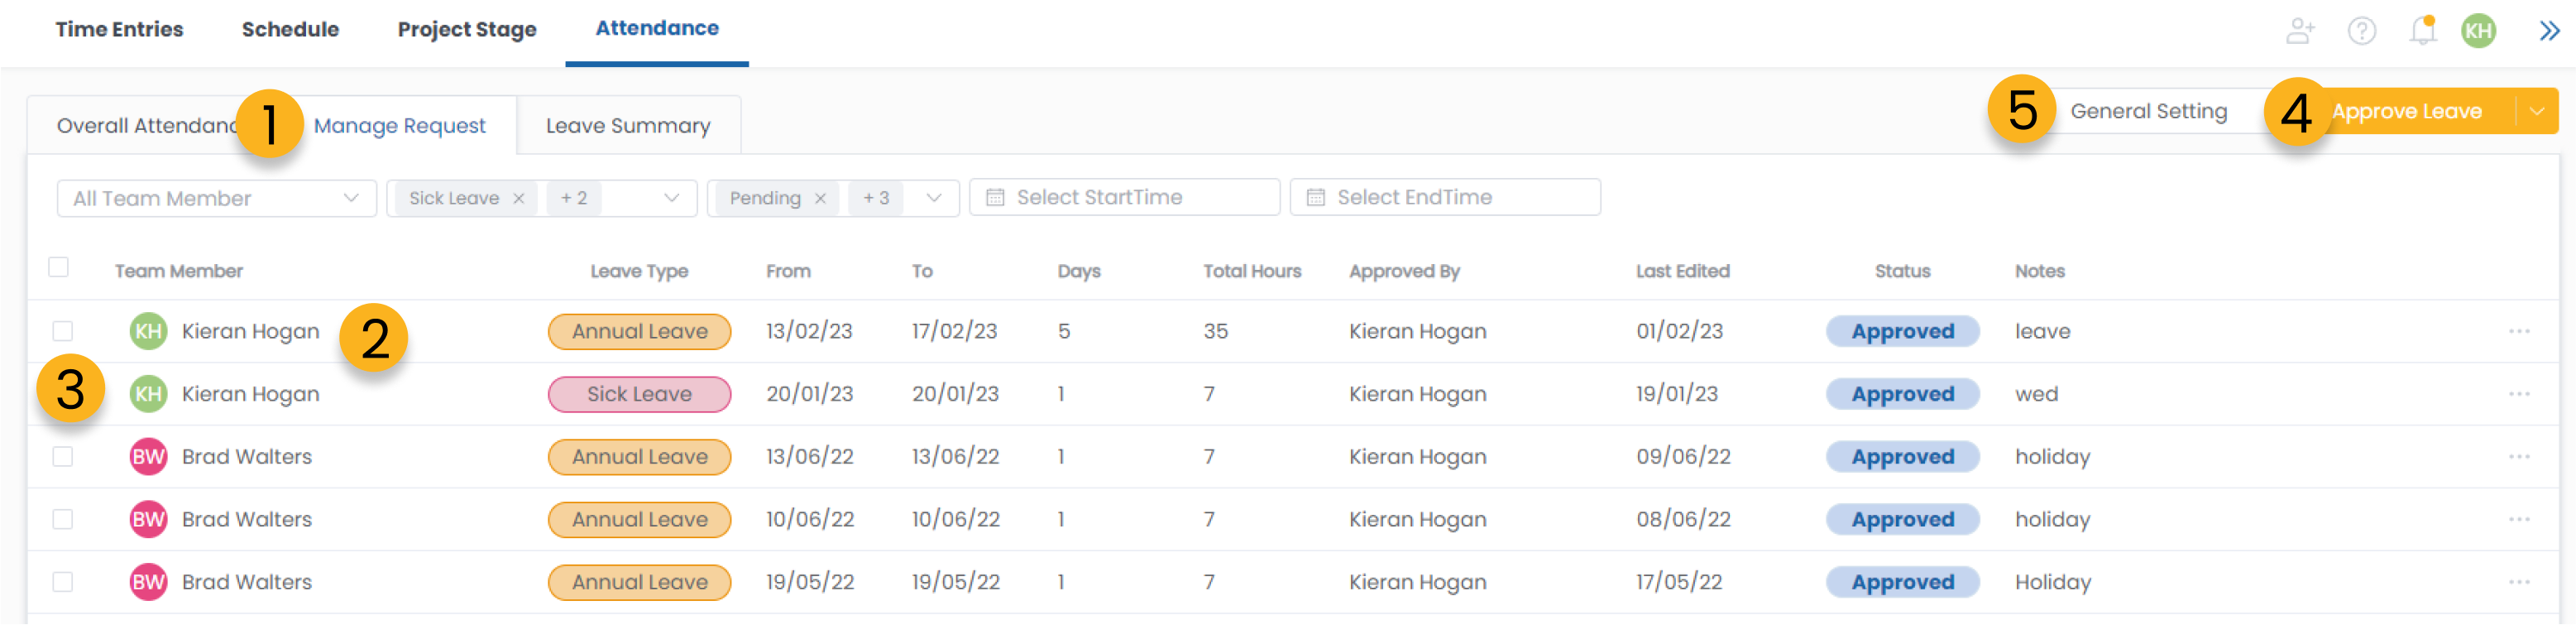
1. Head to the manage request tab to view all the leave requests your team have sent.
2. Select one of your teams leave requests to view the details of their request. You can also approve individual leave requests from the details popup.
3. Click the checkbox on one or multiple leave requests to multi-approve or decline leave requests.
4. Click to approve the selected leave requests or click the dropdown to decline selected leave requests.
5. Edit the general settings of your team members leave amounts.
How to view your remaining and upcoming leave?

1. Filter by team member as an admin you can view all your teams remaining leave, without admin privelages you will only see your own remaining leave amounts.
2. Show amounts in days or hours.
3. Total accrued leave.
4. Most immediate upcoming leave dates.
5. Edit the employment contract details of your employees to manage their default leave accruement.
Invoice
.png)
From anywhere in Clarc, if you click the Invoice function button this will take you directly to your invoice page.
Here is where you can manage and create outgoing and received invoices related to your organisation.
Invoice Basics
Navigating the All Invoice tab

1. Your current tab will be highlihted, currently on the All Invoice tab.
2. These are the separate sub tabs that help you filter between invoices with different statuses.
3. Send the selected invoice via email.
4. Select the organisation you wish to view invoices related to.
5. Connect to your third party invoice integration.
6. Create a new invoice.
Navigating the Invoice Overview tab

Your current tab will be highlihted, currently on the Overview tab.
1. This page is essentially the dashboard for the invoice function, giving you a quick overview of the total value of invoices in the separate categories.
2. The bar graph shows the trend of payments coming into your organisation.
3. You can also view a list of just the overdue invoices, being the invoice most likely to need attention.
4. The other tab allows you to revisit the invoices you have most recently viewed
Navigating the Received Invoice tab

Your current tab will be highlihted, currently on the Received invoice tab.
1. You can upload and catalogue all the invoices you receive by uploading them onto Clarc. If the person who sent you the invoice also has a Clarc account, these can be automatically recorded.
2. You can forward the selected received invoice onto another party or by clicking the dropdown arrow you can create a new invoice with the information from the received invoice for on-invoicing purposes.
3. Filter by project for your received invoices by searching, using the dropdown box or selecting from the project list to the left.
4. Filter by all or unpaid only invoices.
5. Edit the invoice value amount by clicking the edit button here.
6. Click to view the history of changes to the selected invoice.
Creating A New Invoice
Setting up your new invoice
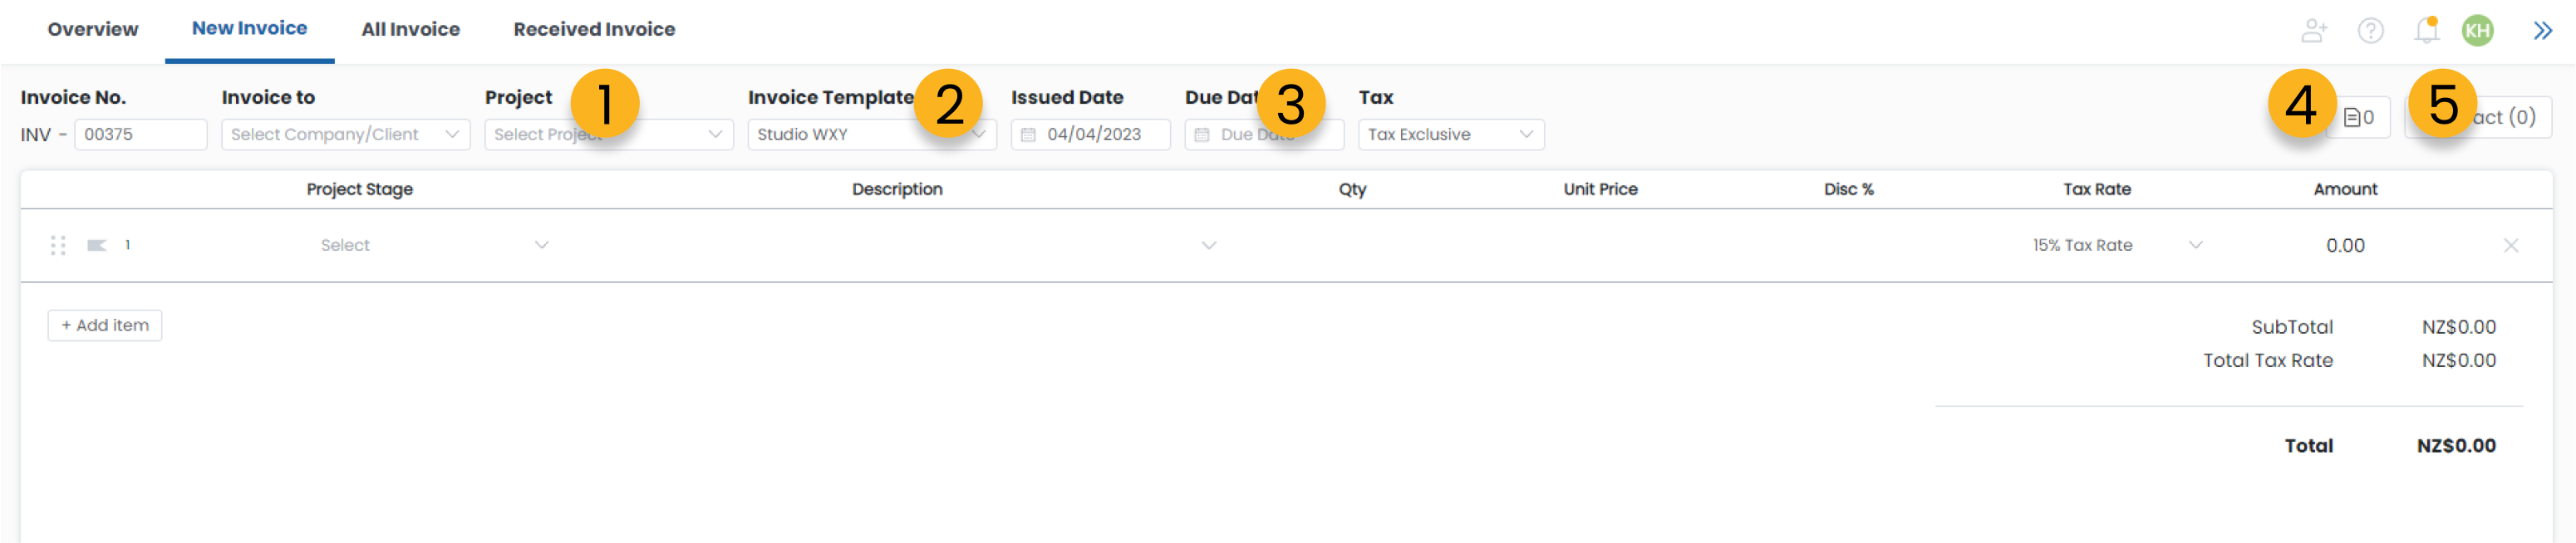
1. Select the project you wish to create an invoice for. The clients details will be automatically filled from the projects details.
2. Select the invoice template you wish to use for this invoice. You can edit and create new invoice templates from your Admin Settings.
3. Choose a due date for your new invoice.
4. Add attachments to your new invoice.
5. Once the project is selected you will be able to view the contract (if created in Clarc) for this project here. If you did not create the contract through Clarc’s contract function you can upload this here for future reference as well. (you only have to do this once and only if you want to)
What does the invoice history tab do?
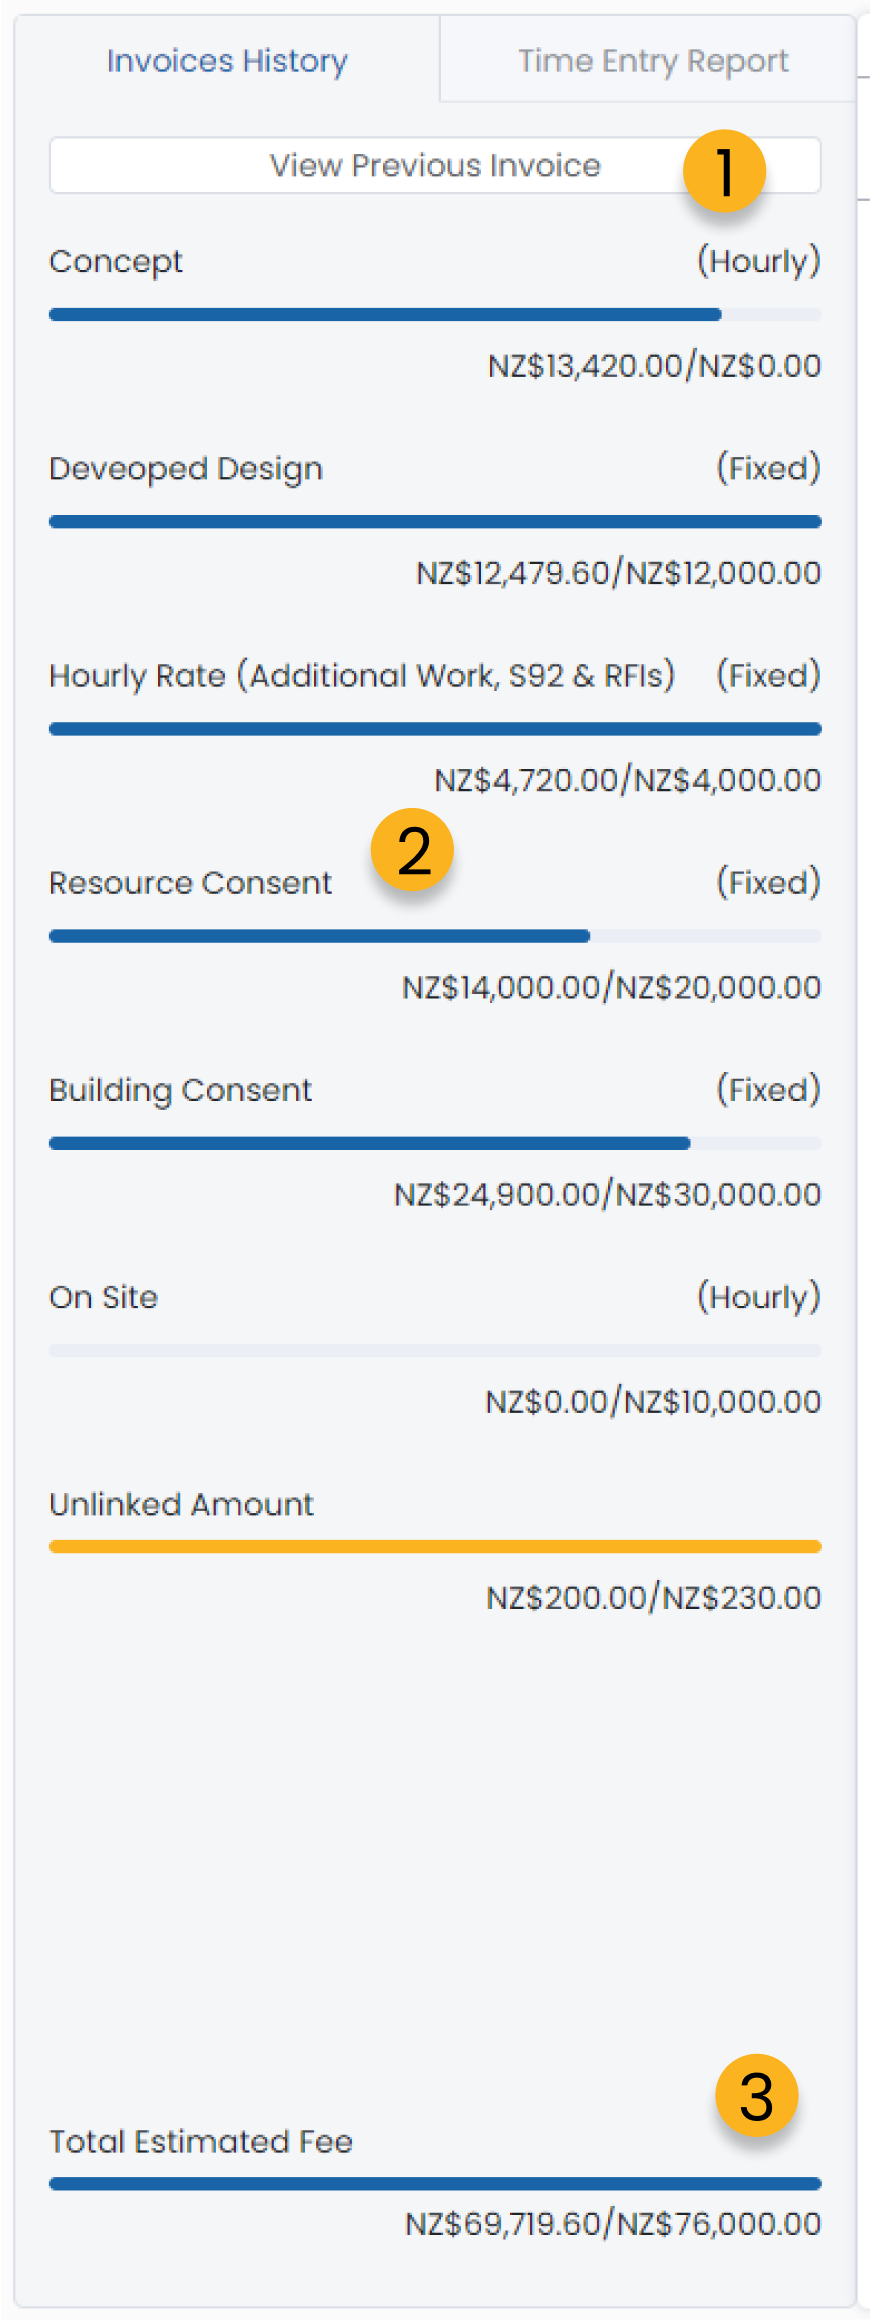
1. View the invoices you have previously sent out for the selected project.
2. Each bar graph represents the contract value for each project stage. When you create invoices related to a project stage this bar will fill up according to the amount you are invoicing for. This allows you to see the remaining amounts you have left to invoice according to your contract and how much you have previously invoice for. These amounts will update live as you create new line items.
3. The total estimated fee is the total contract value and the sum of the total invoiced amounts for the selected project.
How to create new line items?
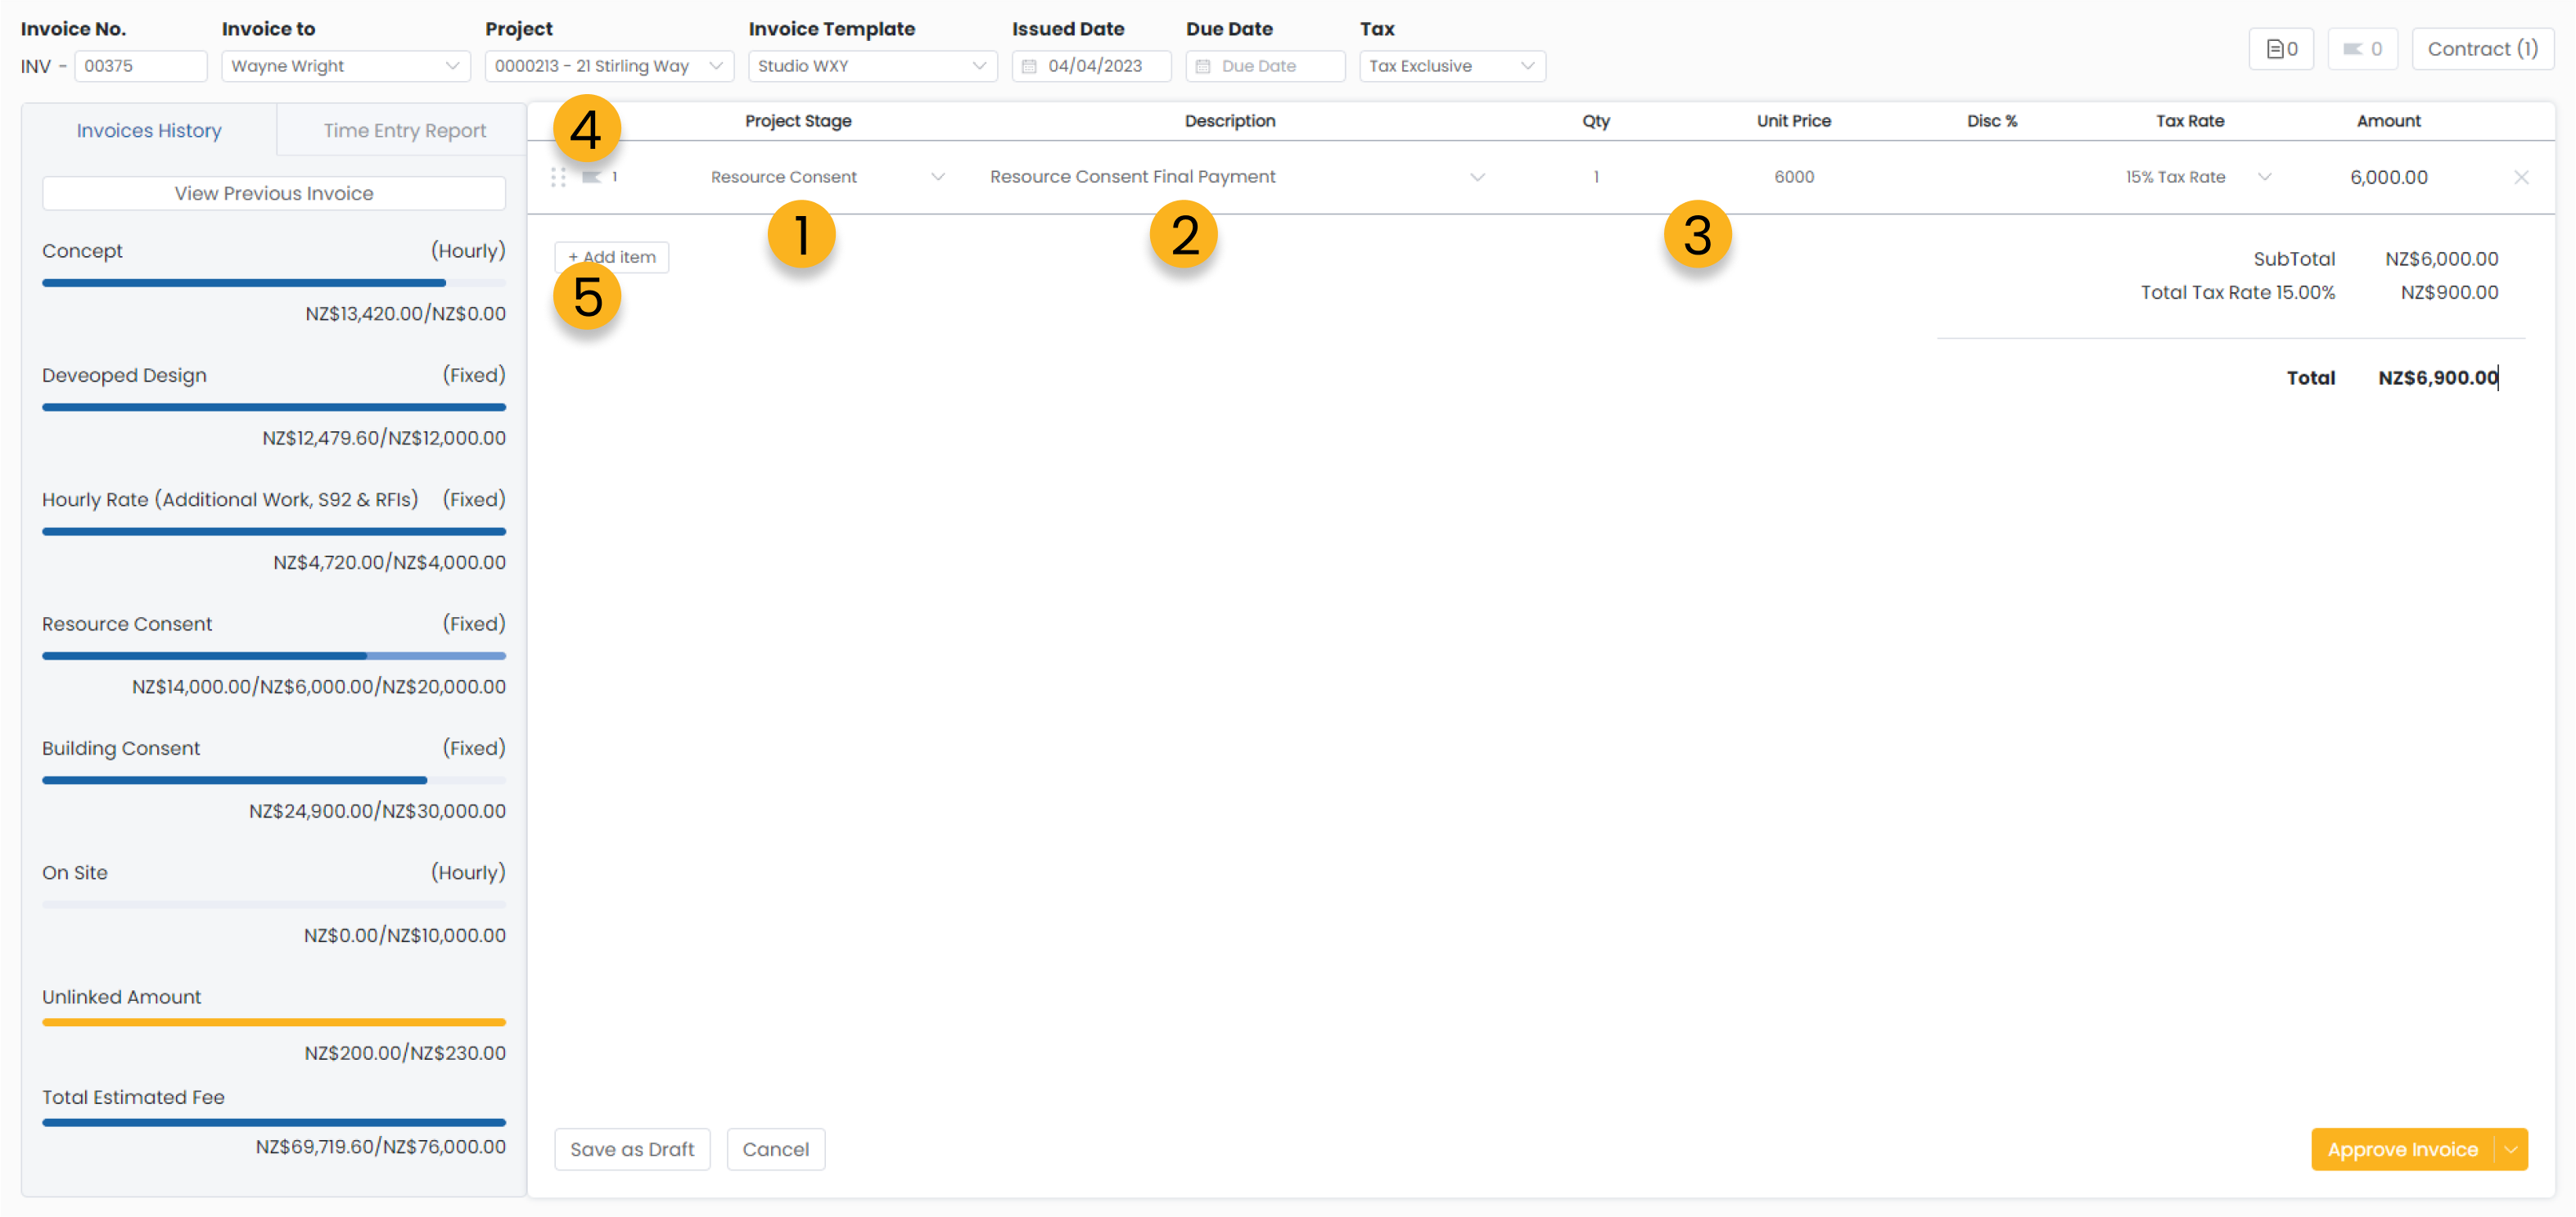
1. Select the stage you wish to create a line item against. You can leave this blank if the line item isn't related to any of your project stages.
2. Write a description for your line item, or click the dropdown arrow to select from a range of preset descriptions you can set up to make invoicing easier.
3. Enter the amounts related to this line item.
4. If this line item is from a received invoice you can also link and attach that received invoice here.
5. Click to add another line item.
How to import time entry data and expenses?
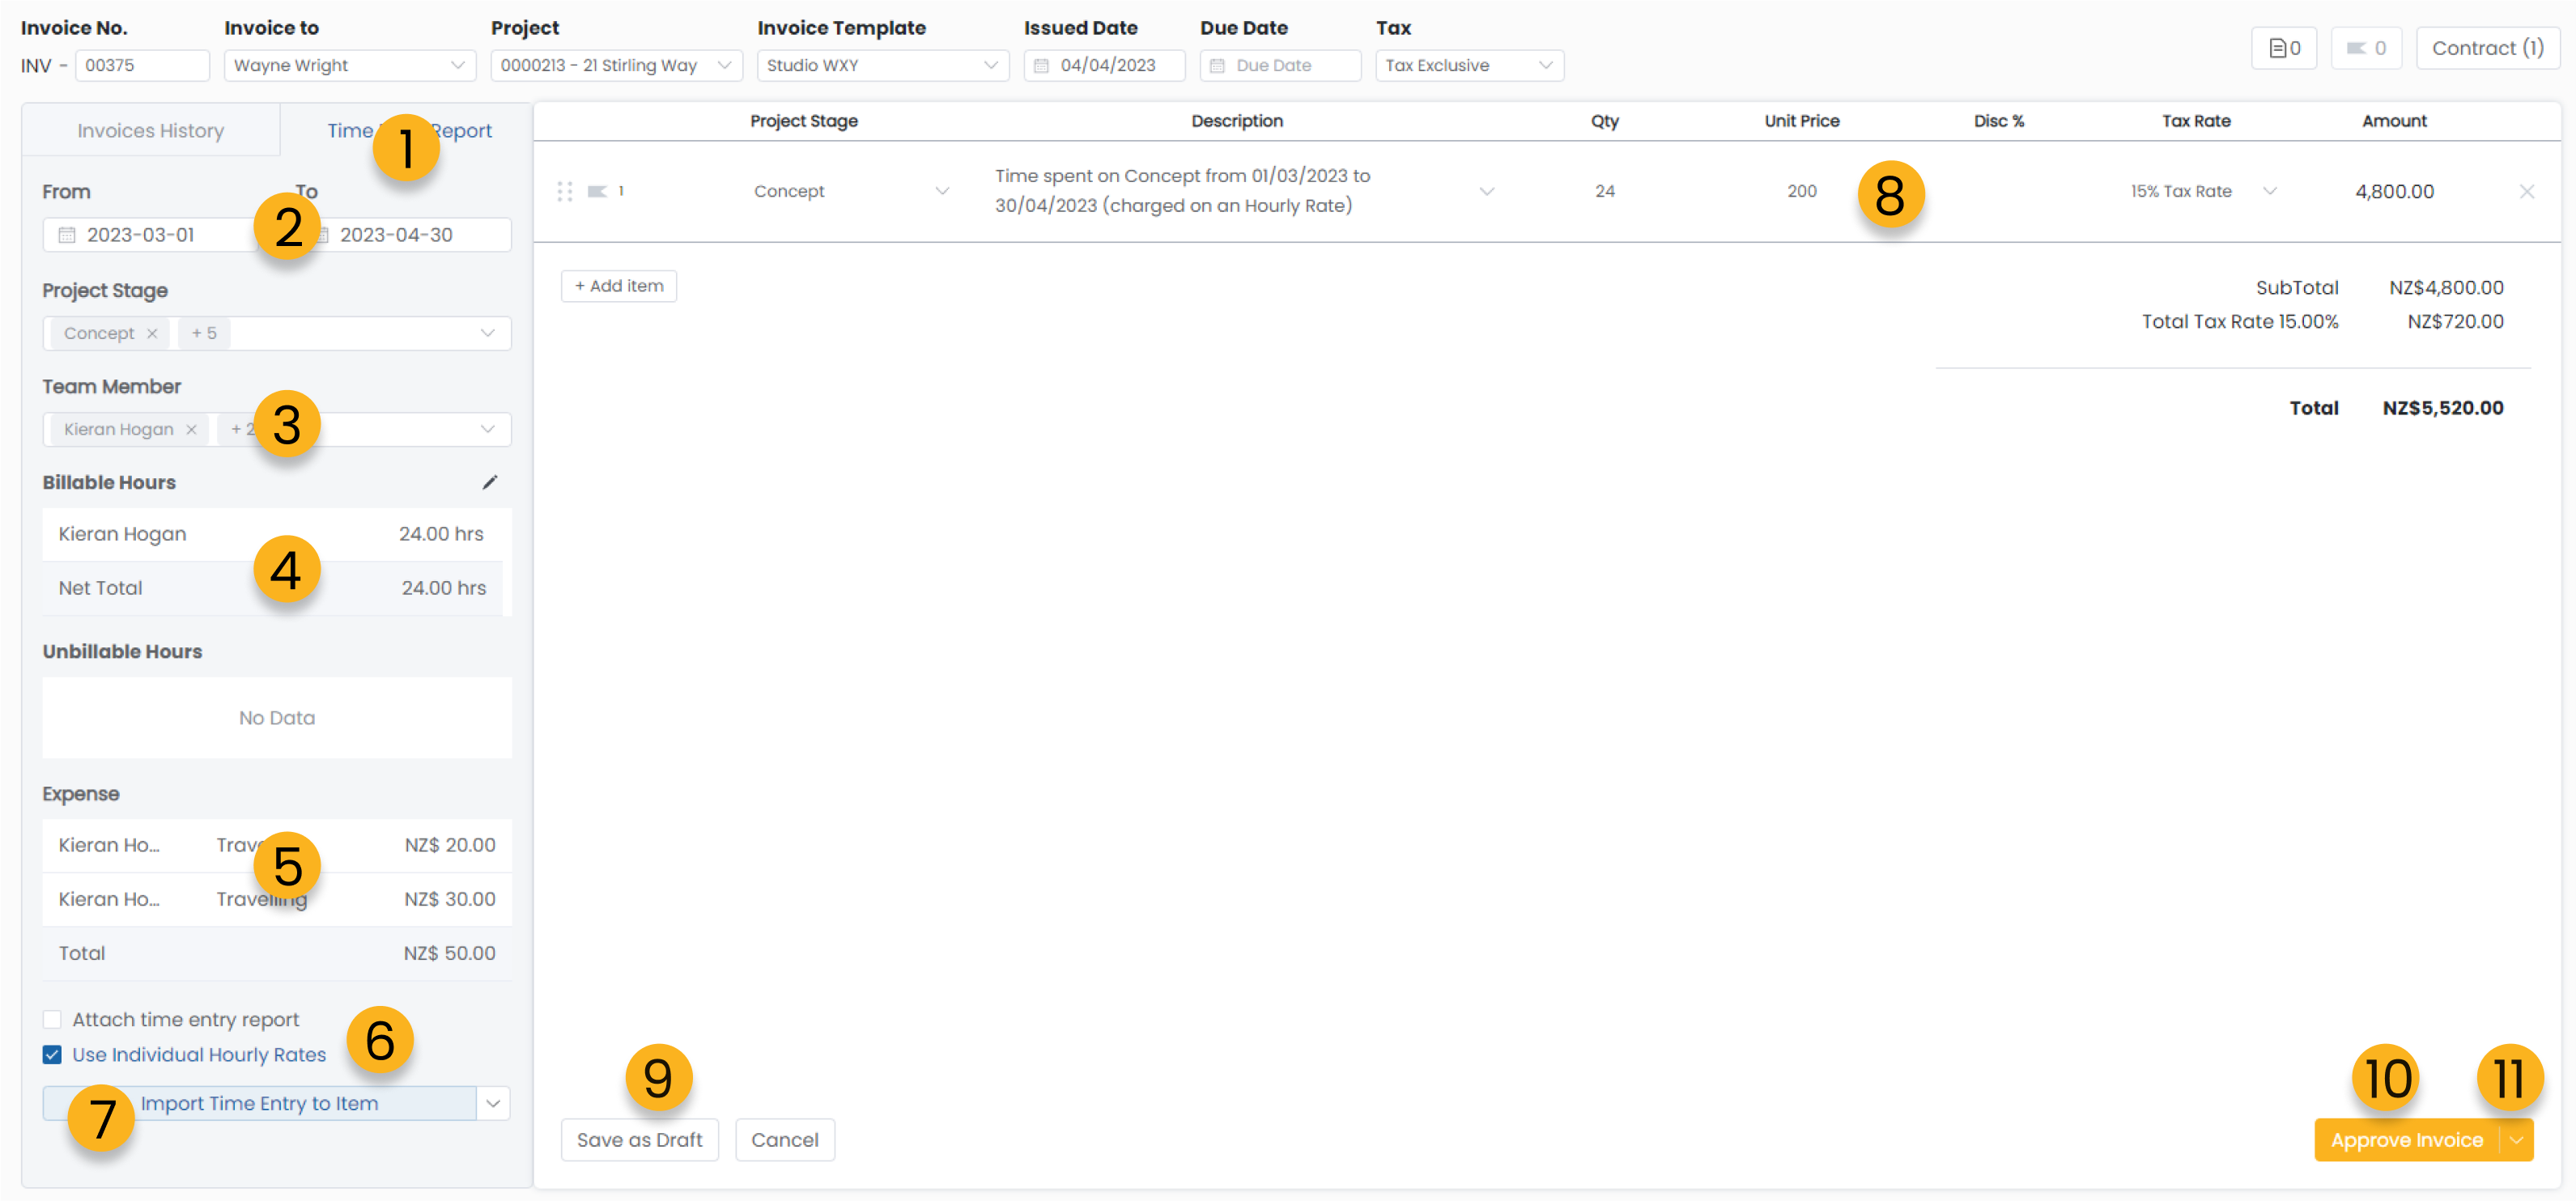
1. Open the time entry report tab from your new invoice page.
2. Select the date range you wish to view time entry data for.
3. Filter between specific project stages and team members you wish you view time entry data for.
4. These are the billable hours from your selected parameters.
5. These are the expenses from your selected parameters.
6. Select whether you want to attached the time entry report to this invoice and whether you want to use the team members individual hourly charge out rates when you import the time entry data. Each of your team members can have a separate individual hourly charge out rate that you can setup in your Admin Settings. If you do not select this box it will use the default project stage rate instead.
7. Click to import the shown time entry data into your invoice.
8. The imported hours will show as new line items in your new invoice.
9. Save this invoice as a draft to continue later.
10. Approve your invoice to send later.
11. Click the drop down arrow to approve and send immediately.
Credit Note
With credit notes, you can easily issue credits for invoices, whether it's to correct invoiced amounts, process refunds, or offset amounts against other invoices and bills.
How to create a credit note
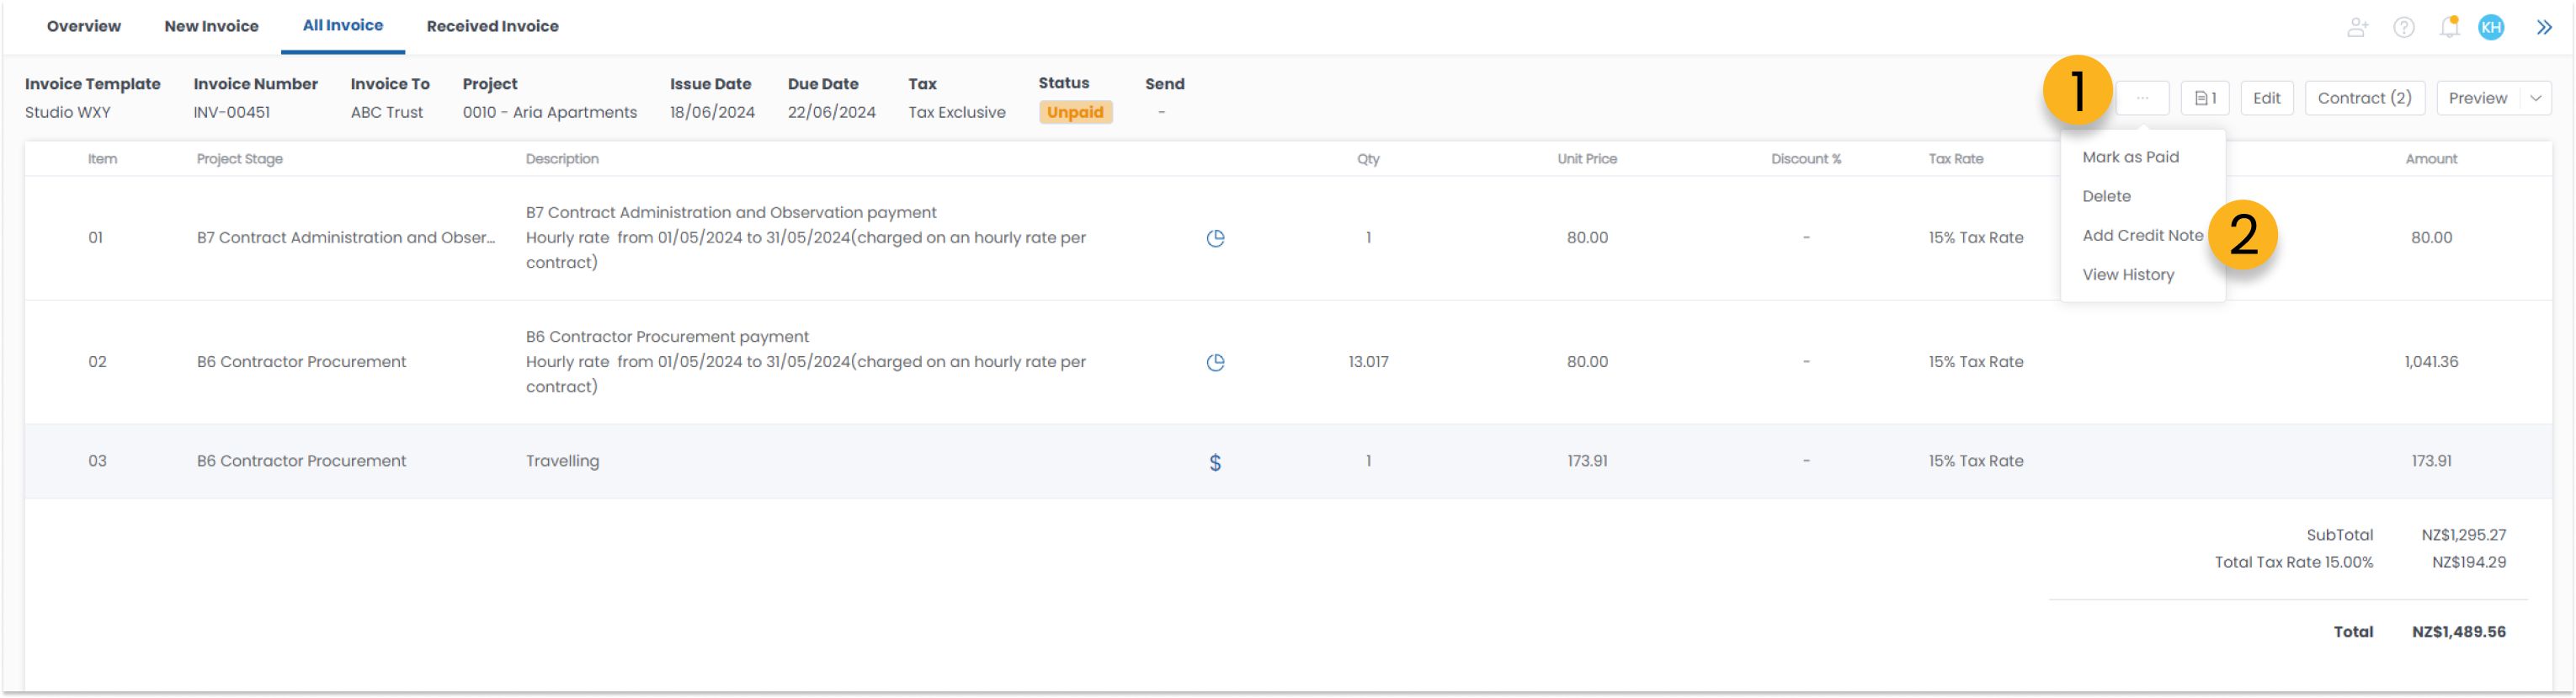
1. Go to the invoice you want to issue a credit note for. Click the drop-down box next to the edit button .Select "Add Credit Note."
2. Select "Add Credit Note."
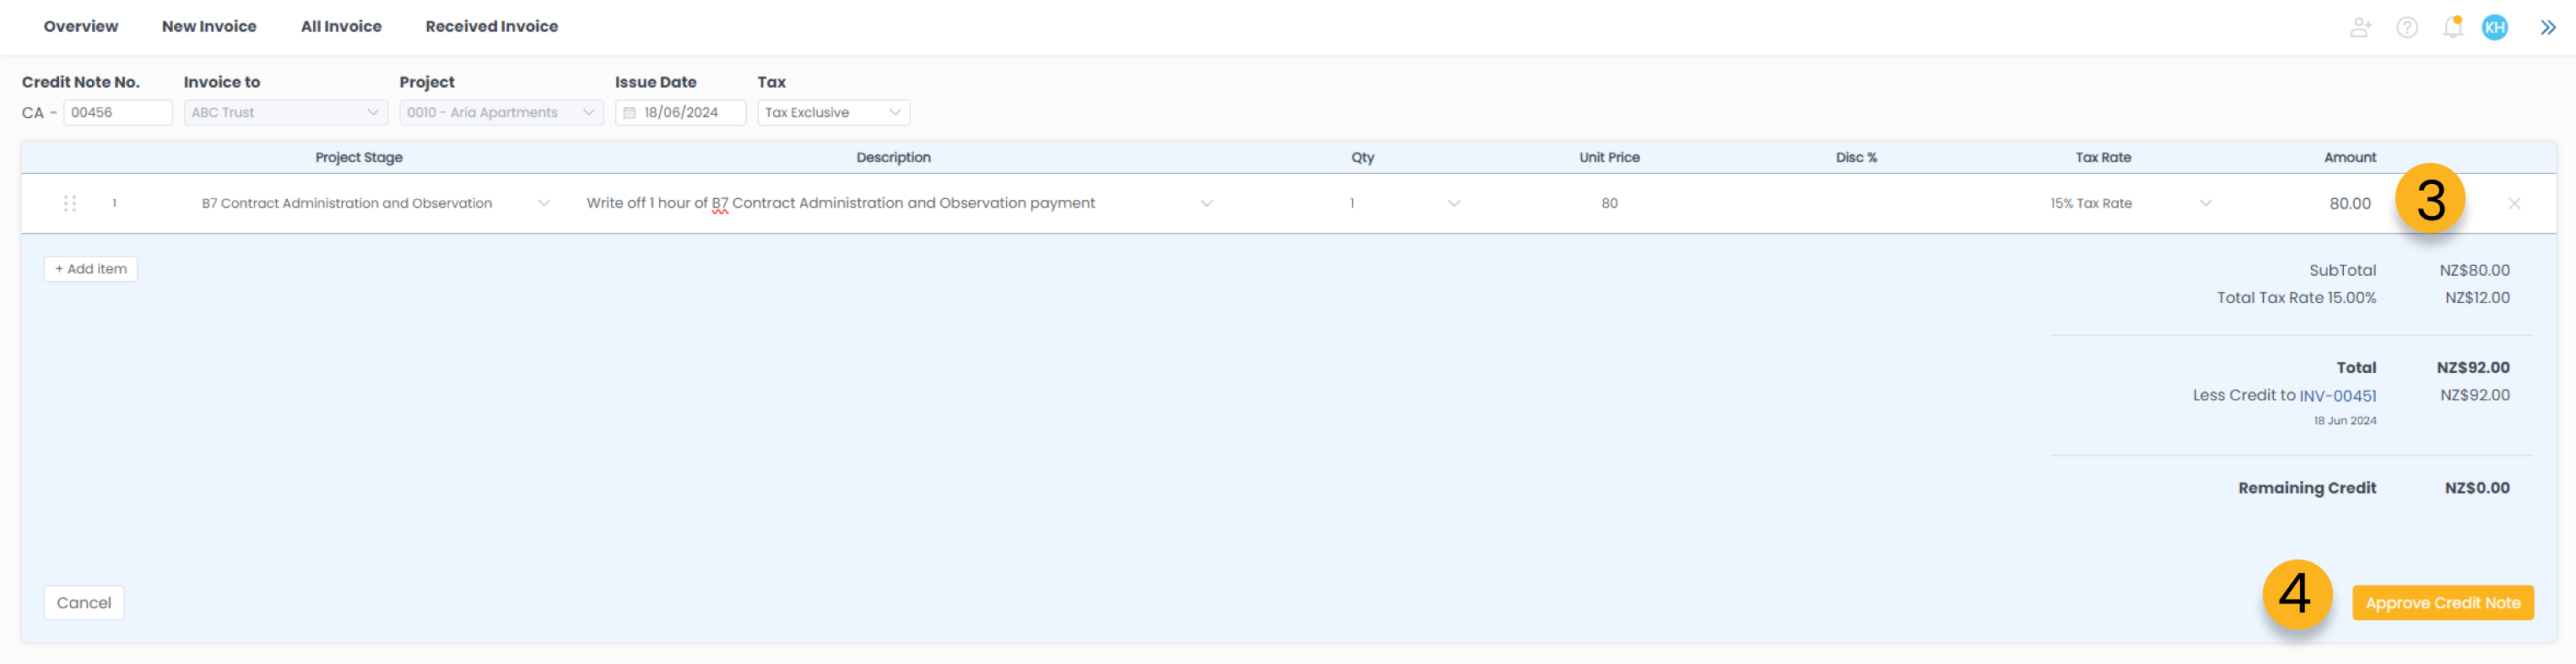
3. You will land on the credit note page which appears blue. Fill in the necessary details for the credited amount, similar to creating a regular invoice.
4. Approve and send.
How to review a credit note
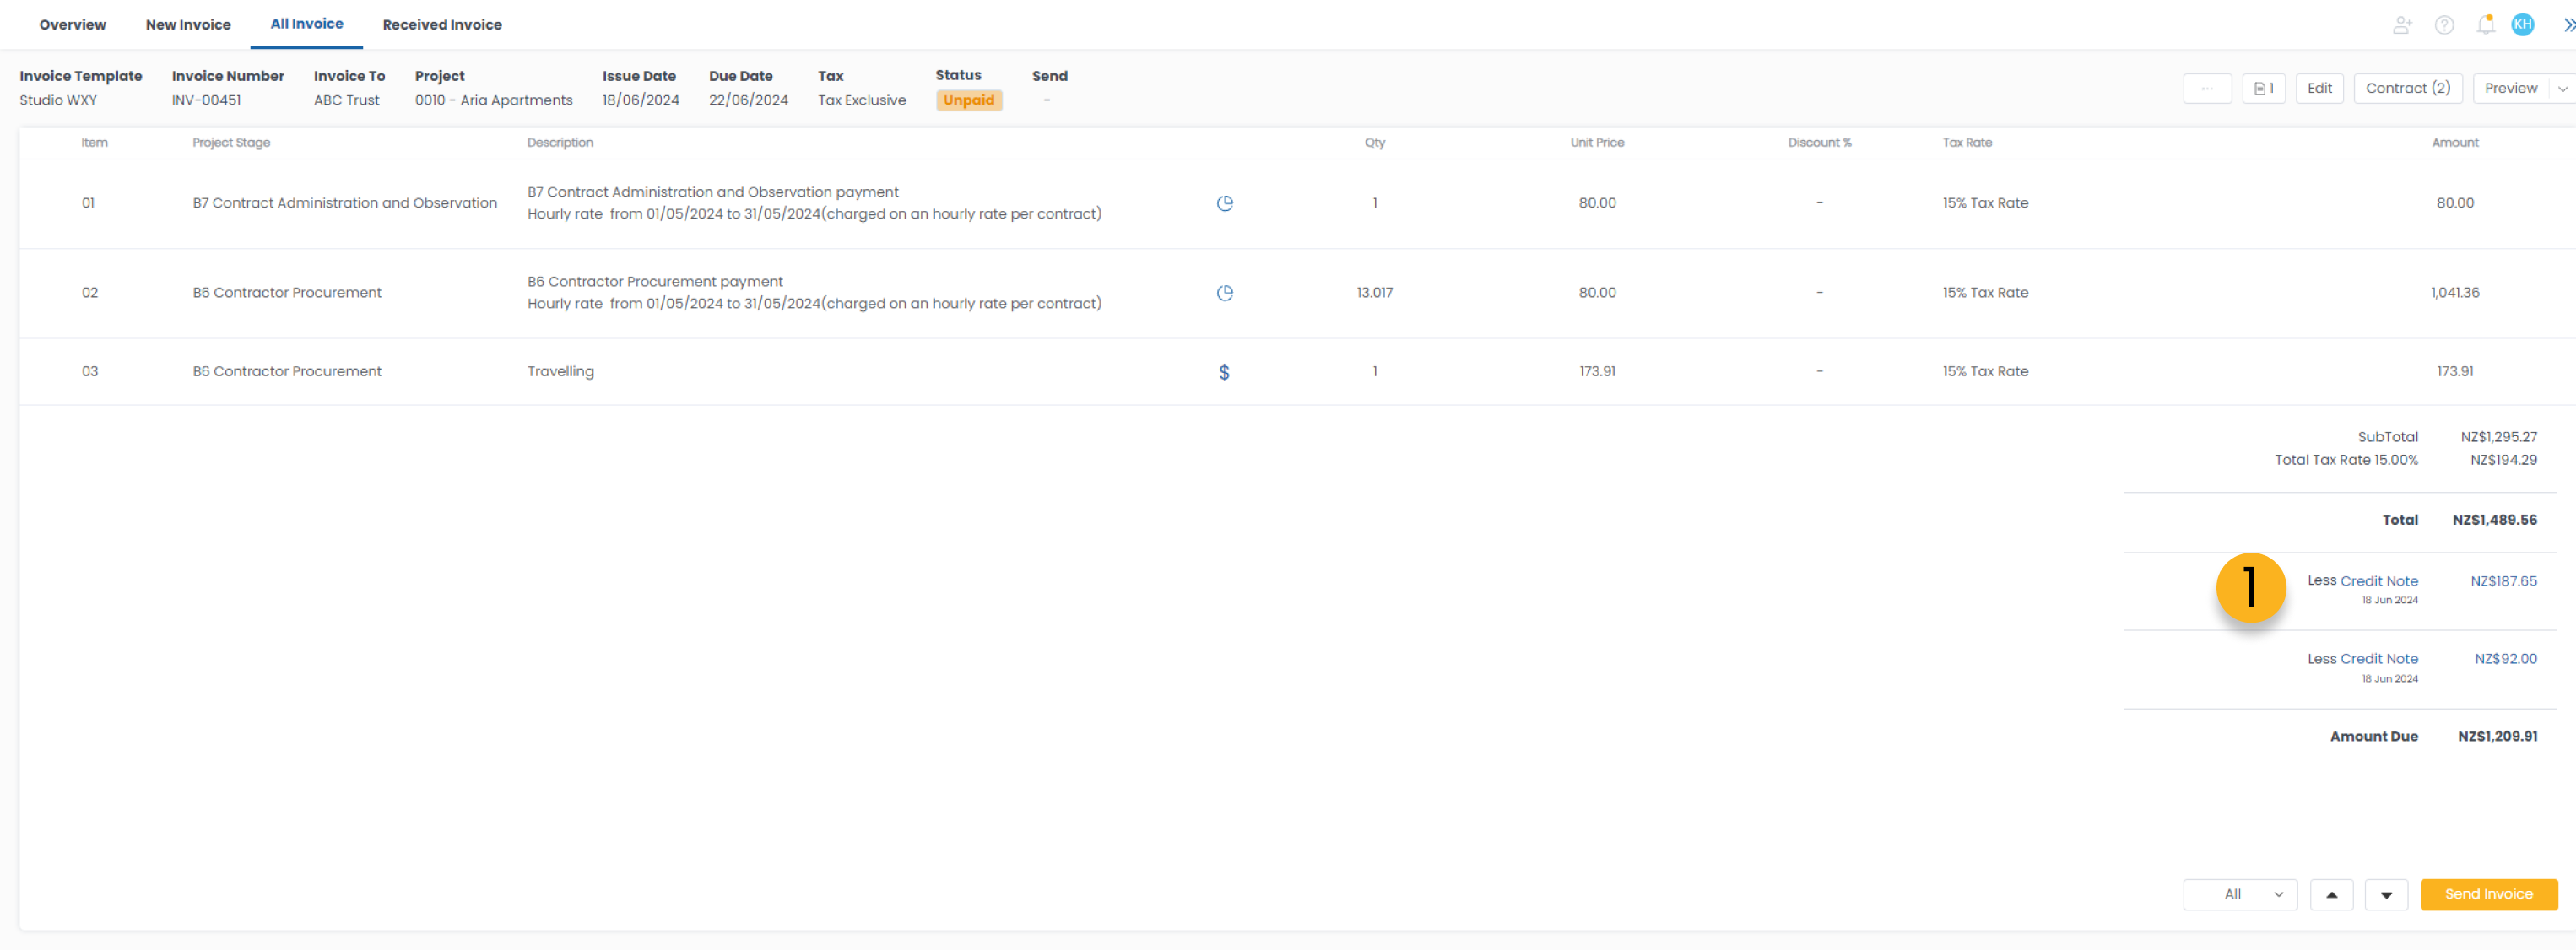
1. Go to your original invoice. All credit notes will be shown under the total breakdown. You can click on the credit note to review it.
How to remove a credit note

1. Go to your credit note, click on the “x” next to the amount to remove the selected credit note.
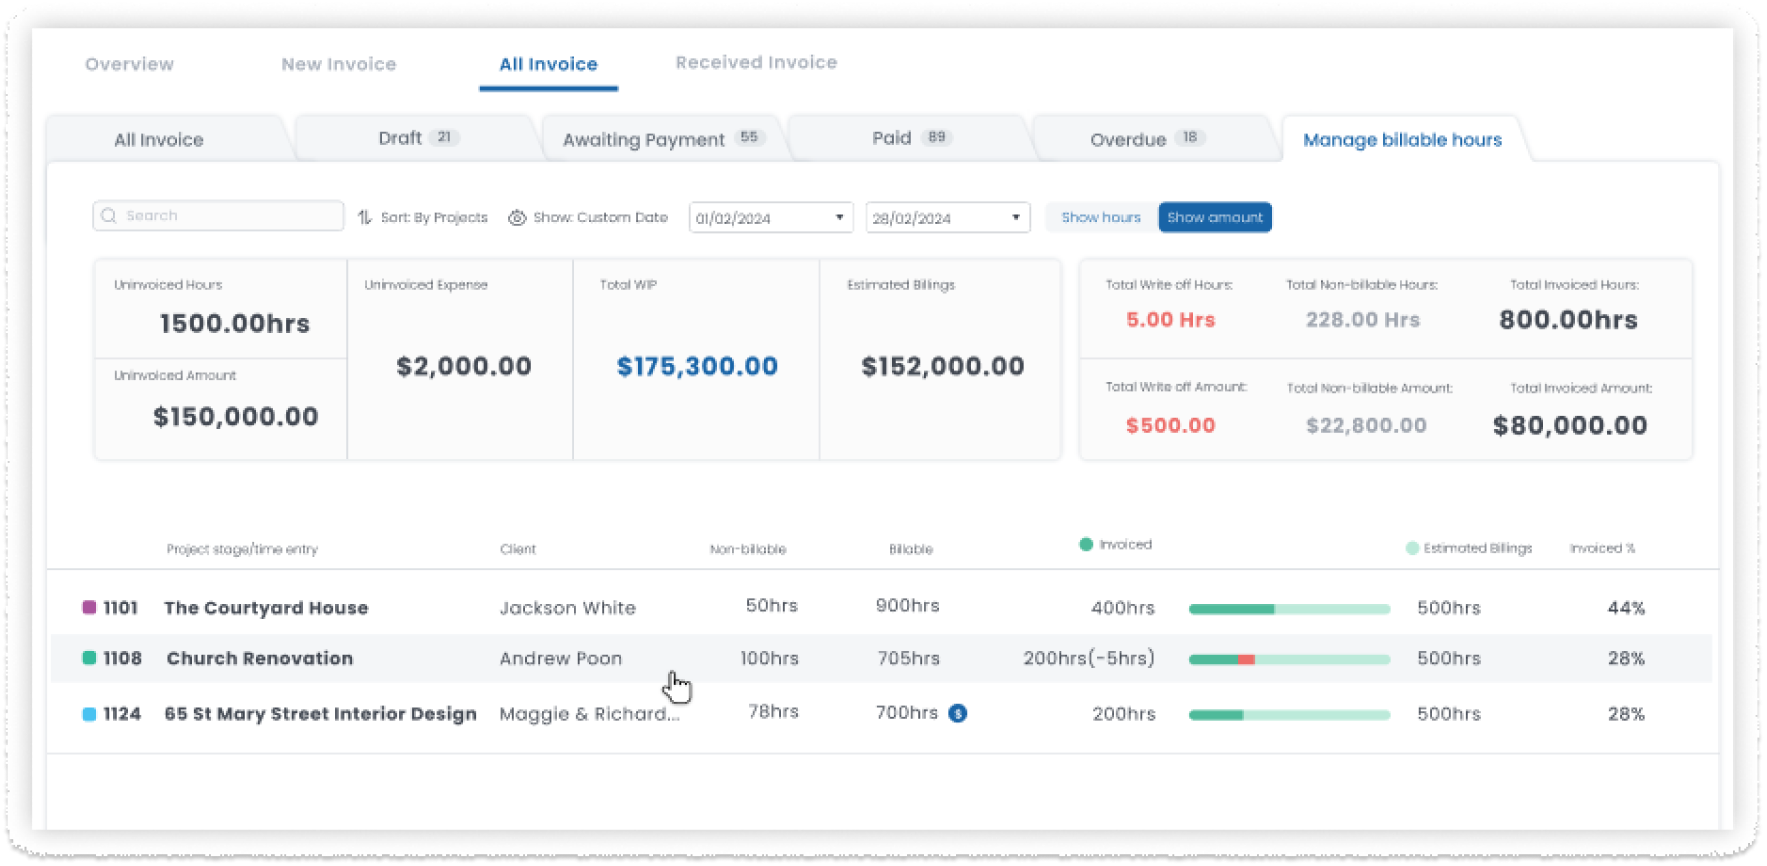
Manage Billable Hours
This Work-In-Progress manager allows you to easily view and manage all your un-invoiced time & expense of all projects, so that you don’t miss out on any billable items.
What can you get from the WIP manager
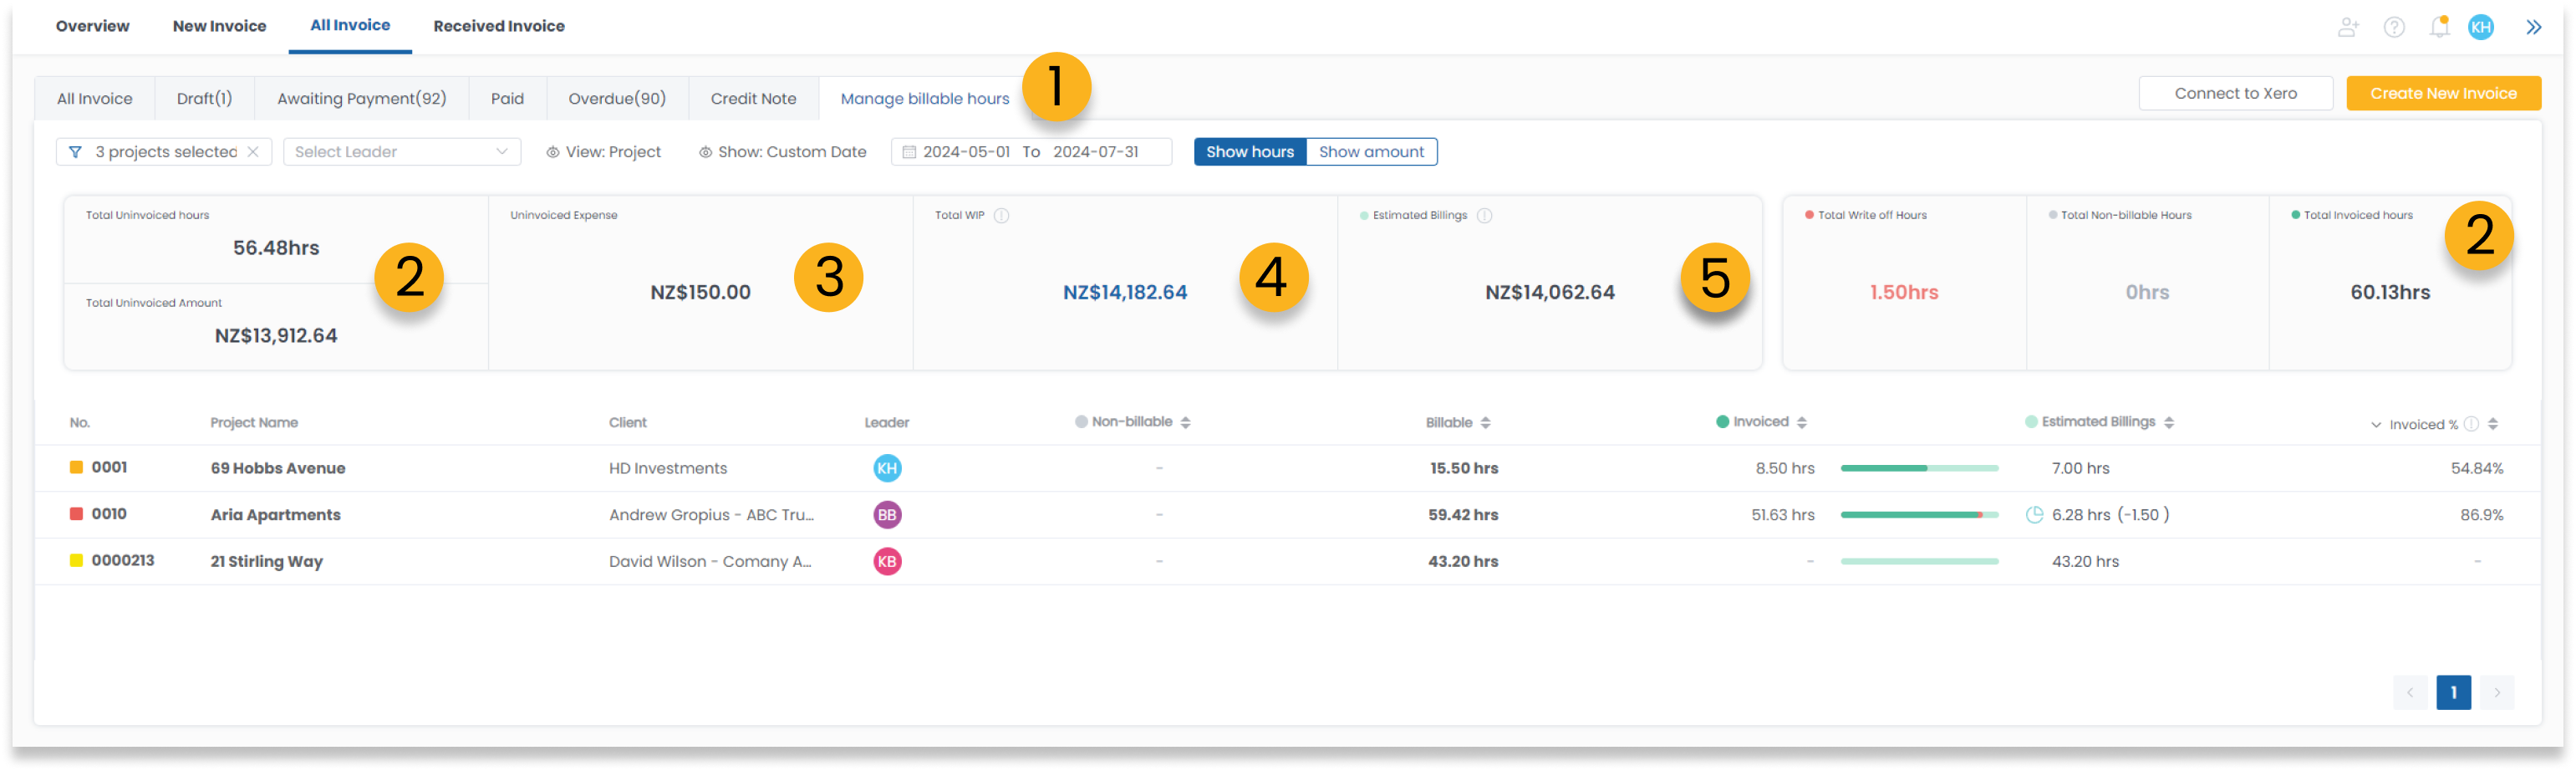
1. Let’s head to WIP manager by open Invoice page then click on Manage Billable Hours.
2. Uninvoiced Hours/Amount - Total billable time that are not yet invoiced.
3. Uninvoiced Expense - Total billable expense that are not yet invoiced.
4. Total WIP - All uninvoiced time and expense of the project.
5. Estimated Billings - An estimated forecast of the actual billable amount, which excludes write offs.
6. Write off Hours / Non-billable Hours / Invoiced Hours - All related hours also shown here for reference.
How to customize your WIP report

1. You can apply filters to help you narrow down the result on this report. Such as by selecting specific projects, by project tags, by stage billing types, or by filter project leader.
2. You can also customize the report by select your perfected date range.
3. The manager offers two views - Project View and Member View. Both views provides a diagram to show the comparison between invoiced and un-invoiced amounts.
Project View

Member View

4. In addition to displaying amounts, we also offer the option to view this report in hours, allowing you to easily identify invoiced and uninvoiced time at a glance.
Create invoices from your WIP manager
WIP manager is an handy location to view all uninvoiced project and create your monthly invoices.
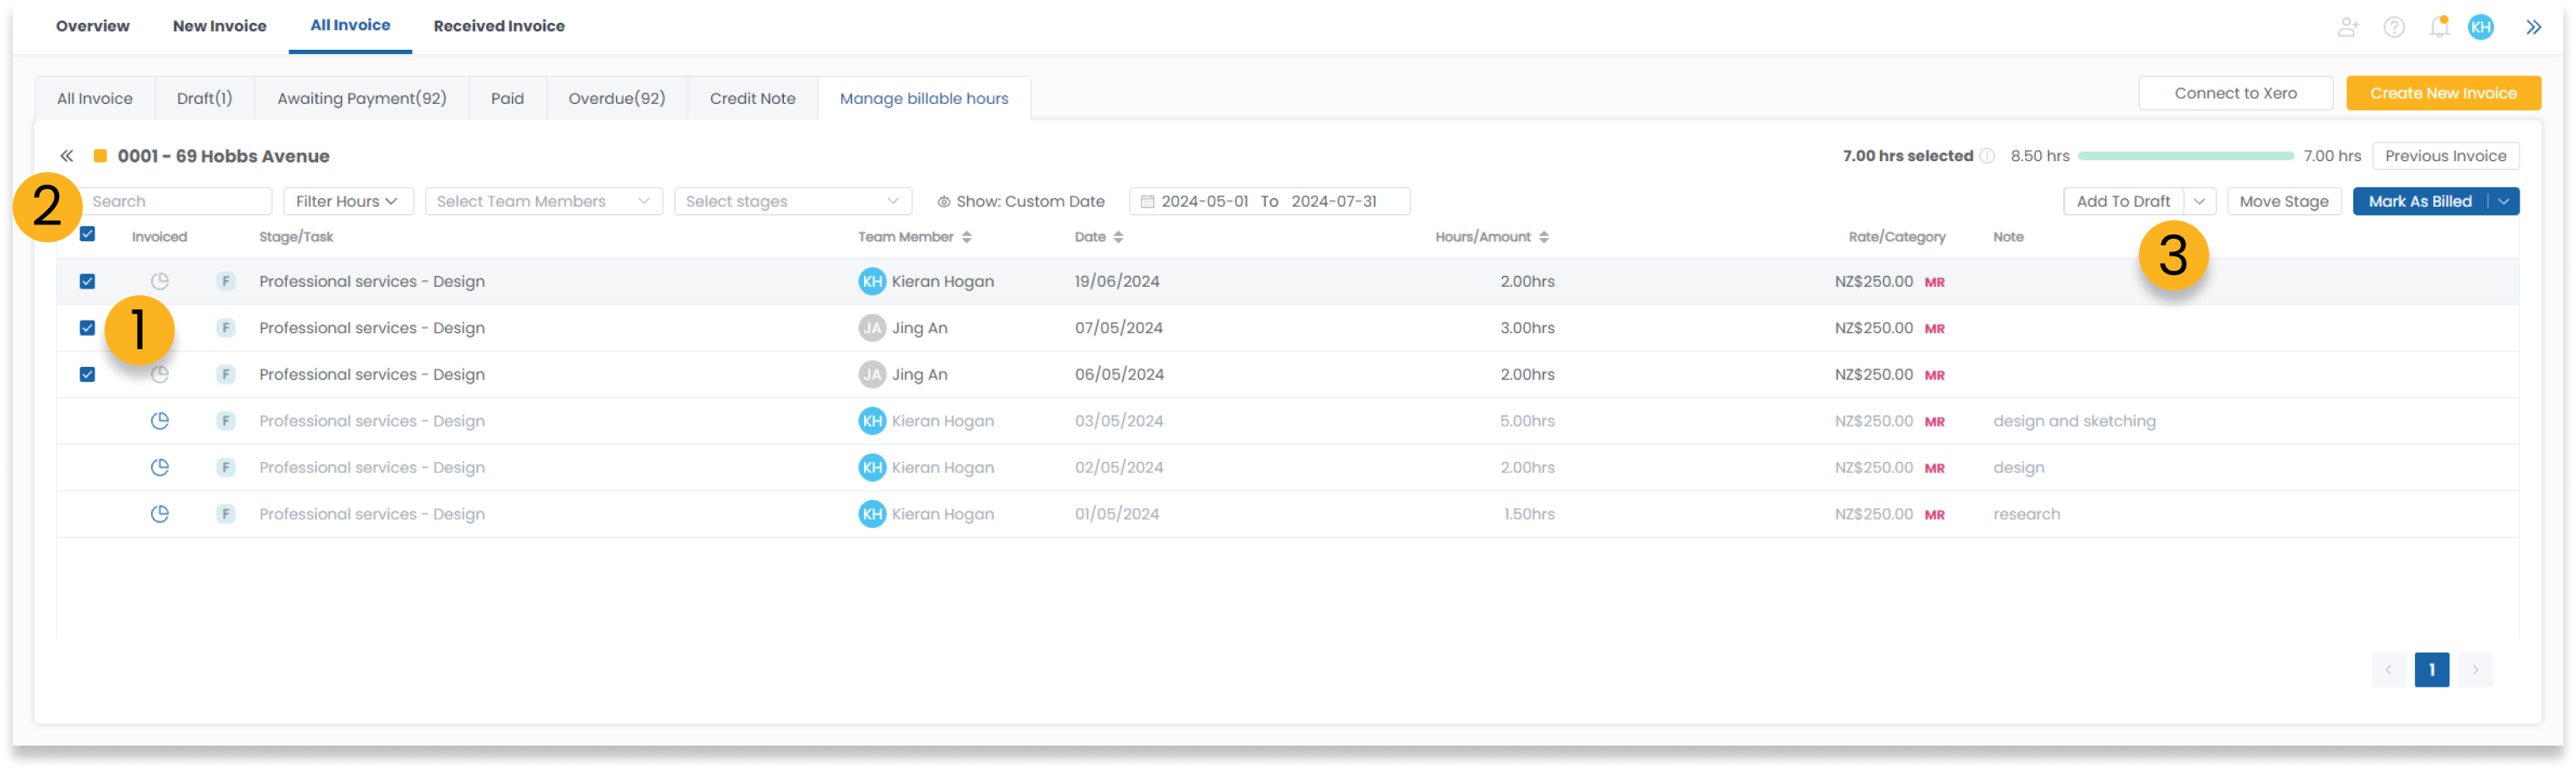
1. From the WIP manager, navigate to the project you want to invoice. Select the Stage/Task that need to be invoiced.
2. Alternatively you can click the first checkbox at the top of the column to select all uninvoiced Stage/Task.
3. Click on "Add To Draft," or “Add All to Draft” beside the drop down. Then proceed with the invoicing process as usual.
Edit Time Entry or Write Off Hours
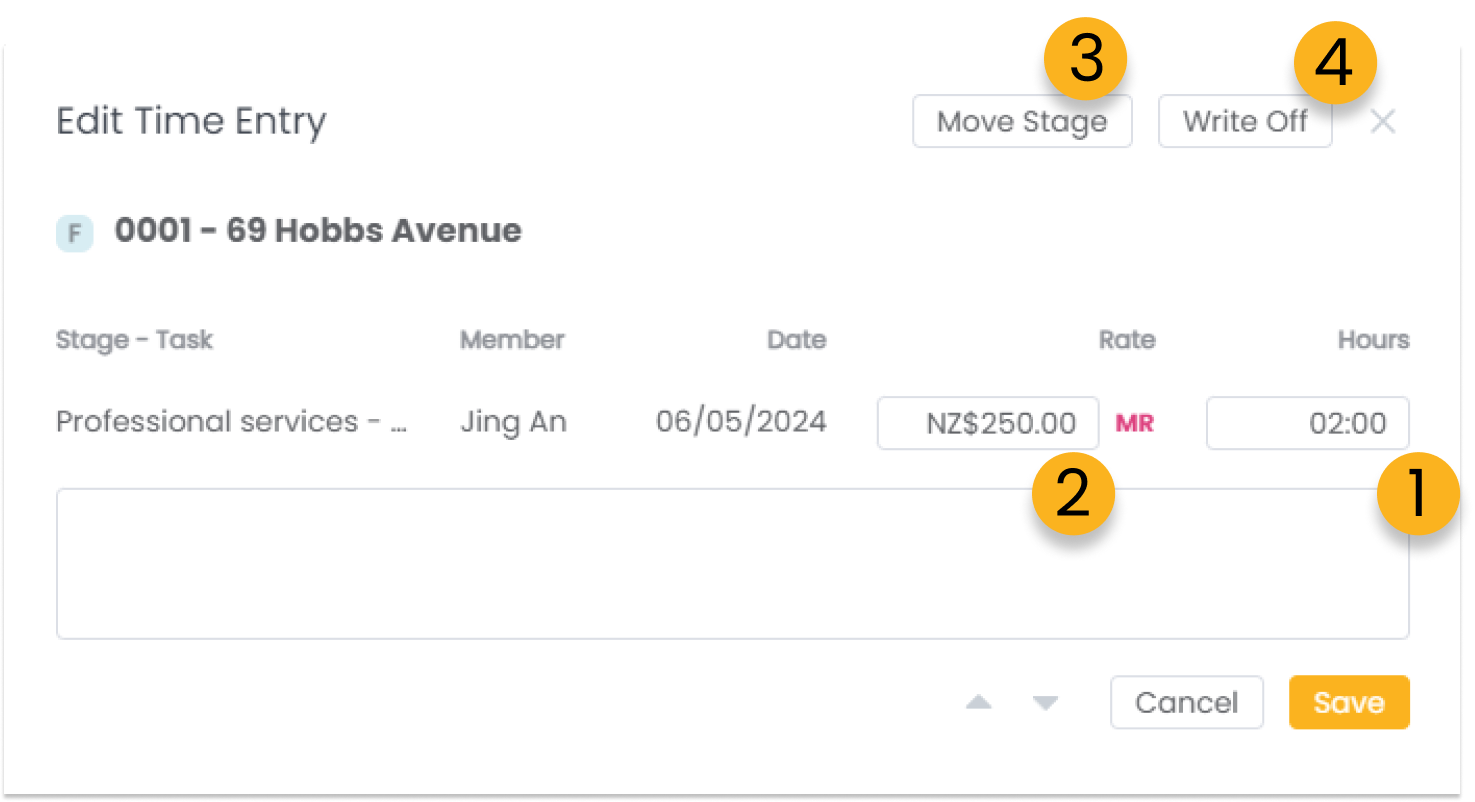
1. Select a Stage/Task. The Edit Time Entry window will pop up, allowing you to adjust the billing hours.
2. You can also change the billing rate for the specific Stage/Task.
3. The Move Stage function lets you assign the Stage/Task to a different one.
4. Clicking the Write Off button will mark the Stage/Task as write-off status, excluding this time entry from the generated invoice.
Invoice Automation
Invoice Automation streamlines your billing process by automatically drafting invoices based on the time and expense entered. These drafts serve as notifications or reminders for clients to review and approve, ensuring accuracy and transparency. This efficient system minimizes manual errors, saves time, and enhances your workflow, allowing you to focus on your core projects while maintaining seamless financial operations.
How to enable Invoice Automation
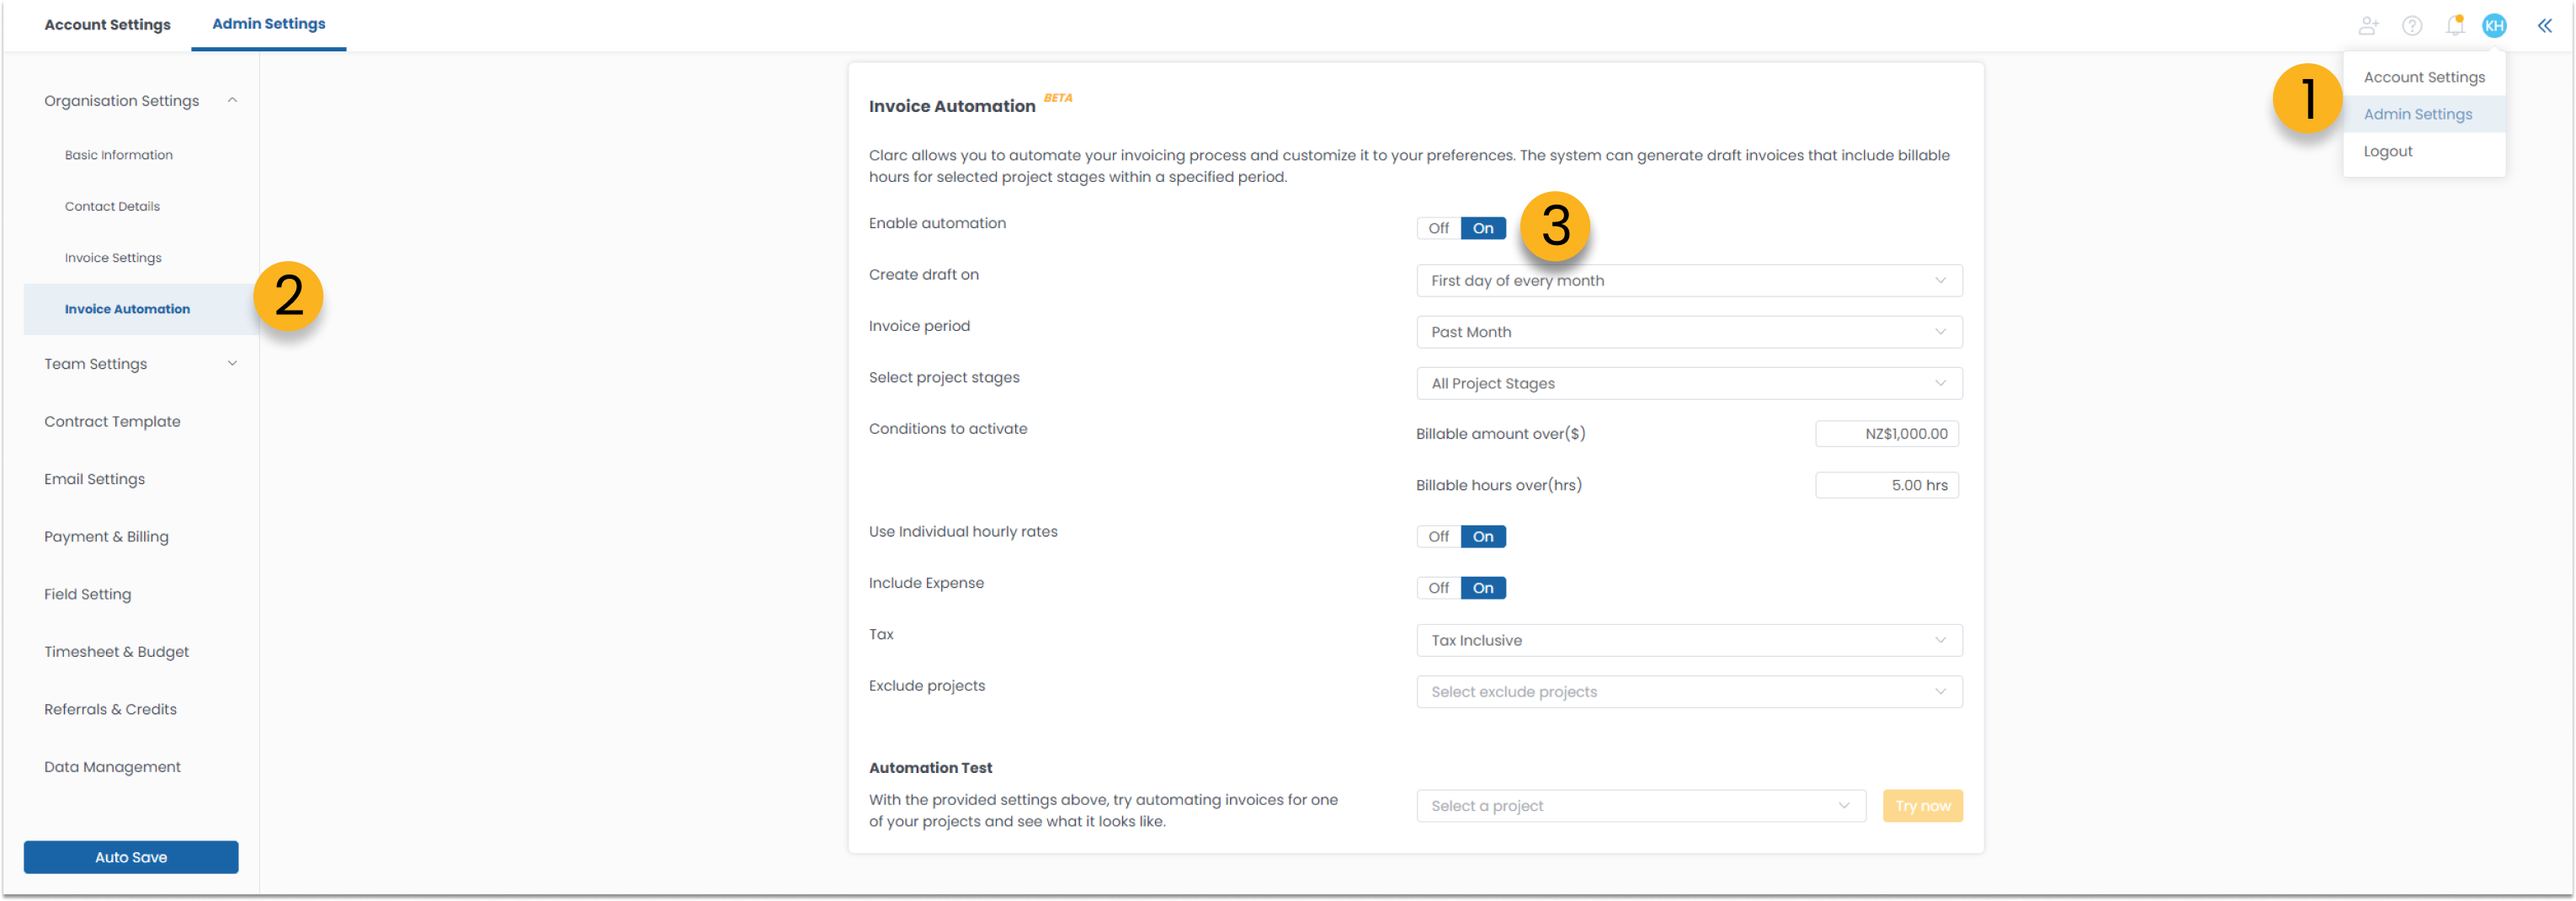
1. To begin, click the user icon and Navigate to Admin Settings
2. Go to Invoice Automation under Invoice Settings.
3. Turn on the Automation.
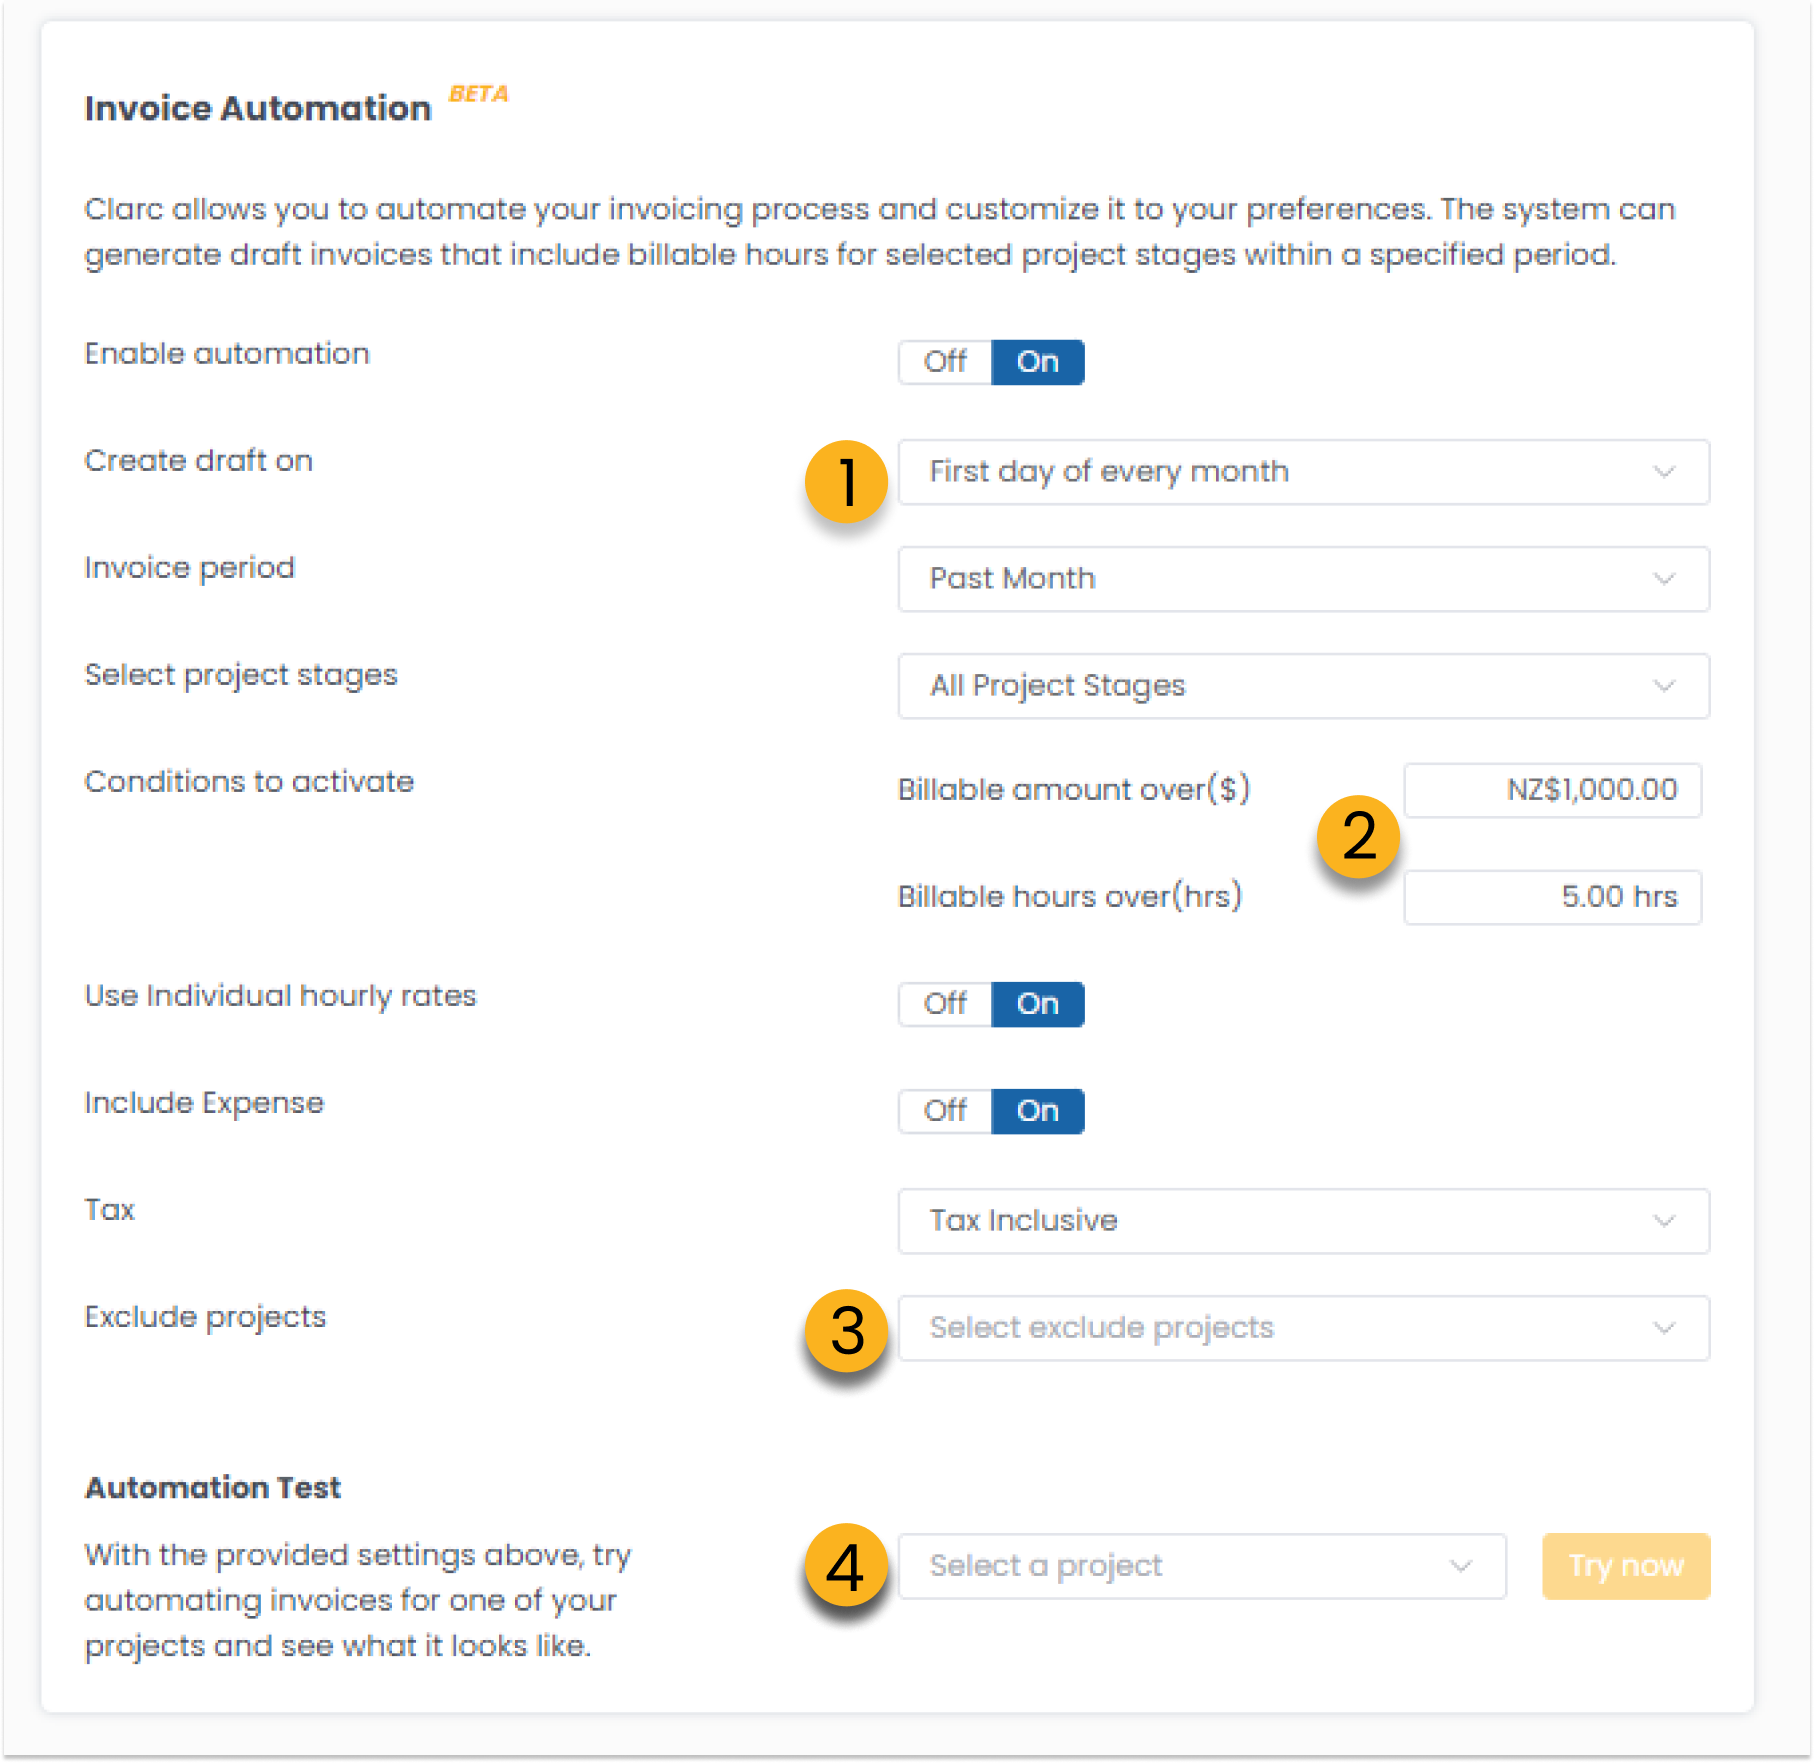
Invoice Automation Settings
1. Invoicing Cycle: Choose the frequency of your invoice generation, whether it be weekly, monthly, or any other interval that suits your business needs.
2. Minimum Billable Hours & Amount Condition: Set a threshold for the minimum number of billable hours required before an invoice draft is generated. This helps in managing small or partial invoices.
3. Project Exclusions: Exclude specific projects from automation, such as internal or admin projects, to ensure that only client-facing work is invoiced.
4. Automation Test: This allows you to trial invoice automation on a selected project, providing you with a hands-on experience before fully implementing it across all your projects. If you have any projects with unbilled hours, this is a great way to see how Clarc’s automation can enhance your billing workflow.
Managing Automated Invoice Drafts
Once set up, Clarc will automatically generate invoice drafts and save them in the system, marked with a green highlight to distinguish them from manually created drafts. This visual cue allows you to easily identify and manage automated invoices.
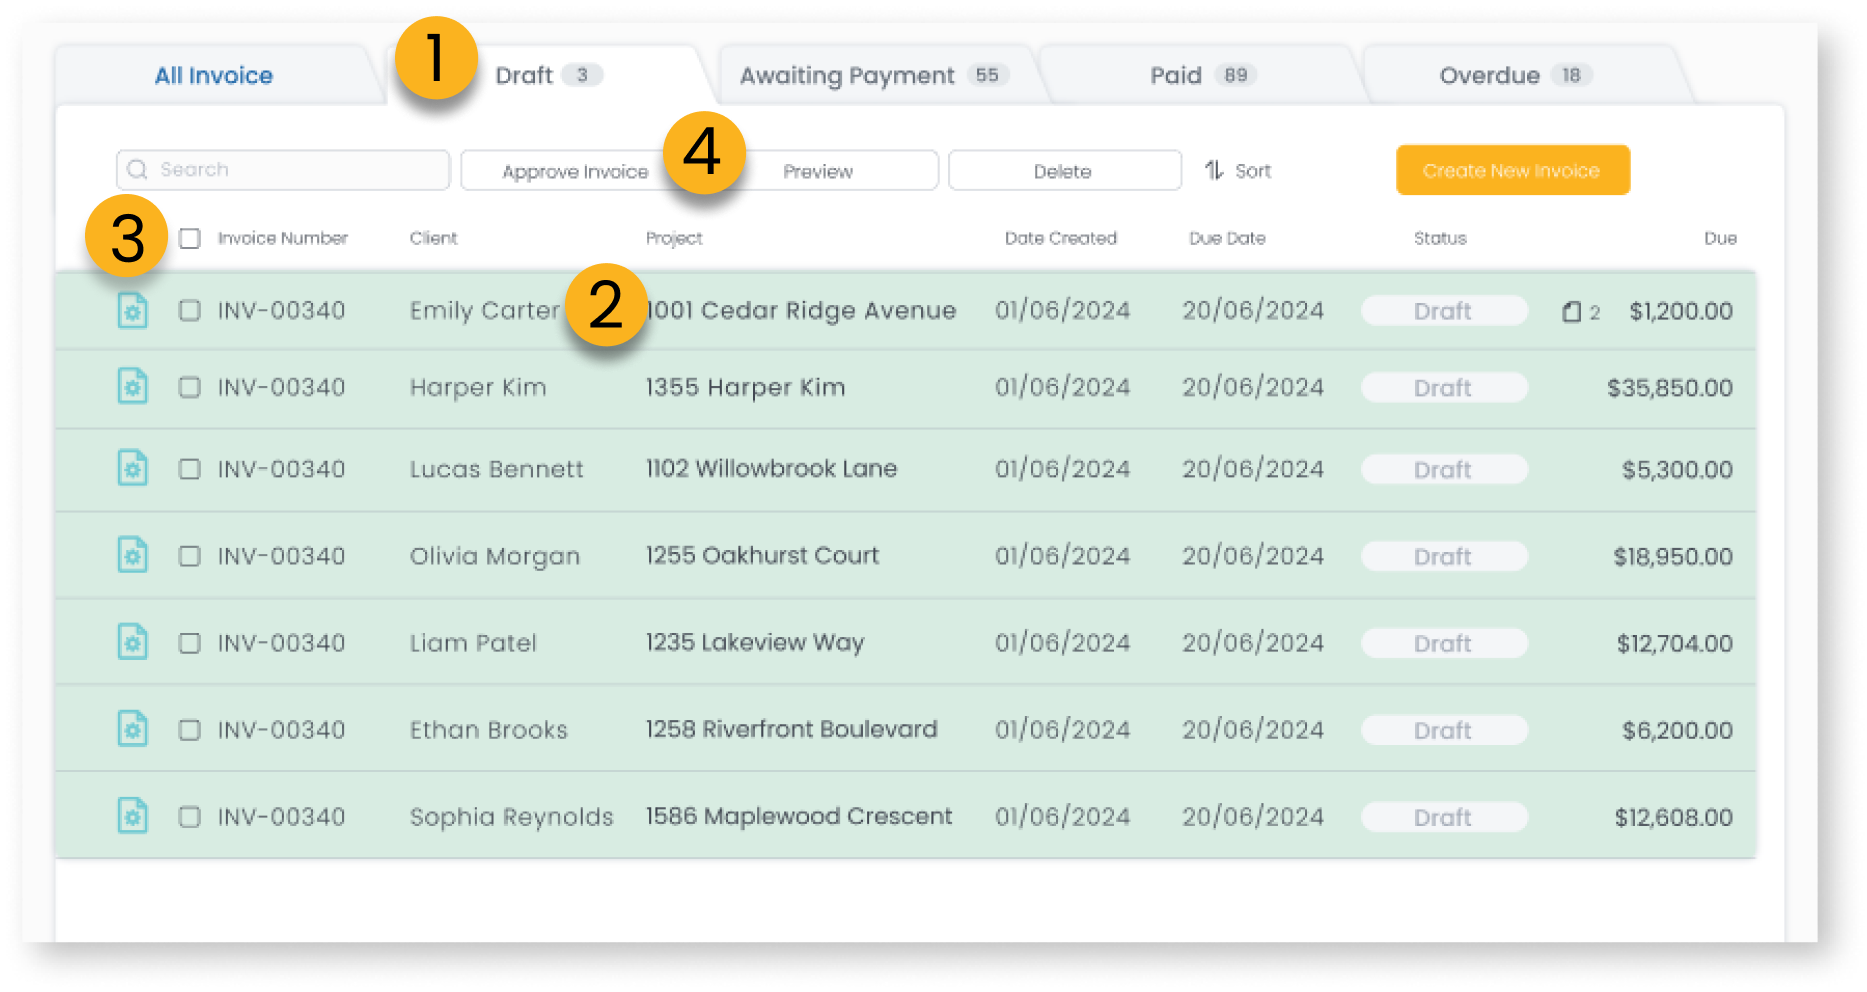
1. Go to your invoice, then open the Draft tab. All the green highlighted items are your automatically generated invoices.
2. Click on any invoice to edit and make any necessary adjustments or additions, just like your standard invoice.
3. Use the left checkbox to multi-select invoices.
4. You can then Approve, Preview, or Delete multiple invoices with one click.
Overdue Invoice Reminders
Set overdue invoice reminders on a cycle that fits your needs.
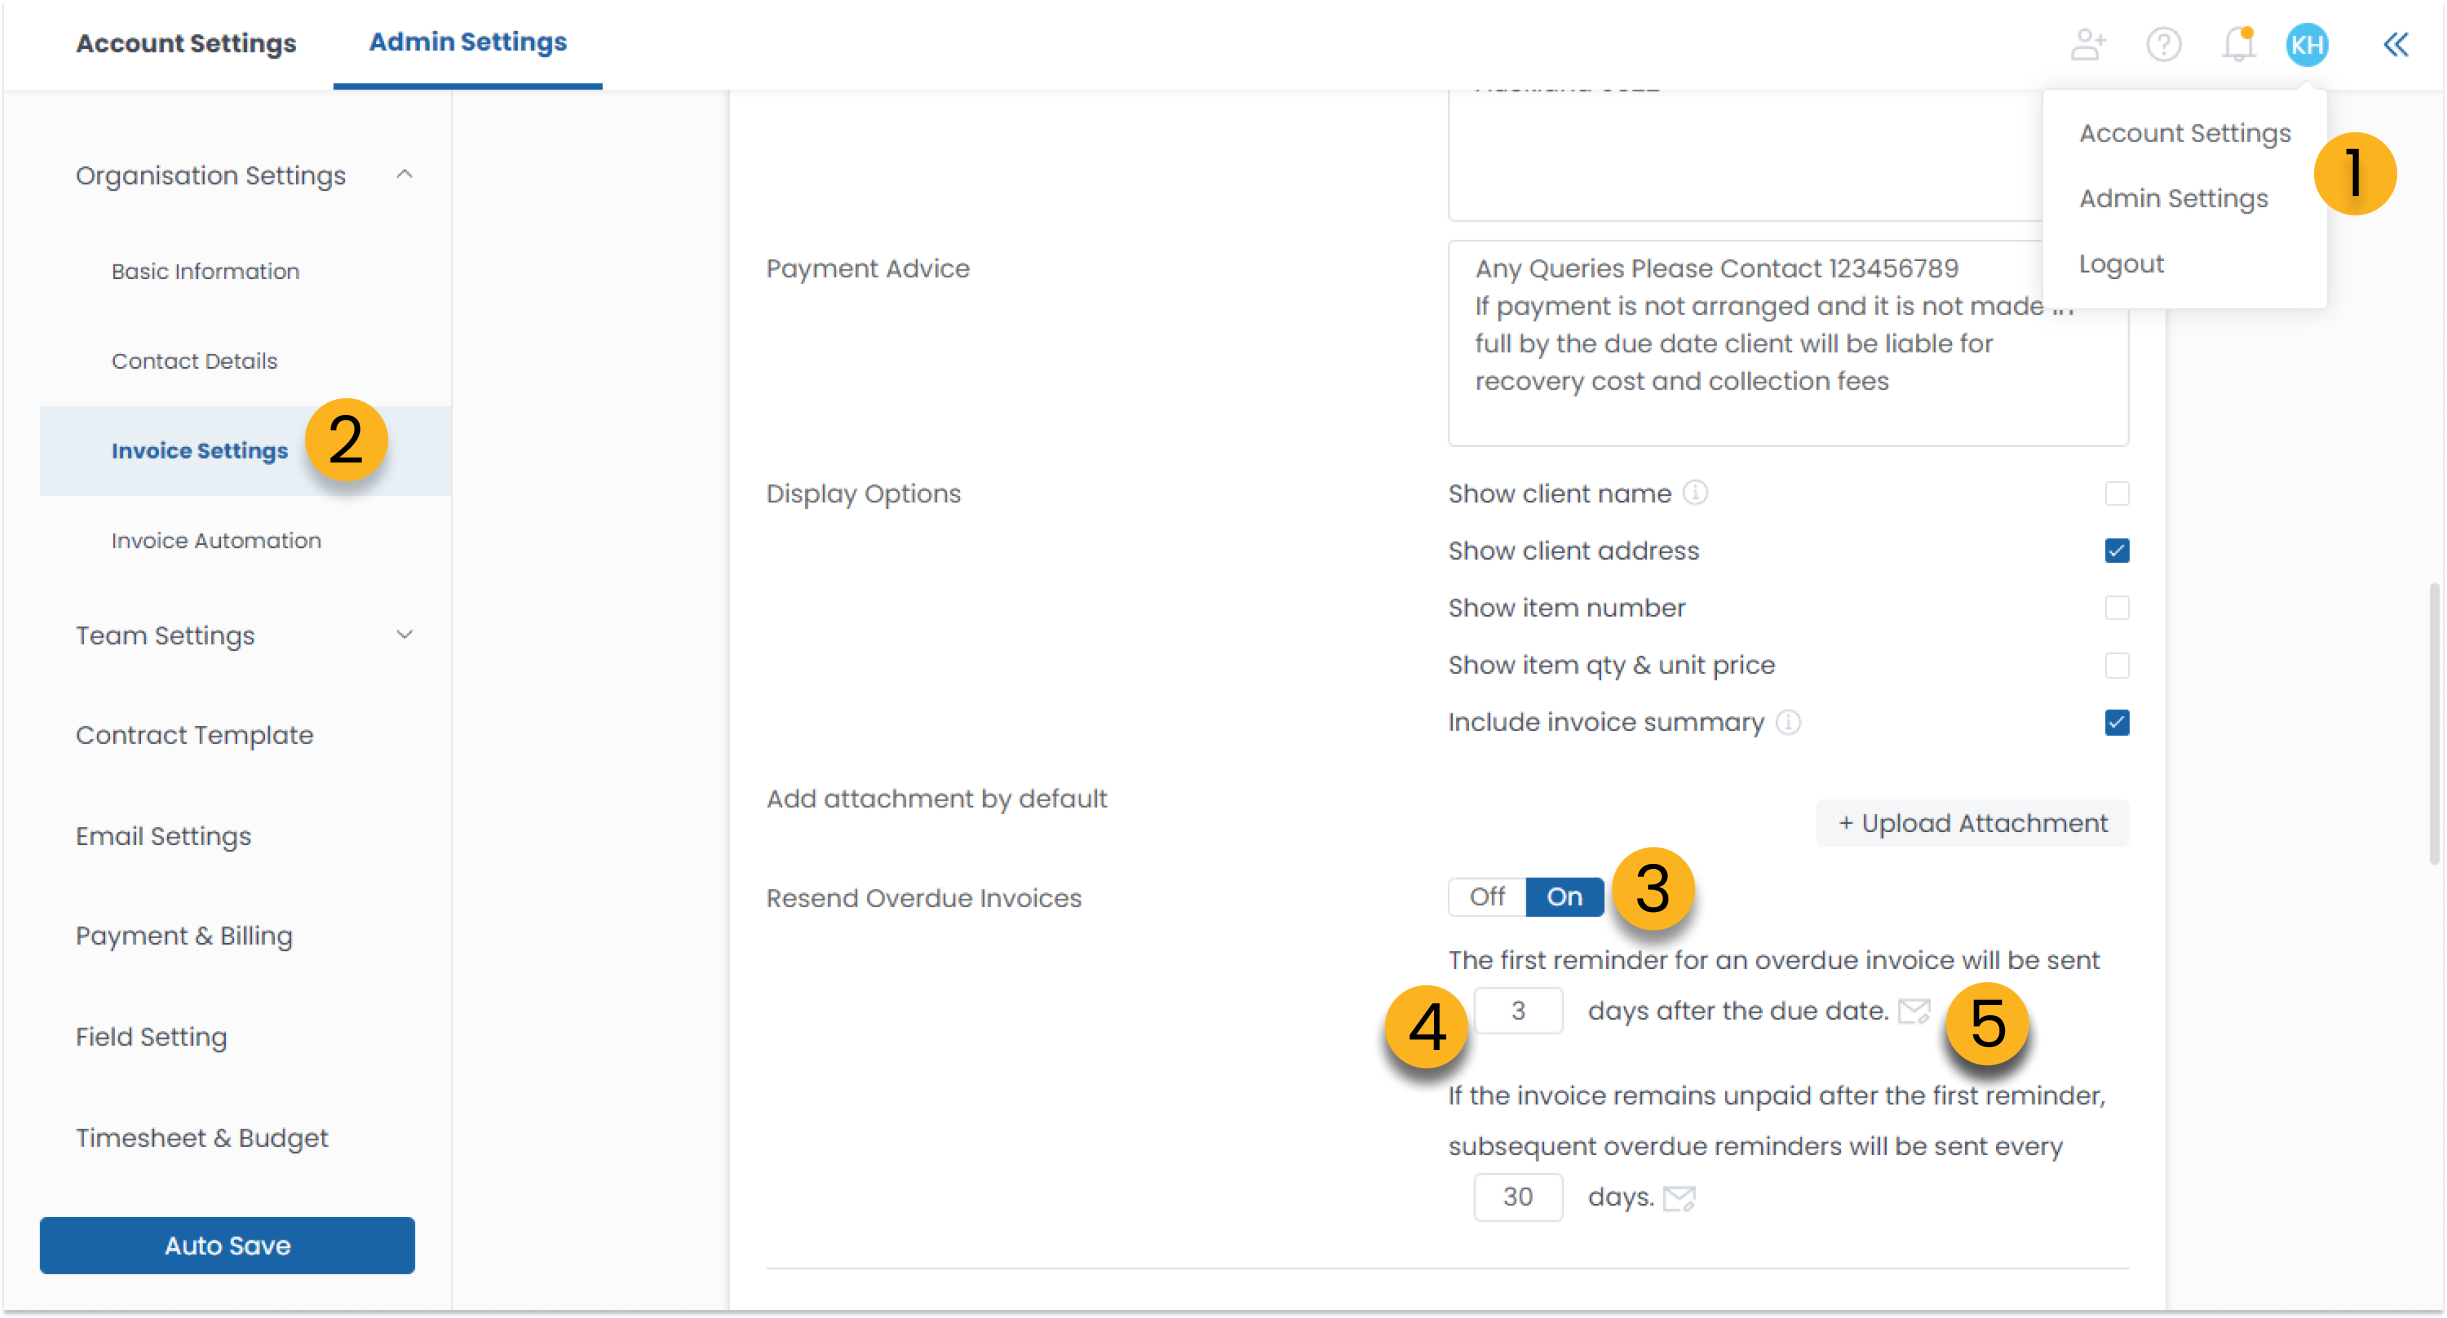
1. To setup, click the user icon and navigate to Admin Settings
2. Go to Invoice Setting.
3. Turn on the Resend Overdue Invoices.
4. Update the first and final reminder date settings.
5. Click the email icon to go to the Email Template Setting. Customize the reminder template under “Send Overdue Invoice” and “Final Overdue Invoice Notice.”

From anywhere in Clarc, if you click the Report function button this will take you directly to your Time Entry Report page.
From here, you will see five separate tabs:
- Time Entry Report (for analysing time entry data)
- Project Budget Report (for analysing budget and invoiced amounts)
- Profitability Report (for analysing the profits your projects and individual stages are making)
- Financial Report (for analysing your overall business health and profits)
- Employee reports (for viewing detailed time cards and finding missing hours)
Time Entry Report
What can you do from your Time Entry Report?
.png)
1. Filter by specific projects or project stages and also team members that you want to view time entry data for.
2. Select a time period you wish to view time entry data for. This can be weekly, monthly or a custom time period.
3. Show/Hide the cost value, that is the relative cost the time has incurred on the business, for each of the time values shown in the report.
4. View the history of sent time entry reports so you know whats been sent from your Clarc account.
5. Run the report. This will update the current view to match the paramenters you have selected.
6. Each of your team members will be show here with the amount of hours they have contributed according to your selected parameters.
7. From the time entry data that is shown, the clients related to each time entry will be shown here.
8. This shows the time entry data according to each of the project stages each entry was logged against.
9. Preview report will open up a separate browser tab with additional detailed breakdown of each project within the time entry data shown.
How to use the preview report?
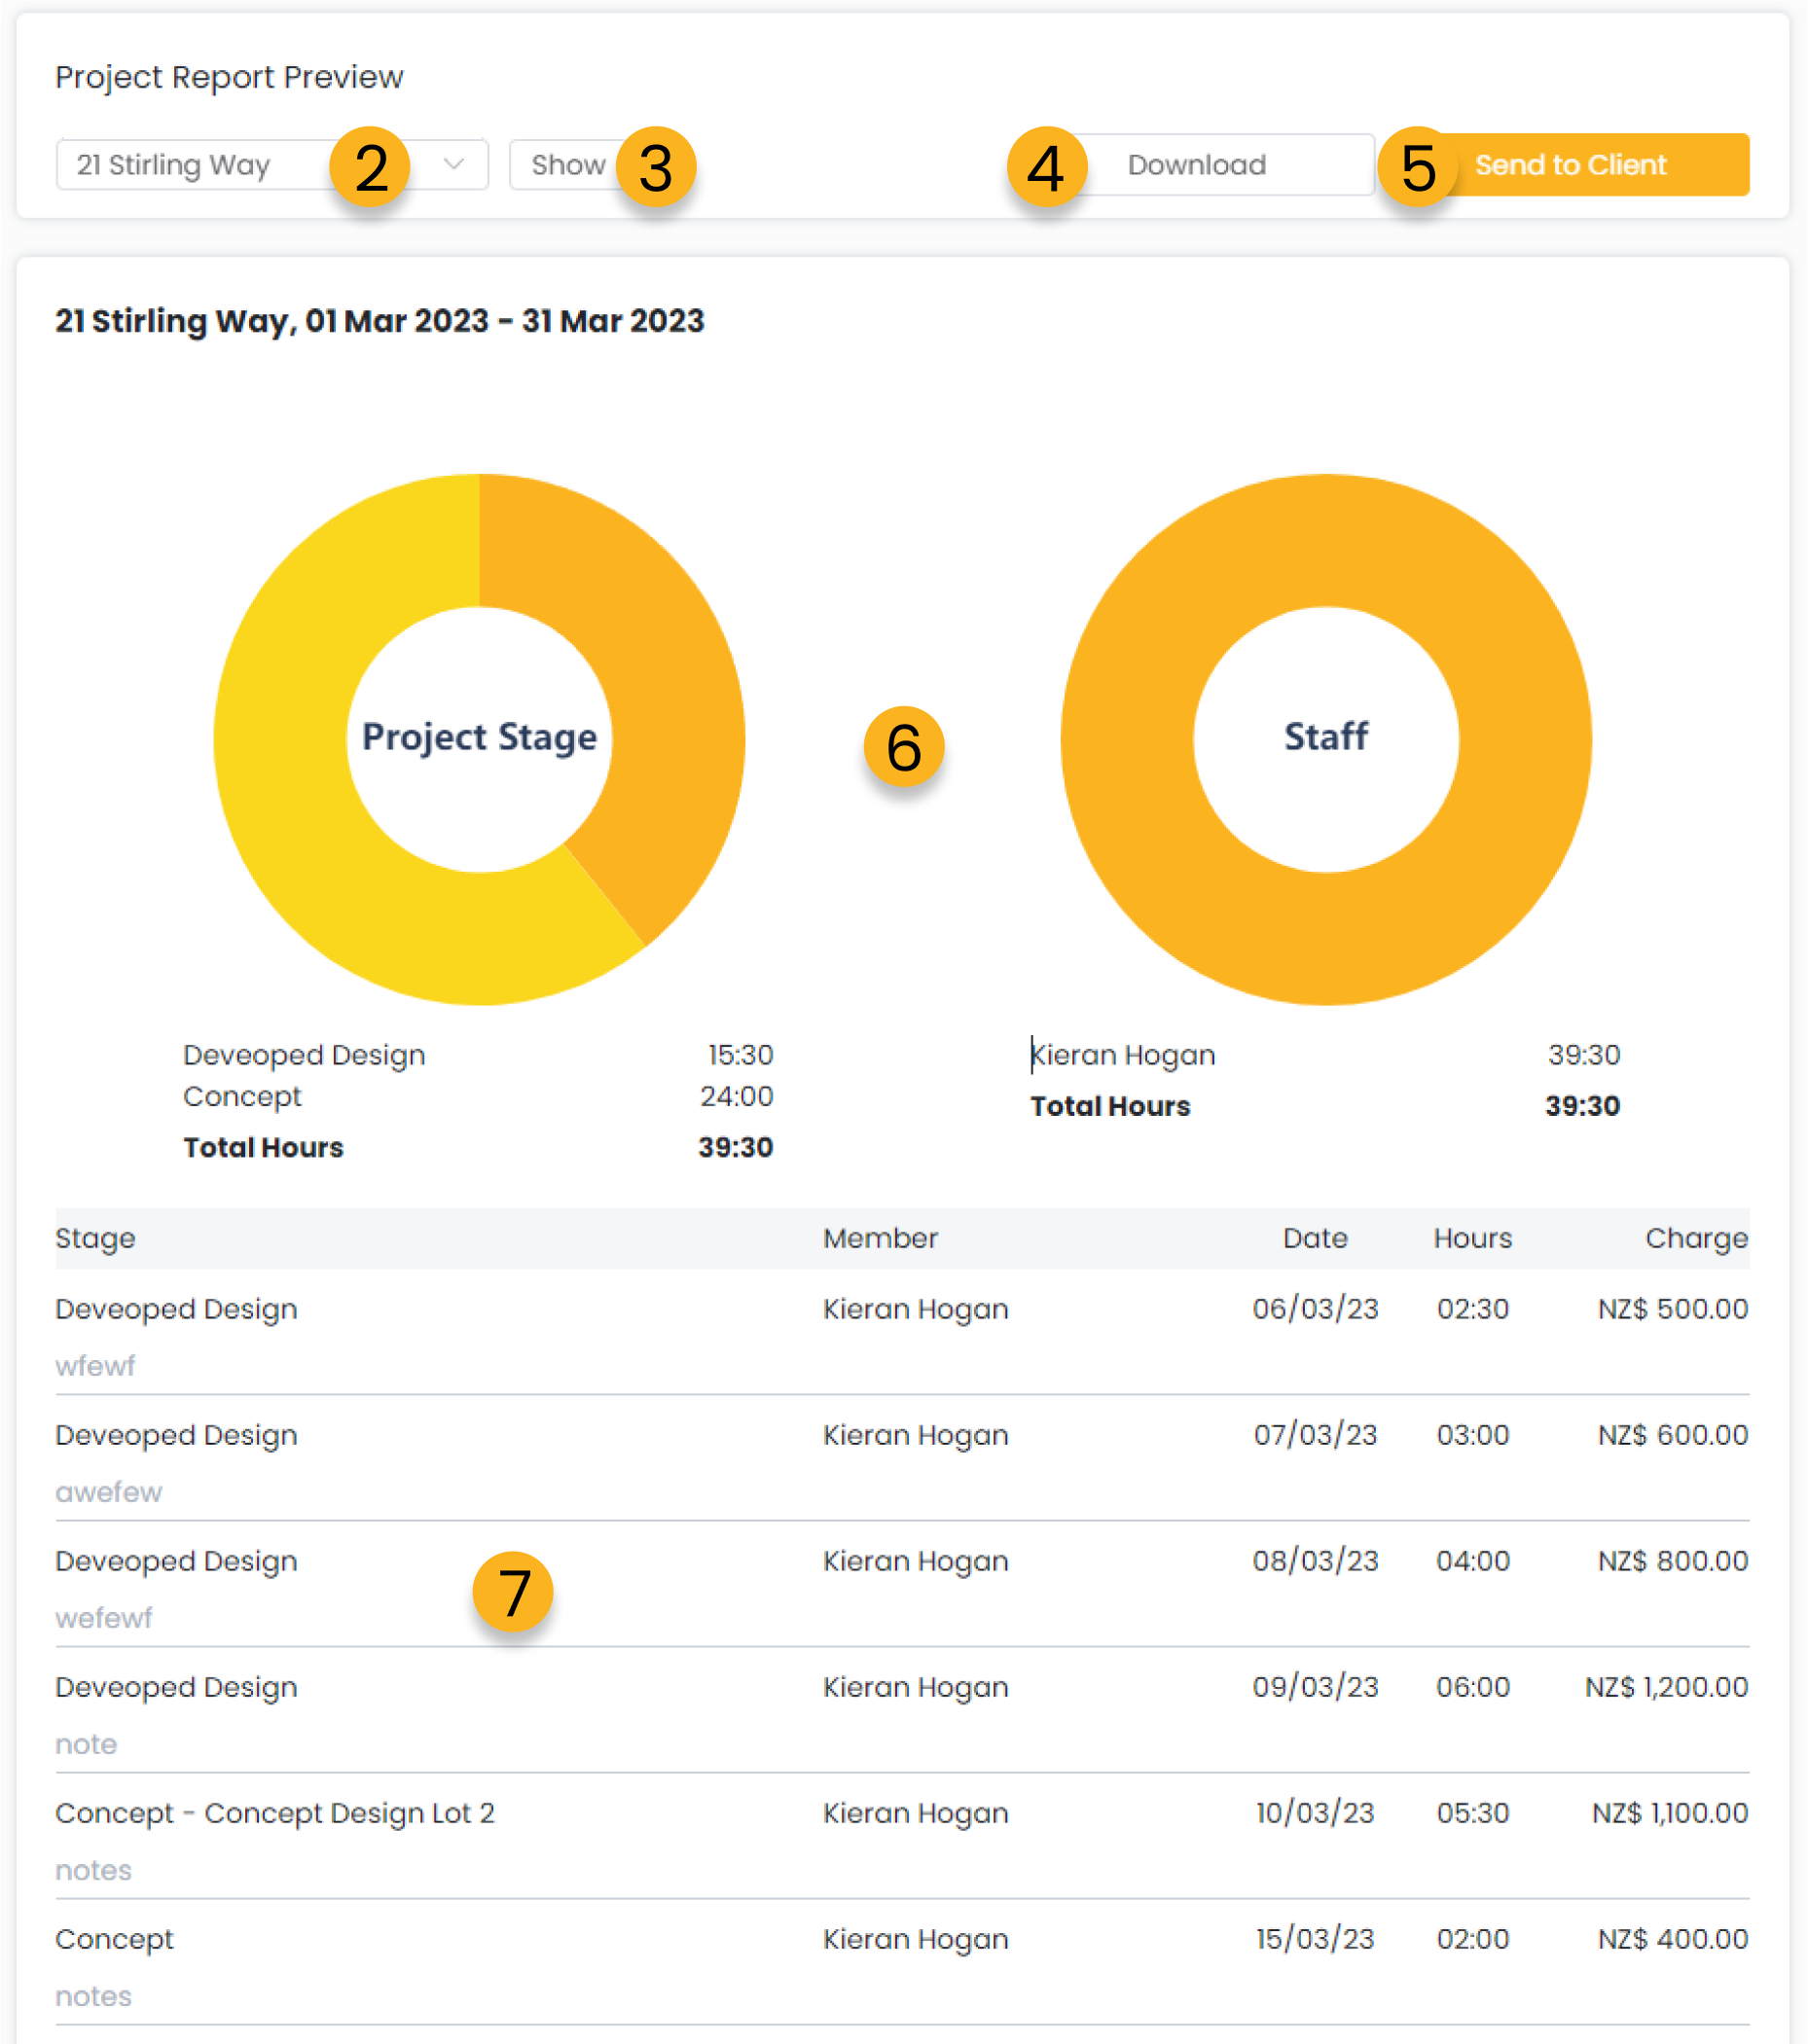
1. Clicking the preview report button from the time entry report page will open up a separate tab where you can preview the details of your time entry report.
2. Each project will have it’s own report preview, click the drop down box to switch between your separate projects.
3. The show button will allow you to show/hide certain information such as the time entry notes and the graphs.
4. You can download this report in pdf format to save for your own records.
5. You can send this report in pdf format directly to your client or others.
6. The graph shows an overview of the time entry data for the selected project.
7. Each individual time entry is broken down with the notes that were entered by your team able to be shown or hidden from here as well.
Project Budget Report
What can you do from your project budget report?
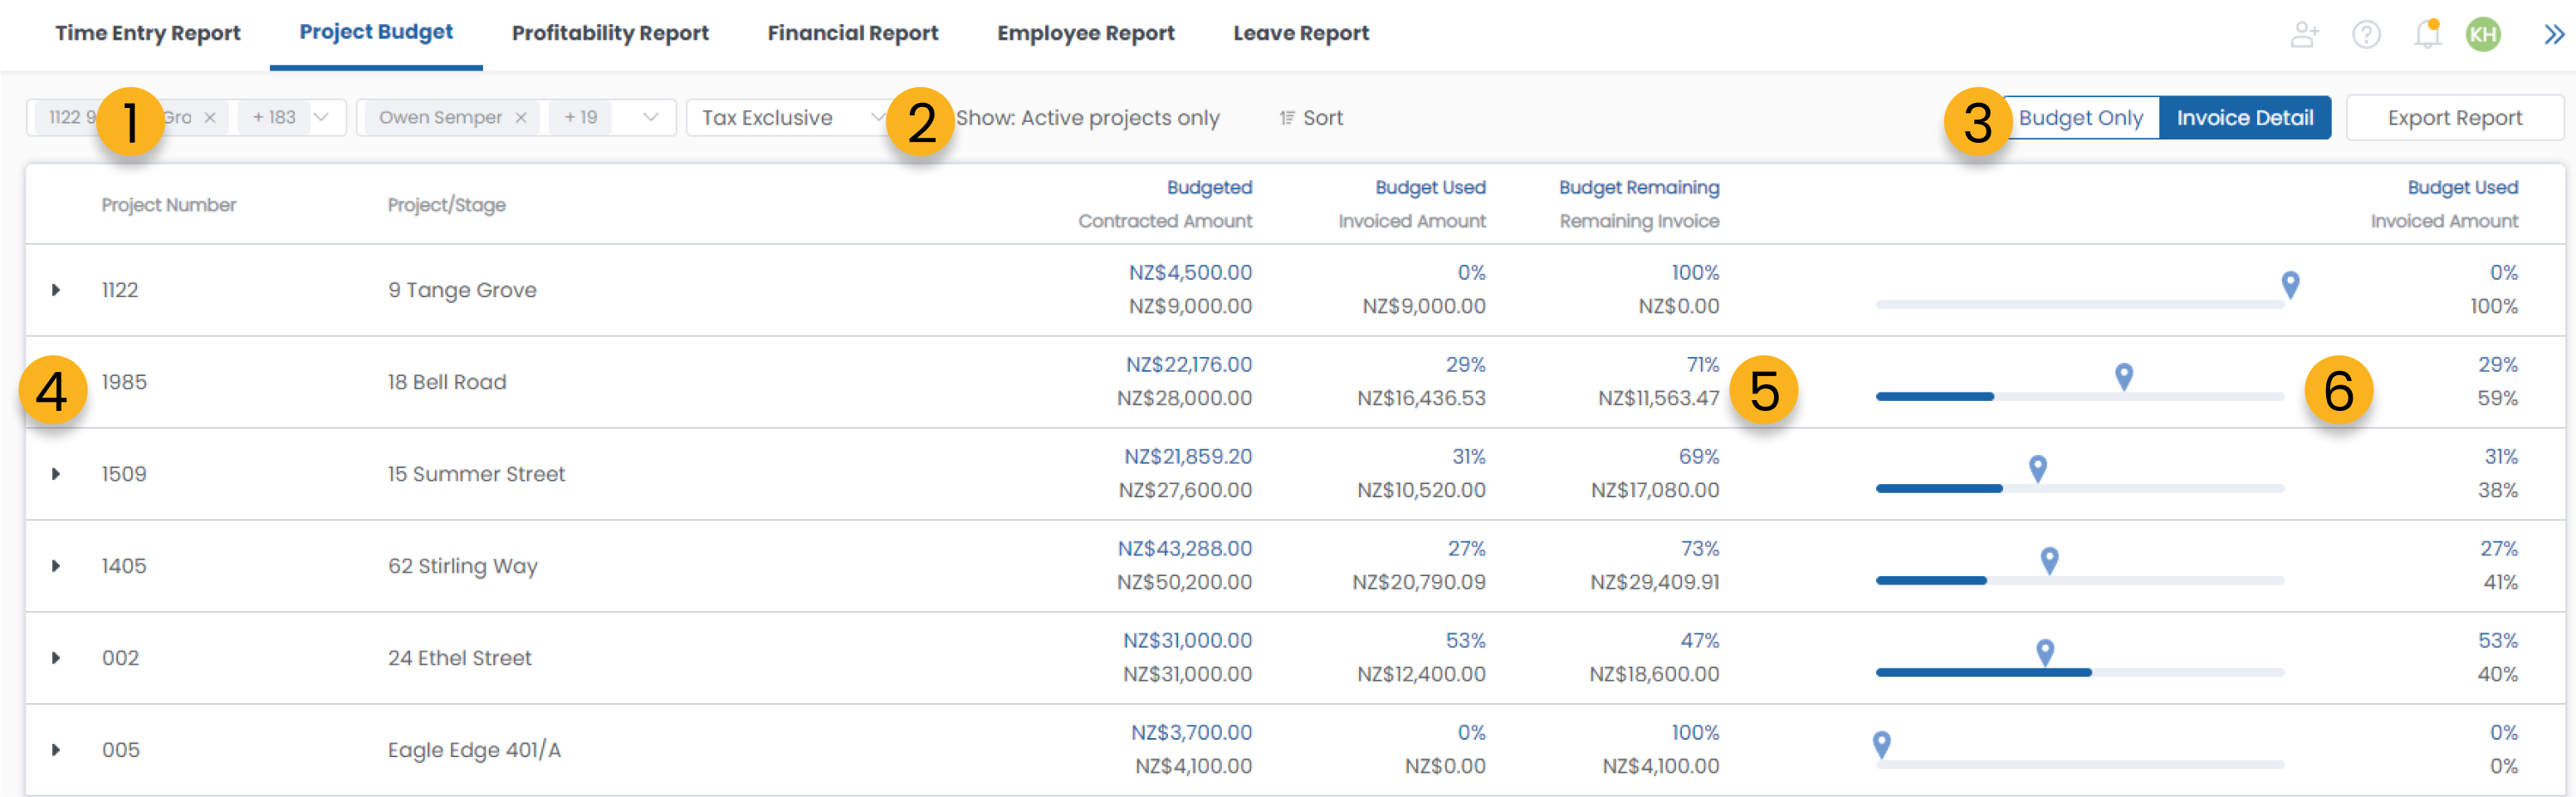
1. Filter the project list by specific projects and team members data.
2. Hide inactive projects.
3. Show invoice detail or budget details only. Showing invoice detail will allow you to compare your time budget expenditure against your contract value and invoiced amounts.
4. Click the drop down to view the project budgets broken down by stage.
5. Each number represented here is coloured according to the heading so you can differentiate between invoice and budget details.
6. The progress bar shows your budget usage and the pin above shows your invoiced amount vs your contract value.
How to analyse your project budget data?

Expanding one of your projects will allow you to view a breakdown of the budget data for that project for each stage.
You can use this data to see whether you are consistently coming well under or over budget for particular stages across your projects and use this information to adjust your future contract values or focus company efforts into areas of improvement for stages you are falling behind on. Fine tune your business to become more profitable and efficient than ever before.
If you have the invoice detail shown on your budget report as well, you will be able to compare the time effort that you have put into a project stage to the amount you have invoice for according to your contract value. From here, you can reach multiple conclusion for whether or not you need to generate more invoices if your budget is used but your invoiced total is behind and many more valuable insights.
Profitability Report
What can you do from your profitability report?
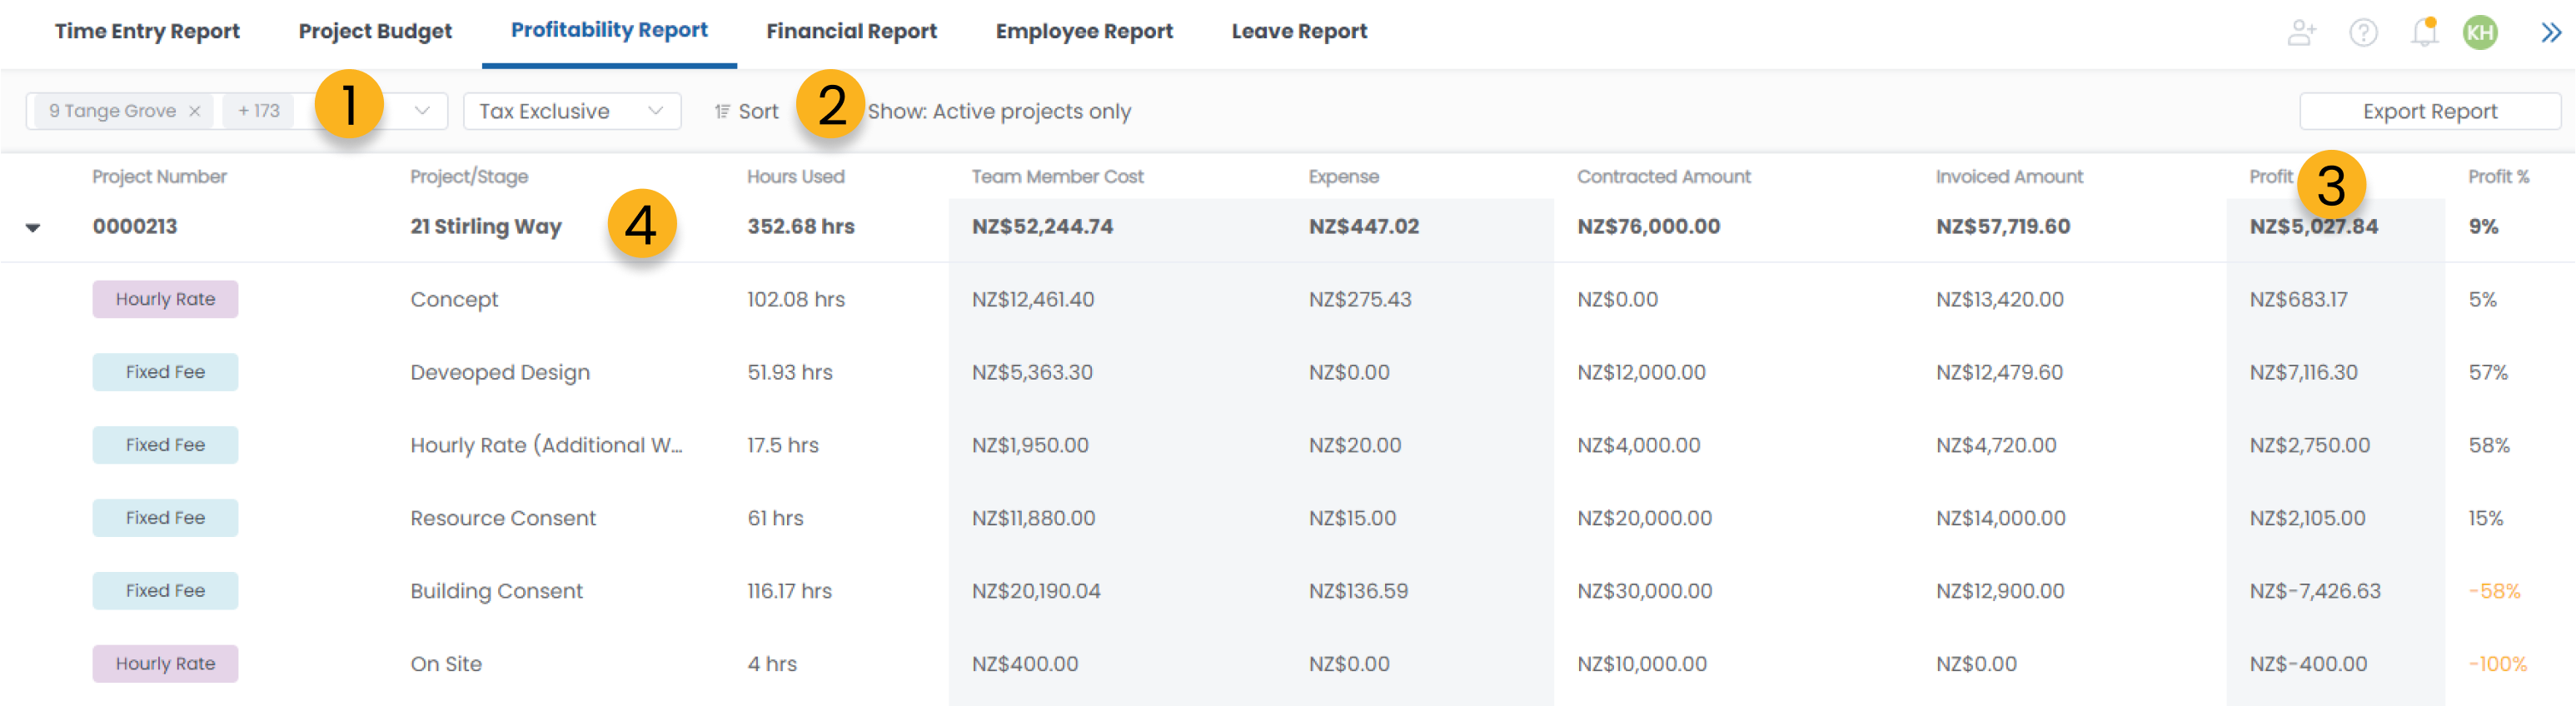
1. Filter the project list by specific projects.
2. Hide inactive projects.
3. Compare the profit values of each of your overall projects and a stage by stage break down.
4. Dive deeper into your projects profitability by clicking on your project to take you to a separate page dedicated to breaking down all of the profits and expenditure for the selected project.
Detailed project profitability report
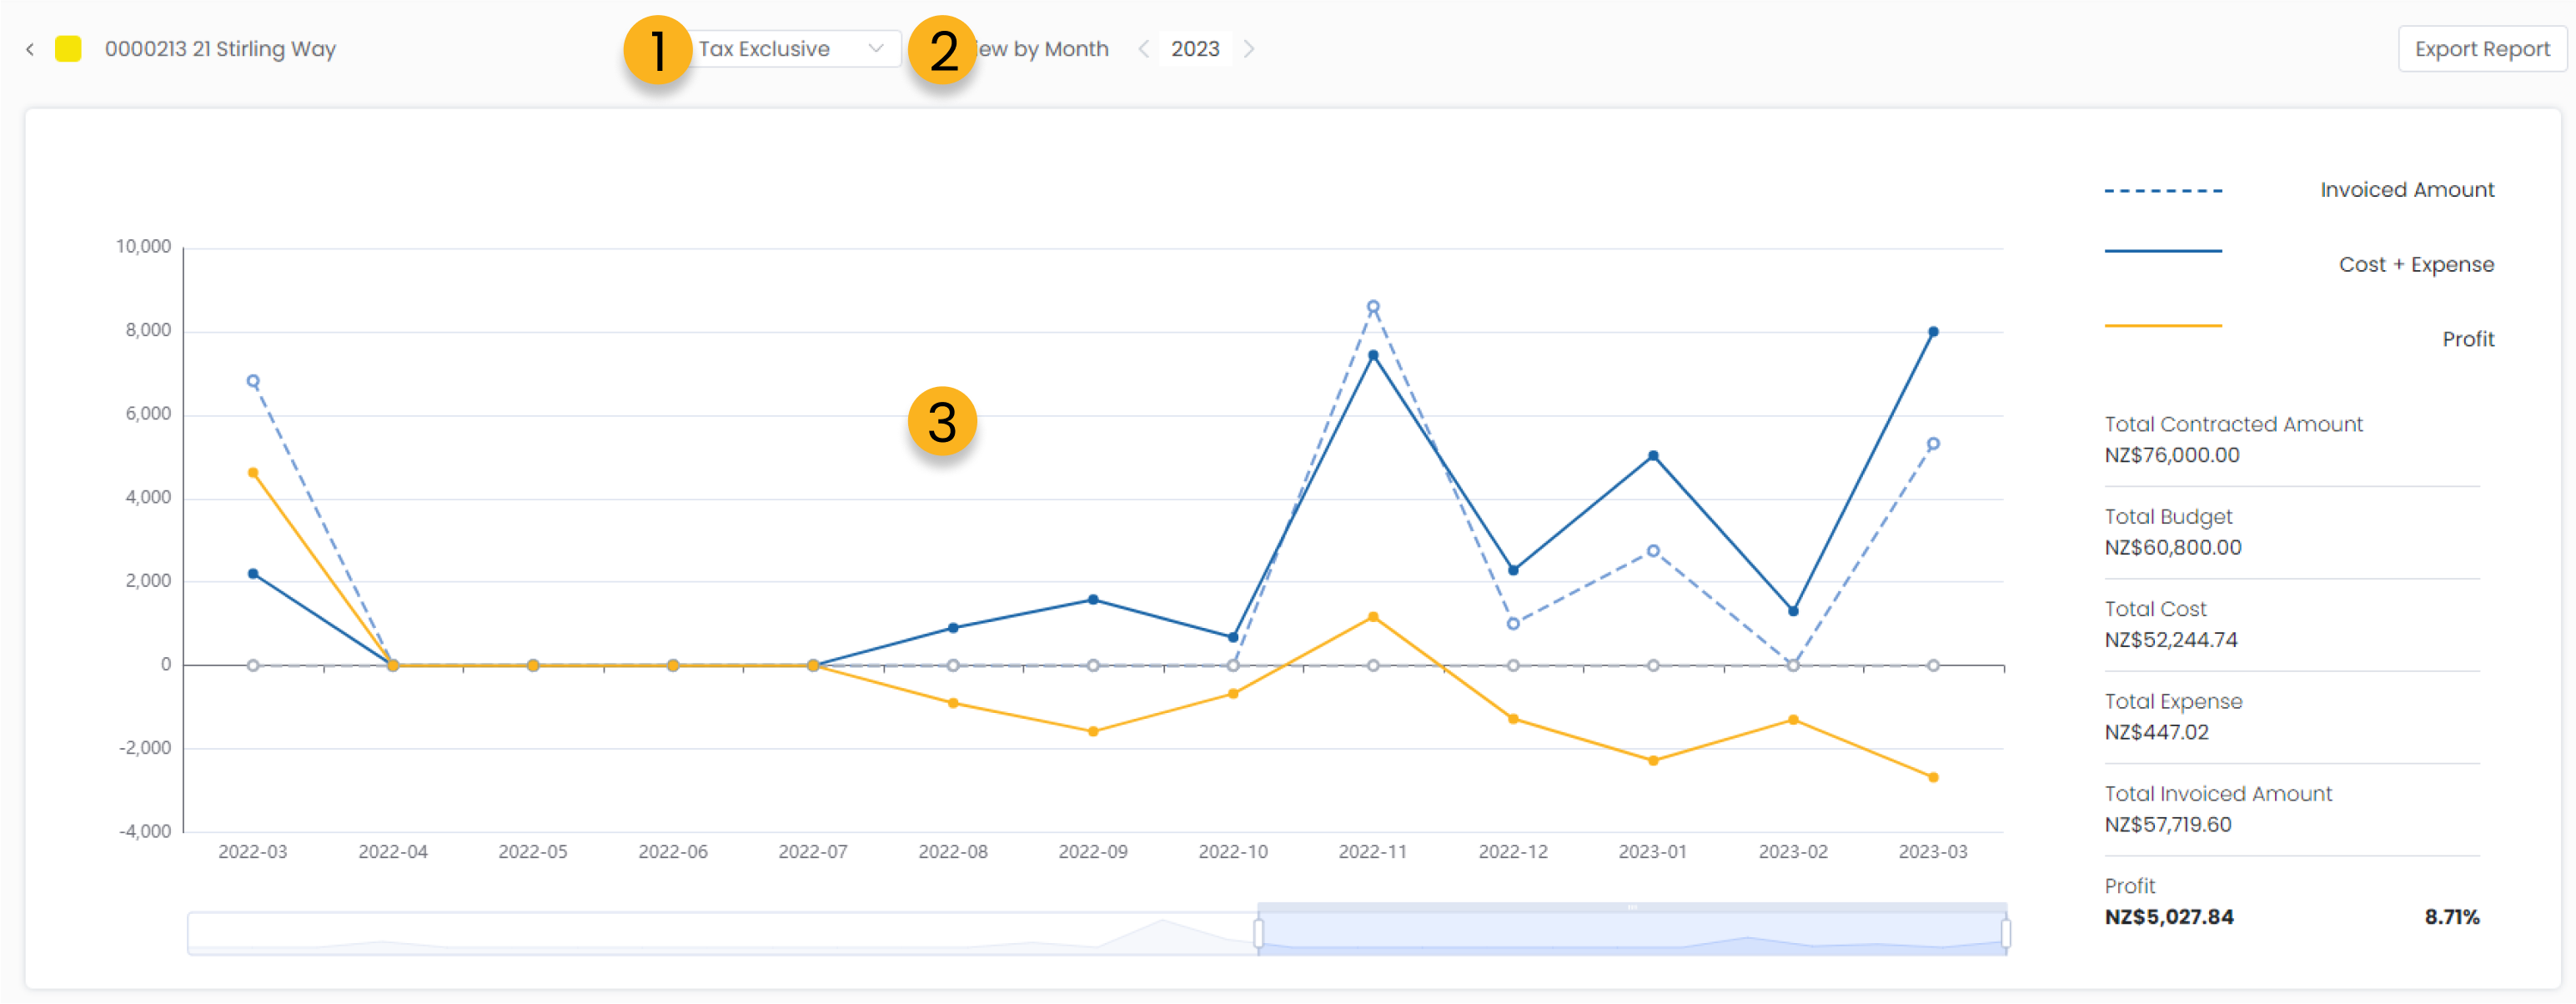
1. Include/exclude tax values.
2. View by month or for larger projects that span over years you can also view by year.
3. The graph compares the total expense (primarily calculated from time entry data) versus the total invoiced amounts. The difference between the two gives you your profit.
4. Denotes the total profit to date for this project.
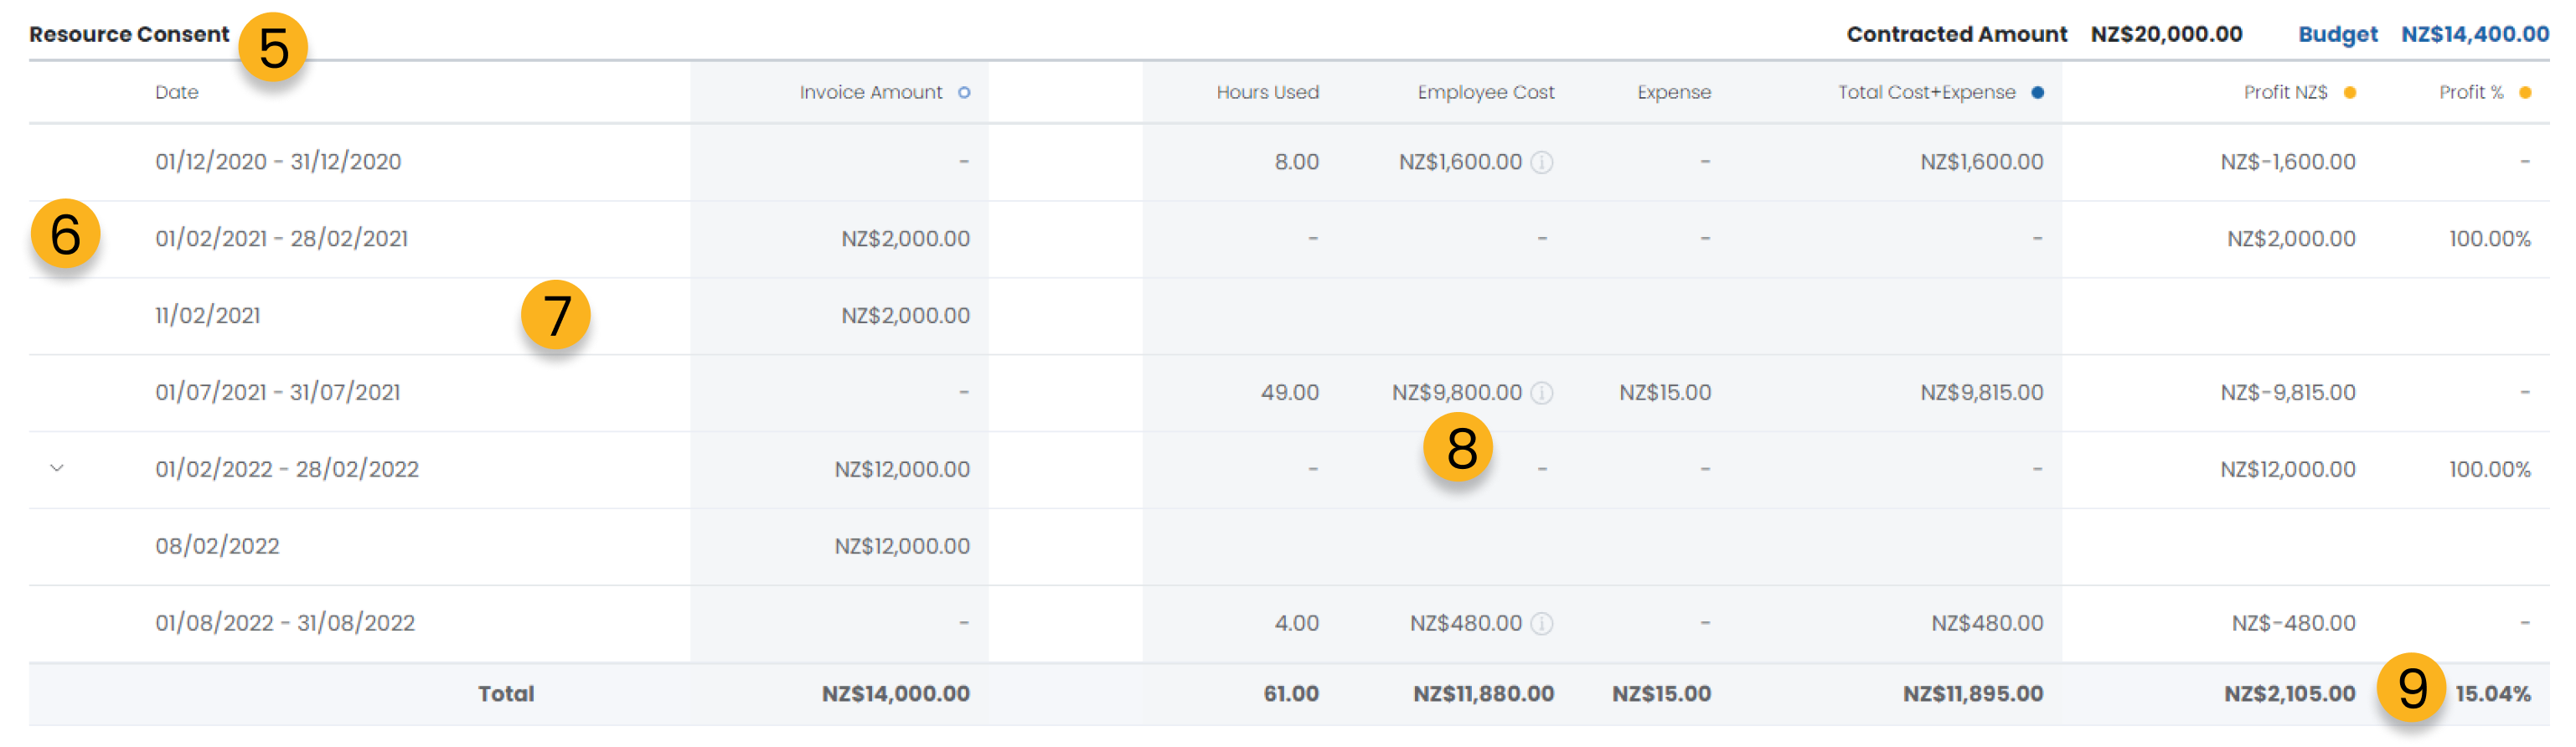
5. Scrolling down you will see a breakdown for each of your project stages.
6. Each line item either relates to an invoice that was sent out or a period where time was recorded by your team. They are shown in chronological order.
7. Within each line item that contains an invoiced amount you can open the invoice related to that time period.
8. Within each line item that contains time records you can click the information button to preview the breakdown of hours by employee for that time record.
9. This shows the total profit to date for this stage
Financial Report
What can you do from your financial report?
Your financial report is where you can view your businesses overall health and profitability. At a glance, view where the majority of your profits are coming from and who is responsible for generating the most profit as a team leader for your business.
1. Filter the project list by specific projects.
2. Choose the time period you wish to view your organisations financial report for.
3. Hide inactive projects.
4. Total values across all of your projects related to profit, displaying you overall estimated business profits.
5. Shows the ratio of your total profit that comes from each of your clients projects. The higher the ratio the higher the dependence on that clients projects your business is for profitability.
6. Shows the overall gross income / invoiced amounts and the ratio to that of your total invoice amount for each project.
7. When you assign a project leader to a project, the profitability of that project is recorded against them as a project leader. Here you can see who leads projects that retain the most profit from your total estimated profit.
8. Shows the total profit from each of your projects in descending order of total profit.
Employee Report
What can you do from your employee report?
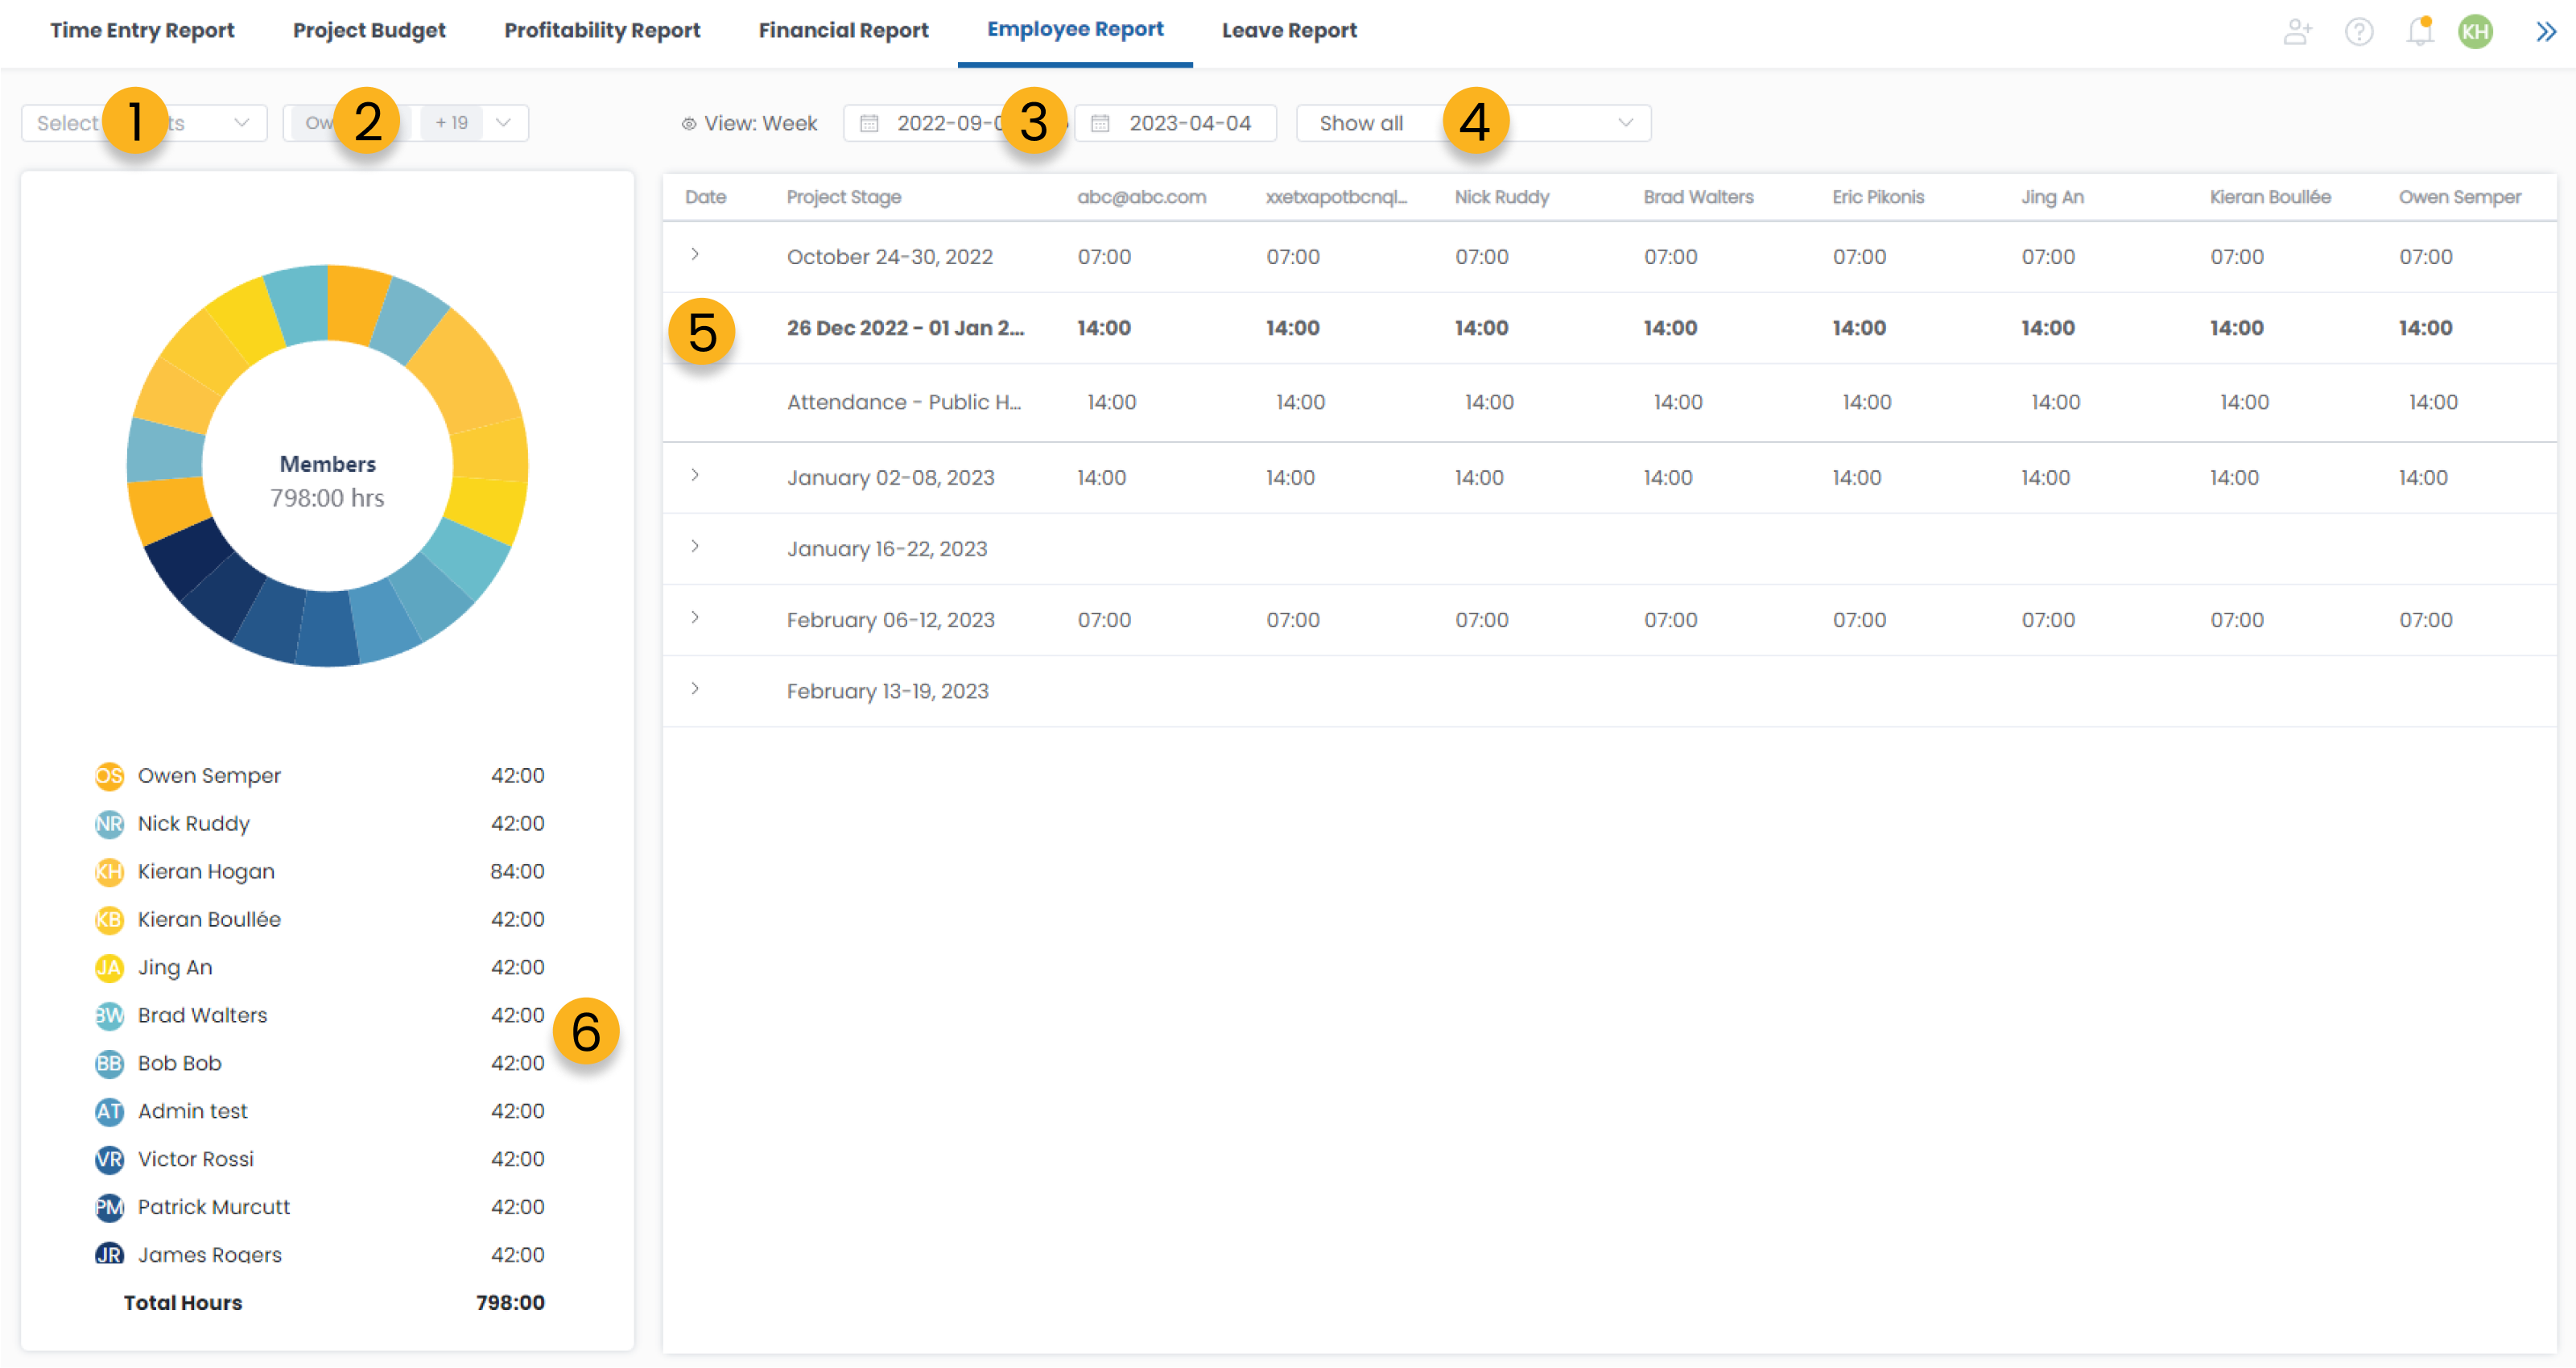
You can use your employee report to view you teams timesheets all at once and even search for gaps and potential missing hours in their timesheets.
1. Filter the project list by specific projects
2. Filter by specific team members
3. Choose the time period you wish to view your organisations financial report for.
4. Search for specifc time cards that have more or less than a number of hours you specify. You can use this to look for missing hours or overtime in your teams timesheets
5. Click the drop down to expand the selected week and view all time entries for that time period.
6. Total time spent by each of your team members during the time period you selected.
Contract
.png)
From anywhere in Clarc, if you click the Contract function button this will take you directly to your Outgoing Contract page.
Contract Basics
Navigating the contract function
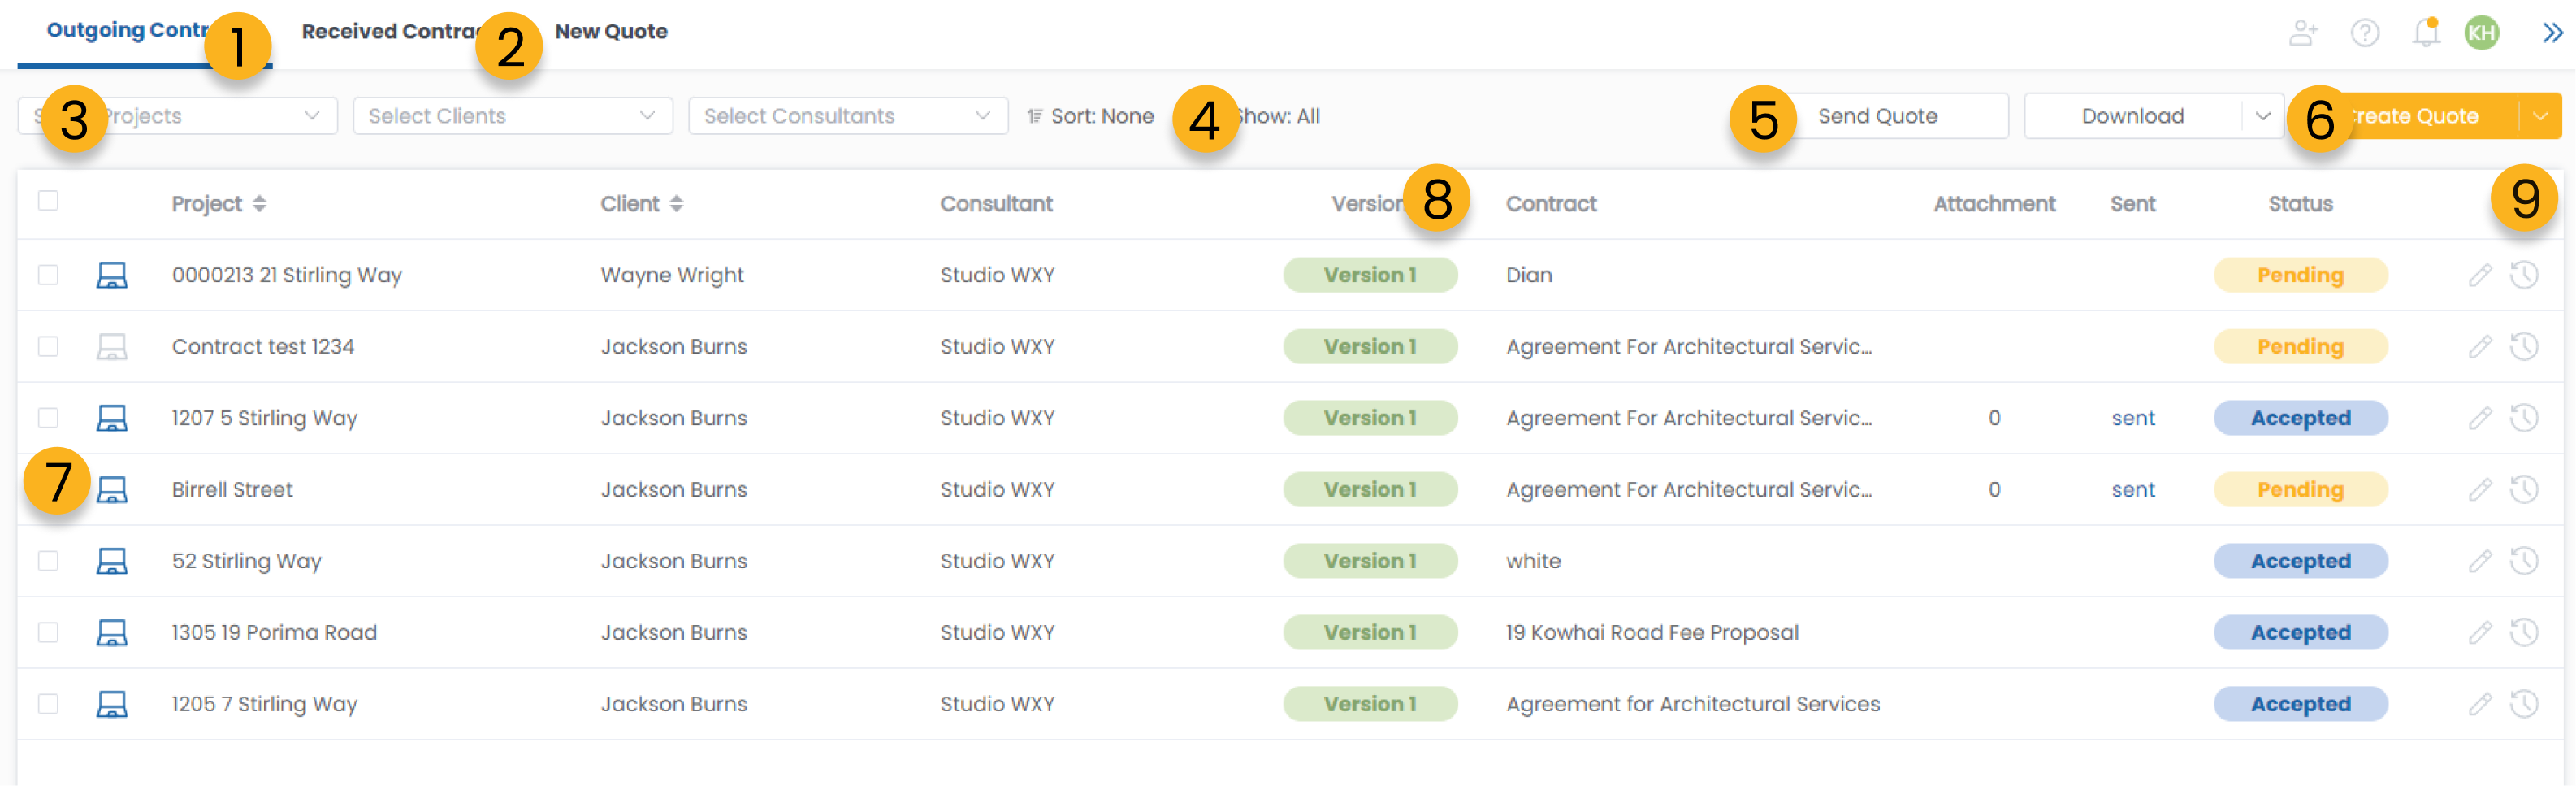
View all of your outgoing contracts that you have created.
1. Store your received contracts in a separate tab to keep track of your organisations workflow.
2. Sort be specific projects and clients.
3. Show all or filter by specific contract status.
4. Send the selected quote/contract.
5. Create a new quote/contract.
6. Click the checkbox to select contracts in your list.
7. You can monitor version history of contracts that need revisions and look back on previous contract revisions.
8. Click to edit the selected contract or view the sent history for this contract.
Received Contracts
Your received contracts

When another Clarc user sends you a contract they created from their Clarc account it will appear here as well. Here you can monitor the incoming contracts from other organisations, view their status and sign them online.
Contract Creation
What are the contract template functions?
1. You can create and edit multiple different contract types and store them within your Clarc account. Use this dropdown box to select or add a new template.
2. These are the default sections to every contract template within Clarc. You can prefill the sections related to your organisation to make new conracts easier to create.
3. The clients details can be filled by you when you create a new contract or your client can fill these sections out when you send a new contract to them.
4. You can prefill your company details within the template.
5. Customized fields are all remaining sections within your template.
6. You can add any of the inbuilt templates or additional text and image sections to your template through clicking this button.
7. These are all the individual sections within your current contract template.
How to fill in your contract details?
1. The clients details can be filled by you when you create a new contract or your client can fill these sections out when you send a new contract to them.
2. You can prefill your company details within the template.
3. Your client will be able to sign your contract online. Their signature will appear here once they have confirmed the document.
4. You can presign your contract template, or add your signature to each new contract.
Contract description and text
You can add as many text and image sections to your contract as nececssary. You can also copy the text from your current template and paste that into a new Clarc contract template.
This makes Clarc contract builder completely customizable and able to cater to each organisations own way of building their contract.
Contract fee builder
One of the key features of Clarc’s contract function is the fee builder.This function connects directly to your project budgets to automate project setup and streamline invoicing.
The fee builder is not part of the contract template itself but can be populated from project templates when creating a new contract.
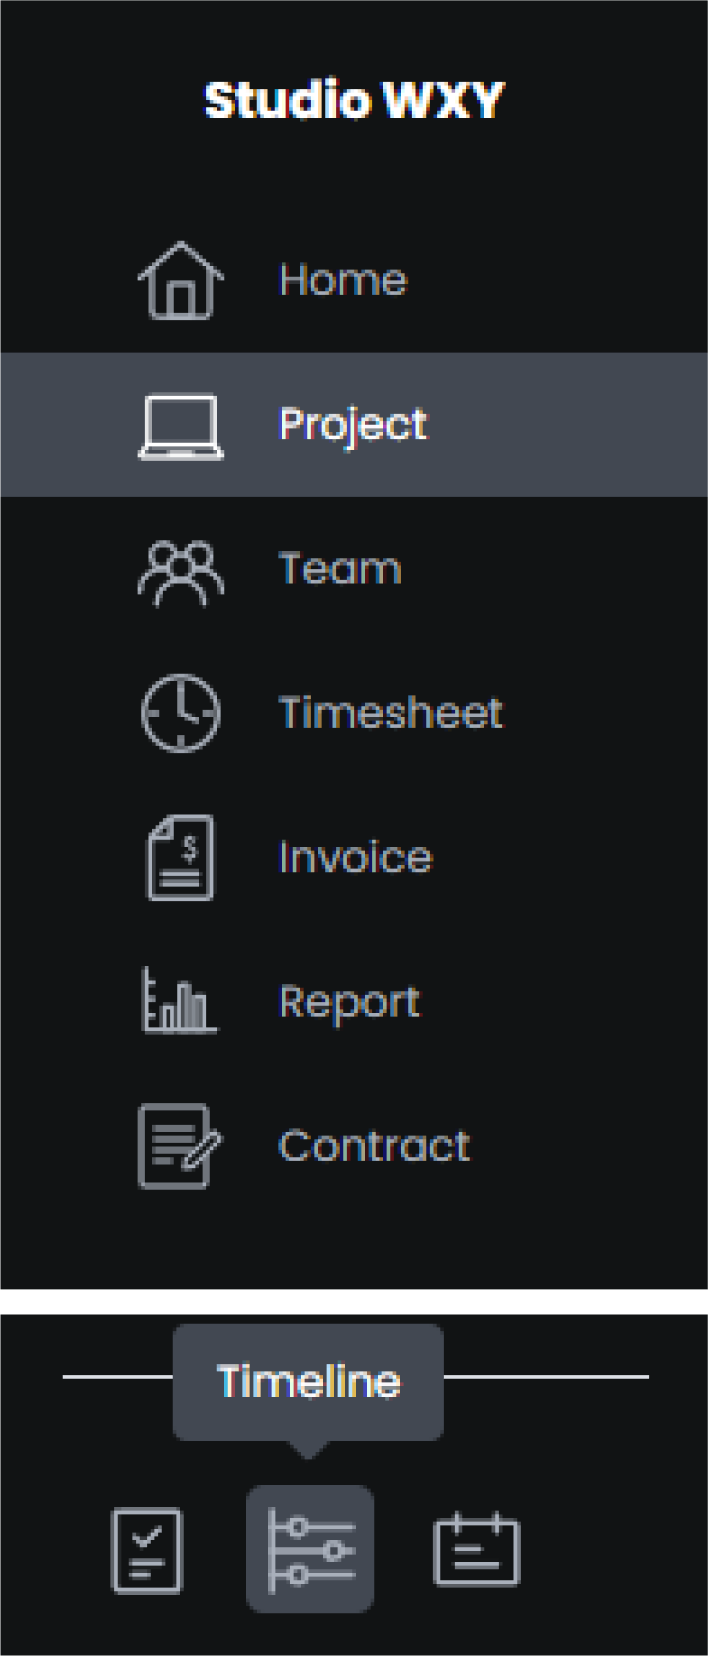
Timeline
From anywhere in Clarc, you can click the Timeline button to just straight to your project timeline. Alternatively, you can click the Project button and at the top left of the page switch from your project list to timeline.
Timeline by Project
Viewing your timeline by project
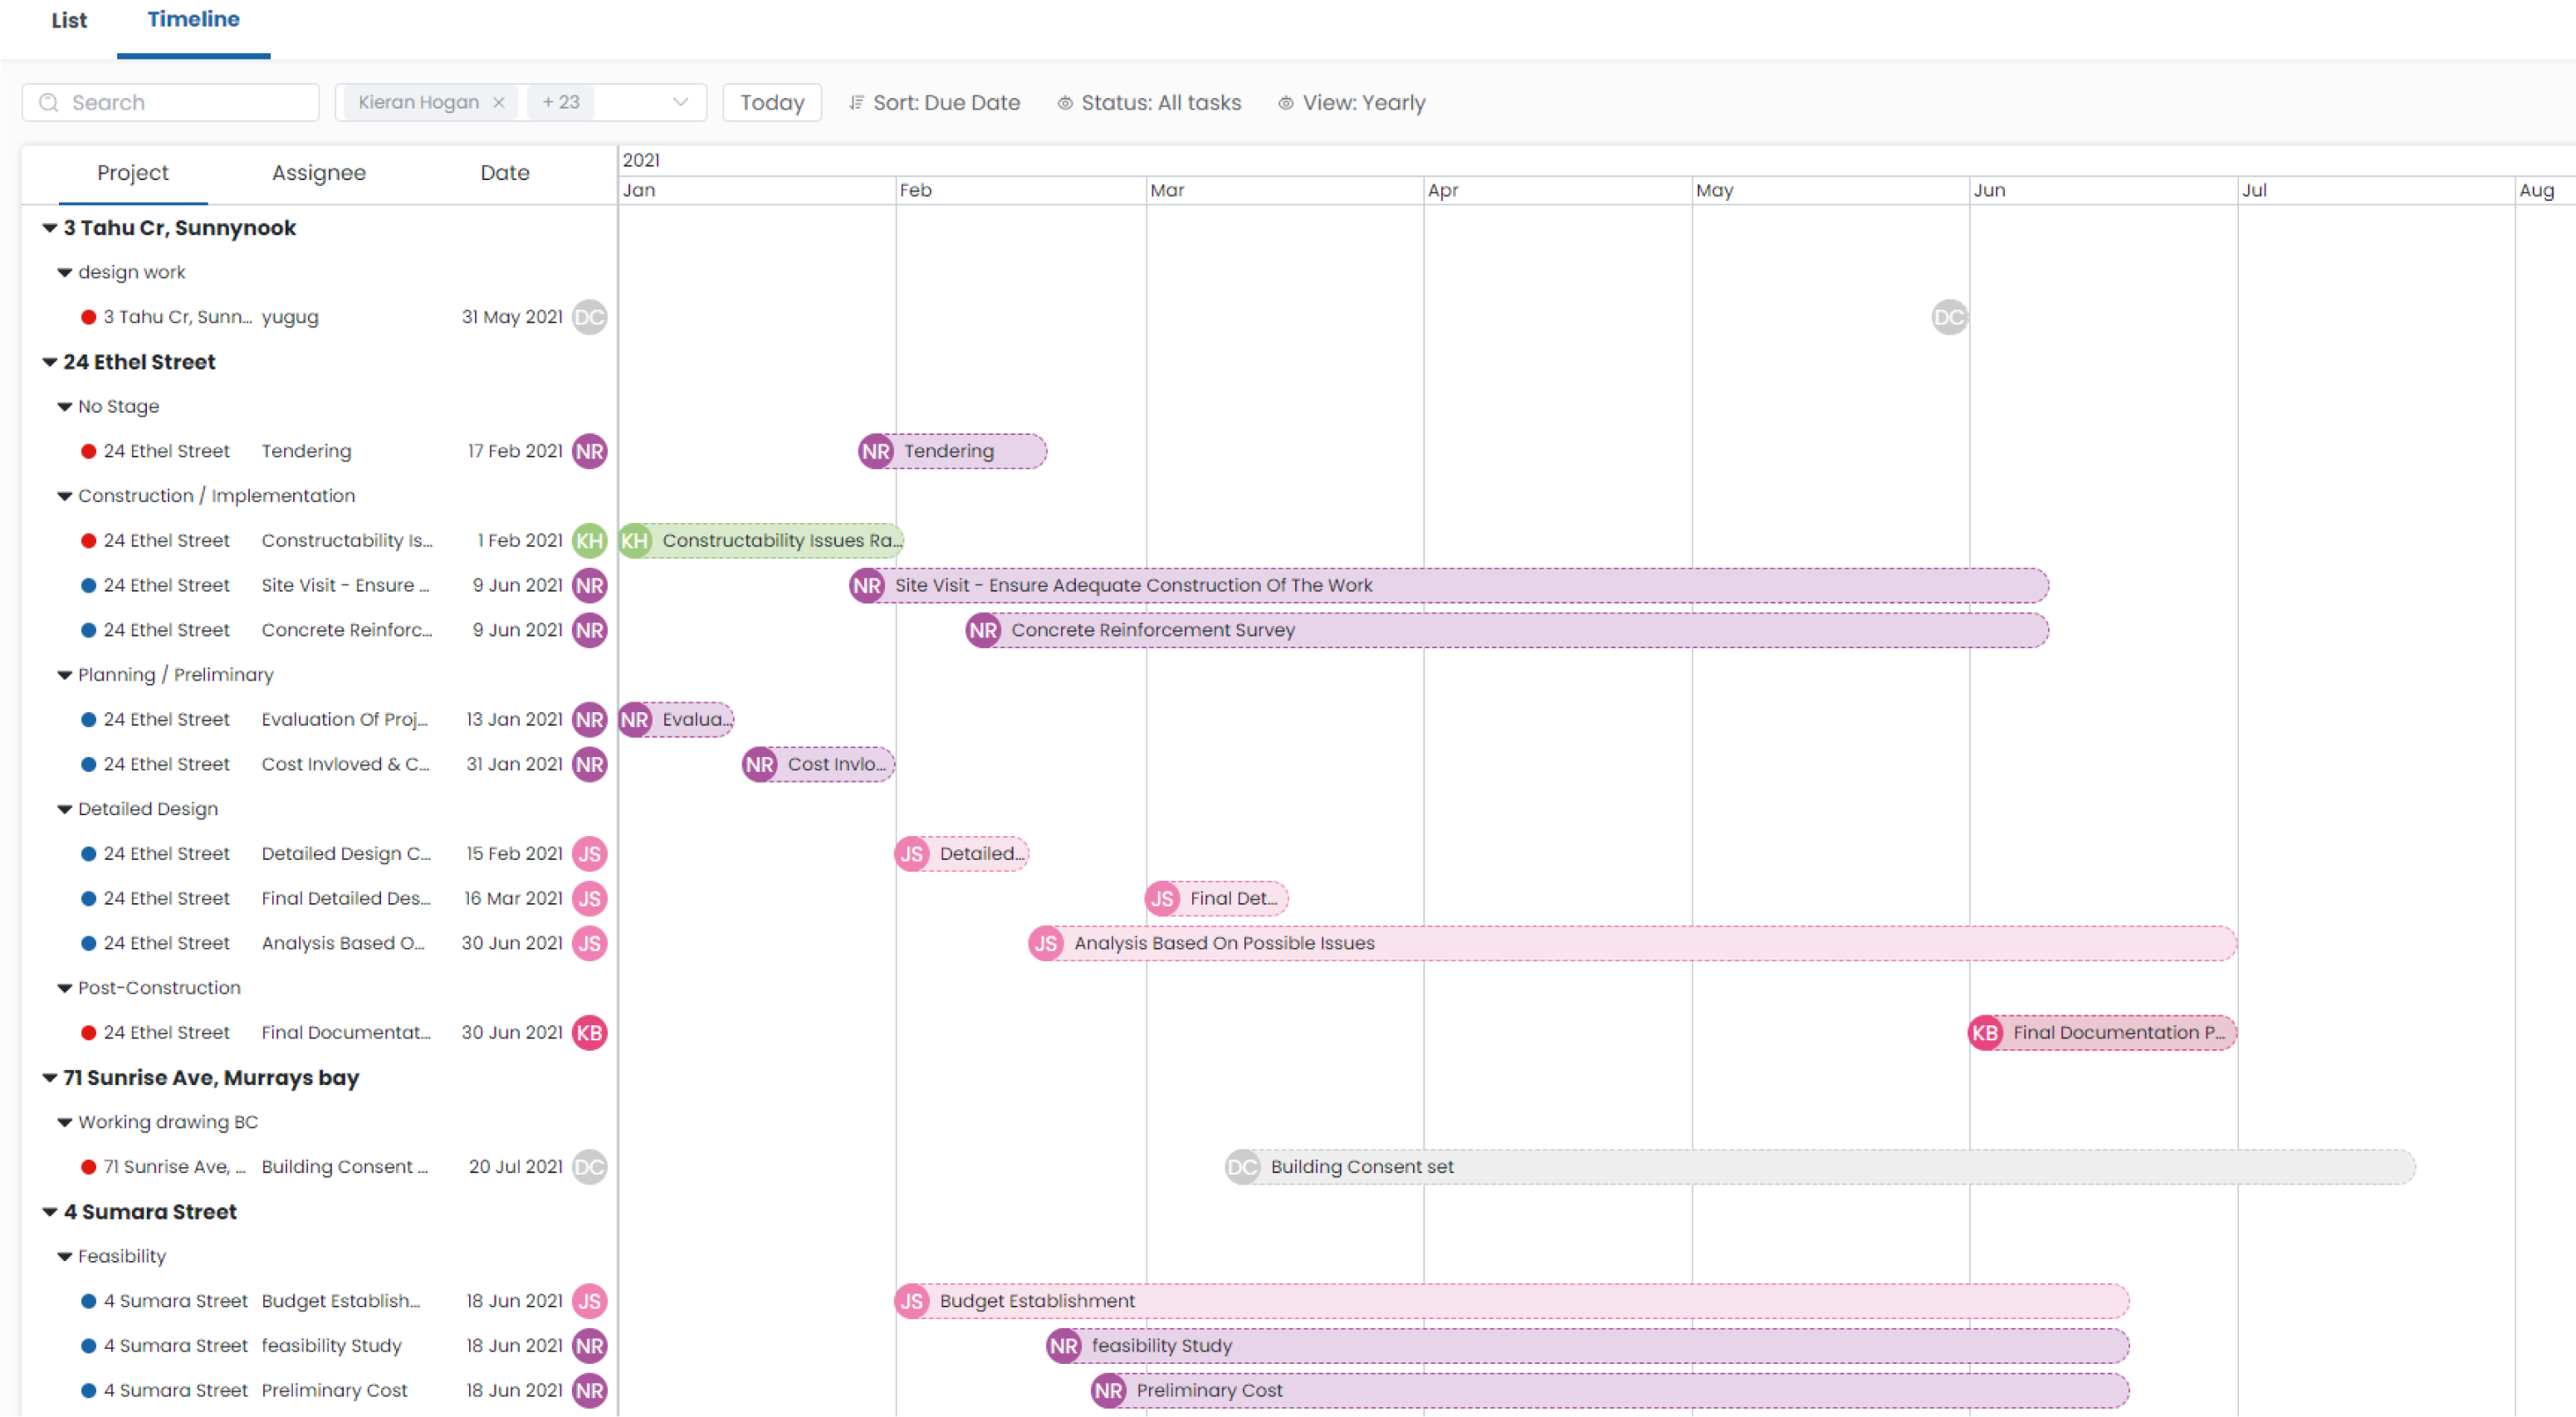
- Viewing your timeline by project allows you tro view whos working on what project at a glance.
- View potential gaps in a projects workflow and predict end dates for project stages and workload dependencies.
- Select one of the bars shown on your timeline to open up the selected task window, adjust dates and collaborate as you would from the Project Workspace.
Timeline by Assignee
Viewing your timeline by assignee
.png)
- Viewing your timeline by assignee allows you tro view exactly what each one of your team members is working on and when thoes tasks are expected to be completed.
- View potential gaps in team members workflow for you to fill with new tasks or adjust existing tasks for a more linear workflow.
- Select one of the bars shown on your timeline to open up the selected task window, adjust dates and collaborate as you would from the Project Workspace.